Bachmann RailTruck Conversion

JimmyB

Now retired - trains and fishing
Country flag
As mentioned elsewhere I am converting my RailTruck to battery, a few photos of the progress.

The RailTruck as bought
471943_DSC_0062.jpg


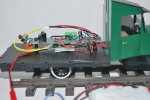
After some thought I decided that the Bachmann board would stay, so track power disconnected, and ESC motor output connected. The Rx/ESC is Velcroed to the body under the Bachmann board, Velcro ensure easy removal without damage.
DSC_0082.JPG

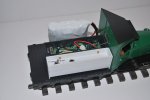
An enclosure is made for the charging socket and switch, and wired in the conventional way.
DSC_0085.JPG

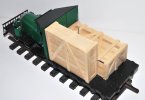
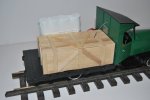
The whole assembly is made to look like a crate, with the top removable for access.
DSC_0087.JPG

Next, on to enclosing the battery in another crate. Full details when complete will be on my blog :)
 
As mentioned elsewhere I am converting my RailTruck to battery, a few photos of the progress.

The RailTruck as bought
471943_DSC_0062.jpg


After some thought I decided that the Bachmann board would stay, so track power disconnected, and ESC motor output connected. The Rx/ESC is Velcroed to the body under the Bachmann board, Velcro ensure easy removal without damage.
View attachment 308698

An enclosure is made for the charging socket and switch, and wired in the conventional way.
View attachment 308699

The whole assembly is made to look like a crate, with the top removable for access.
View attachment 308700

Next, on to enclosing the battery in another crate. Full details when complete will be on my blog :)
Hi Nice work, wondering what battery you are going for.
 
Very interested to see this Jimmy. Doing the same with mine. I have a picture of this railcar, in a later evolution with a closed box on the back. Ridgway Railroad Museum Take a look here. There is another one from the front I will look out.
Max
 
The conversion, and more importantly the disguising of the Rx/batteries/charging is complete.
One comment I need to make, is I have seen mike mike hand cut/score his buildings, and thought how time consuming, though brilliant end result. I think if I had started this before retirement I would have used a sheet of wood/plastic and scribed the planks, but building on coffee stirrer at a time is quite therapeutic.

The crate for the battery produced
RailTruck-11.JPG

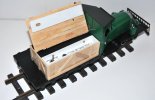
Lid from the low crate removed to show the charging point, the plastic rectangle provides a tight clip in fit to hold it in place.
RailTruck-13.JPG

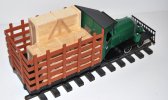
All complete and checked out.
RailTruck-14.JPG

I will be updating my blog which will have greater detail for those that wish it, when it has been done I will post a link.
 
The conversion, and more importantly the disguising of the Rx/batteries/charging is complete.
One comment I need to make, is I have seen mike mike hand cut/score his buildings, and thought how time consuming, though brilliant end result. I think if I had started this before retirement I would have used a sheet of wood/plastic and scribed the planks, but building on coffee stirrer at a time is quite therapeutic.

The crate for the battery produced
View attachment 308776

Lid from the low crate removed to show the charging point, the plastic rectangle provides a tight clip in fit to hold it in place.
View attachment 308777

All complete and checked out.
View attachment 308778

I will be updating my blog which will have greater detail for those that wish it, when it has been done I will post a link.
Very nice work, Jimmy. I have bookmarked your blog. I have found some Evergreen scribed styrene siding that is intended to match 1:20.3 scale wooden US wagon/coach spacing. Largish sheet, from a trader on Ebay. Max
 
Lovely job Jimmy, as a retired person now I am sure you will appreciate the value of using low cost stirrers. Plus they must be better for the environment than plastic of some sort. You must be getting close to all dead rail now?
 
Lovely job Jimmy, as a retired person now I am sure you will appreciate the value of using low cost stirrers. Plus they must be better for the environment than plastic of some sort. You must be getting close to all dead rail now?
No power to the track, sold my old TE, and the new TE is for point operation, though I have used it for a couple of on board battery conversions.
 
You don't necessarily need to poke the aeiral outside - all of mine are located within the loco - even the Yeti which has a metal (nickel silver) body
 
The blog has now been updated, however if you do spot an error please let me know :)


You don't necessarily need to poke the aeiral outside - all of mine are located within the loco - even the Yeti which has a metal (nickel silver) body
This is the first time I have done this, being the new(ish) MR603b, it is the first time I have seen instructions to do this, so I did :)
 
The blog has now been updated, however if you do spot an error please let me know :)


This is the first time I have done this, being the new(ish) MR603b, it is the first time I have seen instructions to do this, so I did :)
Yes, I was a bit concerned on my first RC conversion (the Bachmann 45 tonner) so I made sure that the ESC aerial was in the cab, and left the windows open :nerd::nerd::nerd::nerd:

As that was OK, I didn't worry too much after that, until the Yeti - but I took a chance, making sure that the bare metal of the aerial didn't touch the sides :p:p
 
The note about the aerial is to cover ourselves (and not the aerial :giggle:)..

Except for possibly the very tip(?) the aerial is not 'bare'.

This was a problem with older 27Mhz gear (especially on live steam). The receiver's tend to be tucked under the footplate, surrounded by metal, and there was also the 'rusty bolt' effect..
Modern kit, and transmission protocols, are much more robust.

Nice job, Jimmy..

PhilP
 
I was a little concerned re Aerial inside on my G1 Terrier and IP Steam Tram both all metal, Terrier has Fosworks and Steam Tram Deltang and both have no problem with RC signal.
 
Yes my aerials are within the metal body of my locos and seem to be alright, although there's always going to be exceptions
 
Very nice job. I loved the crates.

When the gears give up the ghost, send me a note. I have spares and (I think) a complete spare axle.
 
Hi Jimmy,

Great job!!! I particularly like the crates I did a similar deadrail conversion using Airwire Convertr board and Soundtraxx decoder a few years ago.

I had never encountered the receiver you used. On researching it, I see that it is primarily a UK product. Are there any dealers or outlets in the U.S.?

Steve Seidensticker
 
I had never encountered the receiver you used. On researching it, I see that it is primarily a UK product. Are there any dealers or outlets in the U.S.?
Steve,

Micro Flyer Radio

Is listed on the Deltang site, and still lists the Deltang Rx65c receiver/controller.
However, production ended in 2021.

The Micron MR603 are available from a number of suppliers. RCS-RC (in Australia) might be another route for you, but both Micron, and I (RC Trains) can supply to the US. - I will enquire if Andy is supplying anyone in the US.

PhilP.
 
Phil,
I know you aren't talking about Fosworks, but when I asked Steve about buying one of his rx in my US locale, he pointed out it wasn't FCC certified. I've never seen either Micron or your products over here. I use Tony's RCS-RC RX/TX and ESCs. Maybe Tony gets his from Micron. I know he uses a UK supplier for some of his stuff.
None of us (to my knowledge) have FCC certification.
Tony (RCS-RC) gets parts from Andy (Micron) and Steve (Fosworks)

Nick (Micro Flyer) does apparently carry the MR603 receivers.

PhilP
 
Back
Top