KylePearce
Registered
As many of us know, the Bachmann trolleys are very detailed but mechanically frustrating. After dealing with cracked gears, feeble motors and overall roughness I made the switch to the USA NW-2 motor block as many suggested. This will document how that conversion went.
What I used:
-USA Trains motor truck, Part # R22-12
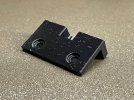
-3D printed mounting bracket x 2
(Or you can make one from plastic angle)
-Side-frame from original gearbox
-rubber toughened CA glue
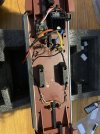
First I started with removing the metal contacts for the old gearbox. Using a dremel I carefully cut the plastic posts that held them. I sanded those spots flush with the surface. Don't mind the R/C equipment , that's a whole other story!

I unsoldered the old contacts from the wiring, and wired in two leads which will be connected to the motor later. They start at the negative side of the diodes. It was important that no wires got in the way between floor and gearbox, as there is no room. On the block itself, the axles had to be trimmed down to the wheel so that the side frame would fit.

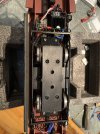
The next step used the 3D printed brackets. If you don’t print, I’m sure this could be easily made from plastic angle. It’s just an L bracket with the correct holes. Note the indent around the holes, which the old gearbox's posts fit into. I screwed one down at one end and put glue on it. I aligned the box and placed it against that bracket. I then put glue on the other one and screwed it into the other side. After the glue dried, the box could be removed easily with 4 screws. The original Bachmann side frame has 2 small posts on each side, pointing inwards. After drilling 4 small (1.5mm) holes in the USA block, the side frame fit was it was. Be careful not to go too deep, as the can of the motor is not far from the wall. Here is the result:

After this, the final step was tidying up all the wiring. There is *just* enough room between the side frame and the weight for the wires to pass. I secured them to the floor so they would not hang down and touch the wheels. The two leads coming off of the lighting circuit got wired into the motor leads, so that the directional headlights worked. If running track power, I'd imagine one would just wire the track pickups right to the motor leads as well. For me, the pickups are removed and the motor and lights are powered off of a 12v electronic speed control.

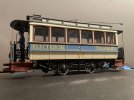
The height did not change at all from the bachmann block. The only change is that the wheelbase is ever so slightly shorter. I can say that the USA mechanisms are 100x better than what this trolley came with. The performance is incredibly reliable, quiet and smooth. I can definitely see why people swear by the USA mechanisms now. I hope this was useful to anyone making their Bachmann trolley run as good as it looks.
What I used:
-USA Trains motor truck, Part # R22-12
-3D printed mounting bracket x 2
(Or you can make one from plastic angle)
-Side-frame from original gearbox
-rubber toughened CA glue
First I started with removing the metal contacts for the old gearbox. Using a dremel I carefully cut the plastic posts that held them. I sanded those spots flush with the surface. Don't mind the R/C equipment , that's a whole other story!

I unsoldered the old contacts from the wiring, and wired in two leads which will be connected to the motor later. They start at the negative side of the diodes. It was important that no wires got in the way between floor and gearbox, as there is no room. On the block itself, the axles had to be trimmed down to the wheel so that the side frame would fit.

The next step used the 3D printed brackets. If you don’t print, I’m sure this could be easily made from plastic angle. It’s just an L bracket with the correct holes. Note the indent around the holes, which the old gearbox's posts fit into. I screwed one down at one end and put glue on it. I aligned the box and placed it against that bracket. I then put glue on the other one and screwed it into the other side. After the glue dried, the box could be removed easily with 4 screws. The original Bachmann side frame has 2 small posts on each side, pointing inwards. After drilling 4 small (1.5mm) holes in the USA block, the side frame fit was it was. Be careful not to go too deep, as the can of the motor is not far from the wall. Here is the result:

After this, the final step was tidying up all the wiring. There is *just* enough room between the side frame and the weight for the wires to pass. I secured them to the floor so they would not hang down and touch the wheels. The two leads coming off of the lighting circuit got wired into the motor leads, so that the directional headlights worked. If running track power, I'd imagine one would just wire the track pickups right to the motor leads as well. For me, the pickups are removed and the motor and lights are powered off of a 12v electronic speed control.

The height did not change at all from the bachmann block. The only change is that the wheelbase is ever so slightly shorter. I can say that the USA mechanisms are 100x better than what this trolley came with. The performance is incredibly reliable, quiet and smooth. I can definitely see why people swear by the USA mechanisms now. I hope this was useful to anyone making their Bachmann trolley run as good as it looks.
Last edited:
