Correct Plug?

David Price

Registered
Country flag
Hello all,

I have a damaged 8-pin plug on a Bachmann Fn3 3-truck Shay and need to find a suitable replacement as it is not listed in the Bachmann store. Two of the cables have come out of the crimped connections in the plug and cannot be put back.

There are multiple sizes of the flat 8-pin female connector and I wondered if anyone could point me to a source of the correct width (20.69mm) as I already have several smaller 8-pins in the same style.
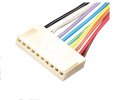
8 Pin Female Connector Plug Only.jpg

Most sites that list them do not give connector dimensions and the socket is mounted on the PCB in the frame under the water tank (Bachmann Part G824X-PCB02)

Any assistance would be greatly appreciated.
 
Hello all,

I have a damaged 8-pin plug on a Bachmann Fn3 3-truck Shay and need to find a suitable replacement as it is not listed in the Bachmann store. Two of the cables have come out of the crimped connections in the plug and cannot be put back.

There are multiple sizes of the flat 8-pin female connector and I wondered if anyone could point me to a source of the correct width (20.69mm) as I already have several smaller 8-pins in the same style.

View attachment 336204

Most sites that list them do not give connector dimensions and the socket is mounted on the PCB in the frame under the water tank (Bachmann Part G824X-PCB02)

Any assistance would be greatly appreciated.
Looks like a Molex connector. Try Googling....
 
Thanks for the suggestions - the issue with using the obvious (ie: Google) is that there are multiple versions of this type of plug with different dimensions (as I indicated in my post - I already have smaller 8 pin versions).

AliExpress for example has about twenty or more sellers of these types of connectors - I finally found one which under "More Information" had schematics plus a table of dimensions for each type (ie: 2 pin, 4 pin, etc.) and think I have found the one I need (and at AUD$1.36 for 10 I haven't exactly broken the bank).


And as an aside the 10 pin image I put up came from an ad (on a German website) for an 8 Pin plug! Same form as the 8 pin I need but when someone puts up an image that doesn't match the text you might understand my concern about whether I will get the right component?

If the plugs I have bought from the url above are indeed the correct plugs and fit the Bachmann PCB I will post here.

Cheers,
 
Hello all,

I have a damaged 8-pin plug on a Bachmann Fn3 3-truck Shay and need to find a suitable replacement as it is not listed in the Bachmann store. Two of the cables have come out of the crimped connections in the plug and cannot be put back.

There are multiple sizes of the flat 8-pin female connector and I wondered if anyone could point me to a source of the correct width (20.69mm) as I already have several smaller 8-pins in the same style.

View attachment 336204

Most sites that list them do not give connector dimensions and the socket is mounted on the PCB in the frame under the water tank (Bachmann Part G824X-PCB02)

Any assistance would be greatly appreciated.
I had a similar issue, so I bought a male/female pair to be certain that they could join, then cut and re-soldered all the wires.

Possibly a bit OTT but it works
 
Had considered this as a solution (already have sufficient small scale multi pin connectors to do this) but I'll see if the plugs I have purchased will do the job - then I don't have to bypass the socket under the water tank/third truck frame.

What I was hoping for in my post was somebody had already done the homework and found a source of plugs (which I think I now have) rather than getting the obvious "google it".

Only taken me two days of emails and searching to find a url with dimensions - so I've now done the hard work for somebody else should they need this bit (assuming it is correct when it arrives). No response from an inquiry to Bachmann sparer parts yet.
I found on my C-19 - which was the one with the problem - that the two multi-lead connectors had different sockets on the tender, and one of them wasn't locking in.

The result, as you say, is that I had to remove the socket on the tender from its previously fixed position and it now hangs down, but it's OK >:)

I use wooden carriers for my three big Bachmann tender locos so that I don't keep unplugging these leads - I have heard a few stories like yours of the wires coming adrift :(
 
Once you find the correct 'style' (body-shape) of connector, the next important thing is the pitch (spacing) between the pins, as many of these families of connectors are available with a range of pin-spacings.

I think you will find you have the correct connector.

PhilP
 
I found on my C-19 - which was the one with the problem - that the two multi-lead connectors had different sockets on the tender, and one of them wasn't locking in.

The result, as you say, is that I had to remove the socket on the tender from its previously fixed position and it now hangs down, but it's OK >:)

I use wooden carriers for my three big Bachmann tender locos so that I don't keep unplugging these leads - I have heard a few stories like yours of the wires coming adrift :(
The damage wasn't caused by loading/unloading - my carry cases have a base with track grooves milled into them and I can drive the Bachmann Mallet & Three-Truck Shay on and off using an LGB orange re-railer (I'm running battery power with CVP Airwire and LokSound 5XL decoders in my electric large scale locos).

The damage occurred inside a 270 degree tunnel with the Shay running in reverse - the rear (third truck) unit disconnected from the draw-bar and and continued to run ahead of the engine whilst the outside sliding at the rear of the engine unit link dropped and dug into the sleepers stopping the main body of the engine. This put a bit more of a strain on the multi-pin connector than it was designed for, but the final straw was when the rear unit took a dive off the track.

My fault for not locking the units together on the draw bar with a screw and washer - but not helped by a well-meaning person giving me unsolicited offers of help whilst I was in the dark inside the tunnel complex whilst trying to sort it all out.............
 
Once you find the correct 'style' (body-shape) of connector, the next important thing is the pitch (spacing) between the pins, as many of these families of connectors are available with a range of pin-spacings.

I think you will find you have the correct connector.

PhilP
Thanks Phil,

well aware of the need for correct pin (pitch spacing) - the ones I have purchased appear to meet the criteria from the drawings on the site.

Would have helped if Bachmann had detailed the plug on the electrical diagram instead of just listing the PCB board (#G824X-PCB02).

Even my major local electronic suppliers have been unable to assist - with some even suggesting I Google it........... DUHHHH!
 
The damage wasn't caused by loading/unloading - my carry cases have a base with track grooves milled into them and I can drive the Bachmann Mallet & Three-Truck Shay on and off using an LGB orange re-railer (I'm running battery power with CVP Airwire and LokSound 5XL decoders in my electric large scale locos).

The damage occurred inside a 270 degree tunnel with the Shay running in reverse - the rear (third truck) unit disconnected from the draw-bar and and continued to run ahead of the engine whilst the outside sliding at the rear of the engine unit link dropped and dug into the sleepers stopping the main body of the engine. This put a bit more of a strain on the multi-pin connector than it was designed for, but the final straw was when the rear unit took a dive off the track.

My fault for not locking the units together on the draw bar with a screw and washer - but not helped by a well-meaning person giving me unsolicited offers of help whilst I was in the dark inside the tunnel complex whilst trying to sort it all out.............
I sympathise :nod::nod:
 
Hello all,

I have a damaged 8-pin plug on a Bachmann Fn3 3-truck Shay and need to find a suitable replacement as it is not listed in the Bachmann store. Two of the cables have come out of the crimped connections in the plug and cannot be put back.

There are multiple sizes of the flat 8-pin female connector and I wondered if anyone could point me to a source of the correct width (20.69mm) as I already have several smaller 8-pins in the same style.

View attachment 336204

Most sites that list them do not give connector dimensions and the socket is mounted on the PCB in the frame under the water tank (Bachmann Part G824X-PCB02)

Any assistance would be greatly appreciated.
Jaycar have something that should work.

I repaired mine by doing this after the wires had broken/separated from the metal piece in the plug.
Look at the opposite side of the pictured connector and there should be a series of slots through you can see the metal.
Lightly press down on the metal using a fine (jewelers) screwdriver and ease the metal towards the wire end.
When it is sticking out grab it with a pair of long nosed pliers and pull it out.
You can now open the crimp remove the old and fit a new piece of wire into the crimp and press it back down to hold it.
Apply a very small amount of solder to give strength.
Look at the metal contact and on the back you should wee a small tab that has been bent flat during removal, use a fine screwdriver to gently lift it till it is standing a little proud and re-insert it into the connector body.
Trim the added wire and the old wire so that they can be joined and soldered (use heatshrink to cover exposed metal).

On the to do list is to replace the plug and socket with something more robust but till then I have just kept it connected.
I store the shay on a shelf sitting on a piece of wood with rail and carry it out when needed.
Interesting that you got that to work - Jaycar responded to my request with the dimensions and the image I first posted here (albeit of a 10 pin image from a German website that used the same image for multiple pin configurations) and Jaycar said they had nothing that would suit. The image at the link above does not seem to resemble the profile of the original pug and socket.

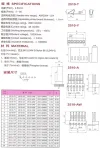
I think I will wait for my order from AliExpress to arrive as the image below appears to indicate the correct profile and dimensions (including pitch which I measured at 2.5mm give or take) for the connector I am after:


Plug Specs-AliExpress.webpPlug Specs-AliExpress.webp

And if it is not correct I've always got the option of soldering the male connector to the PCB and will have plenty of spares for less than AUD$7.50 including postage!
 
On the to do list is to replace the plug and socket with something more robust but till then I have just kept it connected.
I store the shay on a shelf sitting on a piece of wood with rail and carry it out when needed.

As I don't have a track at home but rely on visiting a number of private and club lines I needed something suitable for transportation (some visits involve round journeys of over 300km).

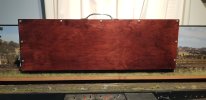
This is the second case I have fabricated & has slots to 45mm gauge for the tyres on the locomotive and slots underneath that sit it in alignment with a straight piece of track underneath:

20241219_113103.jpg

(The shots are taken inside with a section of 45mm track sitting on a 1:48 diorama as the lighting was a bit more controlled than outside)

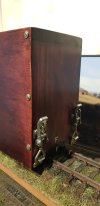
This is how the ends of the case look when ready to open:

20241219_113111.jpg

And with the LGB re-railer in position:

20241219_113233.jpg

Allows the engine to be driven on and off under Radio Control - obviously not suitable for track-power-only engines but I'm not interested in going down that path. It could however be used in this configuration for a live steamer - particularly something like a Darjeeling or NGG Garratt.

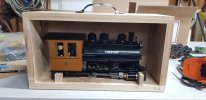
This is the view of a smaller case for a Roundhouse Davenport before packing the top foam, putting the side on and staining/varnishing the timber.

20241206_182619.jpg

This loco is small enough to lift off the base (held in place by the blocks and long pins through the pockets into the base) - and is a lot easier to pickup than a 3-truck Shay or a Mallet!

(It hasn't received my weathering or detailing treatment yet as I've only had it for a couple of weeks)

Cheers,
 
Last edited:
Interesting that you got that to work - Jaycar responded to my request with the dimensions and the image I first posted here (albeit of a 10 pin image from a German website that used the same image for multiple pin configurations) and Jaycar said they had nothing that would suit. The image at the link above does not seem to resemble the profile of the original pug and socket.

I think I will wait for my order from AliExpress to arrive as the image below appears to indicate the correct profile and dimensions (including pitch which I measured at 2.5mm give or take) for the connector I am after:


View attachment 336255View attachment 336255

And if it is not correct I've always got the option of soldering the male connector to the PCB and will have plenty of spares for less than AUD$7.50 including postage!
Ah, I missed the bit in the original post where you said that the socket was fixed to a pcb :oops:
 
As I don't have a track at home but rely on visiting a number of private and club lines I needed something suitable for transportation (some visits involve round journeys of over 300km).

This is the second case I have fabricated & has slots to 45mm gauge for the tyres on the locomotive and slots underneath that sit it in alignment with a straight piece of track underneath:

View attachment 336262

(The shots are taken inside with a section of 45mm track sitting on a 1:48 diorama as the lighting was a bit more controlled than outside)

This is how the ends of the case look when ready to open:

View attachment 336263

And with the LGB re-railer in position:

View attachment 336264

Allows the engine to be driven on and off under Radio Control - obviously not suitable for track power only engines but I'm not interested in going down that path. It could however be used in this configuration for a live steamer - particularly something like the Darjeeling or NGG Garratts.

This is the view of a smaller case for a Roundhouse Davenport before packing the top foam, putting the side on and staining/varnishing the timber.

View attachment 336265

This loco is small enough to lift off the base (held in place by the blocks and long pins through the pockets into the base) - and is a lot easier to pickup than a 3-truck Shay or a Mallet!

(It hasn't received my weathering or detailing treatment yet as I've only had it for a couple of weeks)

Cheers,
NB: meant 45mm gauge on the top surface for the wheel flanges (not tyres) - and 45mm underneath to fit over a straight section of track.
 
Thanks for the suggestions - the issue with using the obvious (ie: Google) is that there are multiple versions of this type of plug with different dimensions (as I indicated in my post - I already have smaller 8 pin versions).

AliExpress for example has about twenty or more sellers of these types of connectors - I finally found one which under "More Information" had schematics plus a table of dimensions for each type (ie: 2 pin, 4 pin, etc.) and think I have found the one I need (and at AUD$1.36 for 10 I haven't exactly broken the bank).


And as an aside the 10 pin image I put up came from an ad (on a German website) for an 8 Pin plug! Same form as the 8 pin I need but when someone puts up an image that doesn't match the text you might understand my concern about whether I will get the right component?

If the plugs I have bought from the url above are indeed the correct plugs and fit the Bachmann PCB I will post here.

Cheers,
Hi David,
If your near a Jaycar Store you can buy them over the counter (AU$1.75) otherwise order them online 10 Pin 0.1in Header with Crimp Pins - 2.54mm Pitch | Jaycar Australia
All the best
 
Hi David,
If your near a Jaycar Store you can buy them over the counter (AU$1.75) otherwise order them online 10 Pin 0.1in Header with Crimp Pins - 2.54mm Pitch | Jaycar Australia
All the best
Thanks Alan,

Jaycar advised me a few days ago that they couldn't assist with this form of plug this time round (nor could any of the other Melbourne suppliers of similar components - inquiries were via email with image and dimensions) so I didn't bother to pursue it further - given I have ended up buying several packets of 10 male sockets & female plugs with cables from AliExpress for AUD$1.75 each it's a bit of a no-brainer anyway.

Greg Elmassian at My Large Scale also helpfully pointed me at this on the US Amazon website search for: 10Pairs JST-XH Connector Kit, XH 2.54mm 8 Pin Header Male and Female Connectors Plug Adapter with Flat Wire Cable 200mm 26AWG Compatible with JST XH (8P)

I wasn't happy with my first wiring of the Shay as all my local store (Jaycar on Springvale Road Melbourne) could offer at the time was a large multi-pin connector more suited to auto installation.

I'm going to rip that out and rewire the whole thing with small form multi-pin plugs (the Shay had no mother board when I bought it from the US and was a wreck as detailed elsewhere).

I've bought some 10 & 12 pin male & female looms as part of this process - the failure has prompted me to revisit my first Fn3 RC conversion wiring.

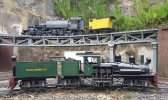
My second conversion to RC of the Mallet utilised a much more efficient way of doing things after I overcame the saga of getting a custom LiIon battery built to fit!

Mallet & Shay-1.jpg

Both locos will run for a full day on a battery charge - the Shay ran on the rolling-road at Stawell model railway exhibition in 2024 for two full days.

You can see the Mallet running here (along with my new Roundhouse Davenport):

The Shay doesn't feature in the video as it was too slow due to the fact that up to three trains were running on the line at once with some very young operators who liked to run fast (my Davenport's load got run up the back-of by the NSW un-streamlined 38 Class seen following it as I was putting my train away in a passing loop!)

Cheers,
 
Back
Top