Depth of Field

G-force1

Prevarication Rules!
Country flag
Depth of Field. No it's nothing to do with how far your wellies will sink into the countryside, but I've found it is something folks have a little problem with understanding, so here's a short explanation. It can be useful, or a b. nuisance, though often in model photography the former, as it can be used to 'fade out' backgrounds etc. and make stuff not meant to be in the picture less prominent.

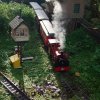
I thought this a good example.

T.V.B.L. Jan 2013 (9) (600 x 399).jpg

The loco at the front is nice and sharply in focus but by the time you get back to the second waggon, there's a bit of fuzz about, which gets stronger to the rear of the train. It's going further and further 'Out of Focus'. Look carefully at the very front of the photo and that too is going out of focus, the sleepers (ties) are getting progressively fuzzier towards the front of the picture. The bit that is acceptably in focus is called the 'Depth of Field'. There are several things can affect the amount of D.o.F available. How close the object is to the lens, the closer the more obvious the effect is, much less when further away. What setting the lens is on or the amount of light available. I'd suggest it's something that can be experimented with to good effect.
 
The old rule was - the smaller the aperture setting the greater the depth of field from any given lens, the the shorter the focal length of the lens used the greater the depth of field available. Max
 
The old rule was - the smaller the aperture setting the greater the depth of field from any given lens, the the shorter the focal length of the lens used the greater the depth of field available. Max

Aperture is a bit subjective with Digitals, some you can set, some you can't. I think it was easier to understand with the old cameras.
 
Good demo..thanks!
Check out a few of my photos:

scot-tilt-shift2.jpg

scot-tilt-shift3.jpg

scot-tilt-shift1.jpg


more on those photos below. ;)

An interesting side-effect of depth of field is that we *expect* to see low depth of field with photos of models: usually the foreground is out of focus, the background is out of focus, and only the subject in the middle is in focus. This is because the models are close to the camera.
IMG_1926.jpg
(not my photo, found online)
So when we see that, it "looks like a model"..

But prototype railroad photos usually have much higher depth of field, because the subject is much farther away from the camera. usually everything in the scene is in sharp focus:
Untitled-1.jpg
So when we see that, it "looks like a real train"

Before digital photography, there wasnt a lot people could do to "fix" the low depth of field problem with model photograhy..
all you could do was increase the light as much as possible, to lower the aperature as much as possible..but even then depth of field was quite limited..

But now! with software, we can digitally alter, and increase, depth of field a lot for close-up photos of models..
One of the new digital methods is called "Helicon Focus", and other similar processes:
Photo Stacking Software - Model Railroader Magazine - Model Railroading, Model Trains, Reviews, Track Plans, and Forums
Which results in model photos like this:
2013324234710_vniner-superchief-hf05y.jpg
(not my photo, photo from: Railroad Line Forums - Using Helicon Focus for increased depth of field)

That greatly increases the realism of model railroad photos! :)

There is also a (much less common) technique of taking photos of real scenes, and *decreasing* the depth of field digitally, to make them look like models! ;)
That is what happened with my first three photos above..
I created those in photoshop (probably a decade ago) for a forum discussion about this topic..
here are the original photos:

sayre3.jpg

sayre1.jpg

sayre2.jpg

My digital blurring on the first three images wasnt totally great..but..did anyone think they were models when you first saw them? ;)
If so, the technique worked!

Here is an ultimate example of this taken to an extreme..I think these are amazing:


More of his videos:

Keith Loutit’s Videos on Vimeo

Scot
 

Attachments

  • scot-tilt-shift1.jpg
    scot-tilt-shift1.jpg
    244 KB · Views: 0
  • sayre3.jpg
    sayre3.jpg
    354.9 KB · Views: 0
  • scot-tilt-shift2.jpg
    scot-tilt-shift2.jpg
    249.1 KB · Views: 0
  • scot-tilt-shift3.jpg
    scot-tilt-shift3.jpg
    168.8 KB · Views: 0
So.. Having a crappy-slow laptop, I do not know whether I am watching stop-motion models, or frame-dropped real-life. :(:(
If the former.. What scale, and how did he get the water effects. - Water and fire do not scale. Oh, and how many containers!
If the latter, am surprised he got permission..
 
What about hyper-focal focussing....

David

Sounds hyper-expensive!?

I guess, I am never going to get really good pictures with my Father's old Sony Cybershot DSC-P32? - A whole 3.2 Mega Pixels..
Oh, and a f=5.0mm 1:2.8 lens (whatever that means)? :think:
 
Also important with full scale pictures, much (maybe most) of the photography is at infinity.

Hyper-focal focussing, if I remember rightly, is where, for the aperture you're using, you focus at the point which gives you maximum depth of field. In 35mm film days, with a 50mm (i.e. a standard) lens set at f8 and focussed on 34ft you had sharp focus from 17ft to infinity. With a 35mm or 28mm lens, focussing at 17ft would give you 8.5ft to infinity and with a 28mm lens focussing on 11ft the depth of field would be 5.5ft to infinity.

Yo can use the same system with a digital camera if it has manual focussing and an aperture priority setting and you know the focal length of the lens and have some means of finding the hyper-focal distance to focus on.
 
Errr! This was intended to be a 'simple' explanation for the less experienced, and perhaps struggling with the effect. :rolleyes::shake:
 
This thread has drifted right-out of my depth of field!
;):(o_O
Think i had better focus on getting some dinner? :):nod:
 
Try using the zoom on your camera, being reasonably close to the subject with a long lens will give you blurry background. Useful for avoiding those pictures of knees so often seen in the model railway press
 
The challenge of getting head on or rear on model trains to look sharp like the real thing.......

Really top notch lenses and large image sensors can draw in immense amounts of light so will give you the chance of getting some impressive depth of field (sharpness zone) but most of us probably have more run of the mill equipment.......

Head on photos of model trains really do tax depth of field when trying to get a sharp image of the whole rake, where as, side-on photos are a piece of cake to get pin sharp.

Depth of field is easier to control with a camera that has manual controls...but can be sort of executed with an automatic camera that has a variety of programmed exposure settings.

It is a case of get as much light as you can (but be careful with direct sunlight as it can washout highlights if reflective or light areas are present....use a sheet to soften and reflect sunlight), stop your aperture right down as far as it goes until you have the about 1/100th second shutter speed (if you can get the aperture to F16 or even F22 you're laughing).. (a bit like squinting your eyes in bright light).... while the camera is supported on a stable surface like a tripod, bean bag or box etc., as the speed of the shutter will drop with the decreasing aperture and lead to un-sharp blur if there is any movement of the camera or the subject..
Stopping the aperture right down does also bring in some focus distortion problems with lower quality lenses but will really only be apparent if you intend to enlarge the image above A4 size.

The real problem with a stopped down lens, is that this restricts the light getting to the sensor and if the subject is moving, then not getting blur will be hard to achieve and depend on the light available to give a high enough shutter speed to 'freeze' the motion.
One way around this is to up the ISO of the exposure...this pushes the image sensor but will lead to image quality degradation (grainy) at very high ISO settings (1600 or 3200 and above). But this 'pushing' does give you more chance of 'freezing' the motion of the model train whilst having that all important huge depth of field.

In this photo the light was okay but not great, the train was moving so I had to compromise a bit on the depth of field so the blur begins a little too soon as you look back along the locos. Had it been brighter I could have stopped the lens down further, increased the depth of field (the sharpness zone) back to the following freight cars.

gp 38 head on smoke and dust.jpg

Night and evening light shots really do test the depth of field aperture, shutter speed and ISO setting as you are working with a lot less light.
This photo was taken with hardly any light apart from the layout lights. The ISO was really pushed (3200) and has made the photo very grainy the shutter was 1/25th and aperture F16. The streetcar was moving steadily forward.

streetcar night  on its way.jpg

Another twilight shot but ISO at about 800, aperture F16 and speed 1/50 the train was stationary so easier to get sharp.

night amtrak beaver 1.jpg
 
Using the iOS 12 software with one of the iPhone XS cameras, you can use portrait mode. This takes a number of images virtually at the same time which allows the depth effect and bokeh. Later in editing you can select the amount of depth or bokeh and change the way the photo looks. It’s very effective to be honest. Computational developing its apparently called. Requires no focus stacking or clever post production (or Photoshop).
 
I have never understood why some people insist on taking photographs of there own railway while trains are moving, giving a blurred image. If you are photographing other peoples railways then you usually have to go with what you have got, but if you have control, stop and pose the train before you take the photograph to get the sharpest possible image. I find that at exhibitions, most exhibitors are happy to stop a train for you to photograph it.

David
 
I have never understood why some people insist on taking photographs of there own railway while trains are moving, giving a blurred image. David

Ah, but there is the satisfaction of capturing that image with the subtle blur of the motions, wheels and background and a trailing steam plume conveying the essence of the subject's speed and grace . All of this combined with the perfectly sharp and lit outline of the locomotive . Skill and artistry. Just what you see repeated again and again in countless full size preservation railway comics. But then again I've never got past the static staged shot with my line :D. Unless its a video. Max
 
I have never understood why some people insist on taking photographs of there own railway while trains are moving, giving a blurred image. If you are photographing other peoples railways then you usually have to go with what you have got, but if you have control, stop and pose the train before you take the photograph to get the sharpest possible image. I find that at exhibitions, most exhibitors are happy to stop a train for you to photograph it.

David

Sorry to disappoint you.
 
B
Using the iOS 12 software with one of the iPhone XS cameras, you can use portrait mode. This takes a number of images virtually at the same time which allows the depth effect and bokeh. Later in editing you can select the amount of depth or bokeh and change the way the photo looks. It’s very effective to be honest. Computational developing its apparently called. Requires no focus stacking or clever post production (or Photoshop).
Bokeh?
 

1540558491797.jpeg
The term comes from the Japanese word boke (暈け or ボケ), which means "blur" or "haze", or boke-aji (ボケ味), the "blur quality". The Japanese term boke is also used in the sense of a mental haze or senility. ... The term bokeh has appeared in photography books as early as 1998.
Bokeh - Wikipedia

https://en.wikipedia.org/wiki/Bokeh


Ah! Grasshopper....
You have much to learn from the Master...
;)
 
Back
Top