DIY Filament Dry Box

  • Thread starter Thread starter GAP
  • Start date Start date

GAP

G Scale Model Trains, 1:1 Sugar Cane Trains
Country flag
Living in a high humidity climate I am having trouble with my PLA+ absorbing water and causing problems mostly stringing and blobs with the occasional breakage due to it going brittle.
At the moment I am using vacuum bags with silica get to store the filament and taking it out to do a print.
Talking to a couple of blokes at a gaming store (they 3D print their warhammer scenery for the games they run) about the problem they suggested using a dry box because while printing the PLA can absorb water and ruin a print.
I looked at some dry boxes on line but none of them fitted my situation (lack of power points).

While searching the net for DIY solutions I found a couple but this one stood out as it will fit on a shelf right above the printers and doesn't require power. It is now a WIP to be built once I get the parts.

This is another that I looked at;

This is the latest one I found.
 
Last edited:
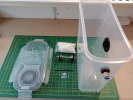
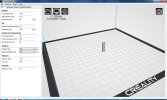
I finally decided on which dry box to go with and it was this one, it took around 20-30 minutes to assemble, the print time was fairly long (all day and into the night).

He did a mod to rewind filament back into the box for storage and to save filament.

I am printing the filament outlet files and the ptfe tube cap at the moment and will fit them when they are finished.

This will allow me to put the dry box on a shelf above my printers and run the filament down ptfe tube to the extruders.

I had to hunt around for the dehumidifier packs because the common ones I could get in Aust were mostly to big (to tall) but these ones fitted perfectly (I did get some strange looks at the supermarket as I tried different packs to see if they would fit under a spool of filament.

I could only source 7.5L Sistema boxes which had the clips on the lid, the ones in the videos were not in stock at Amazon.
I also printed some wedges (7mm at the high end) to raise the bottom of the box as the sides sloped dramatically and the spool slid up against the back.
 
Last edited:
After printing parts for close on 30+ hours, I had all the parts to build my first dry box with a rewind feature,
The parts for a second one are on the printer and should be ready in 10 hours (tomorrow morning).
Mod time was about 10-15 minutes.
This has been by far the largest print I have done, but it was worth it.
Price wise I will use about half of a $30 reel of filament, $7.50 each for the box and the dehumidifier pack, so for about the cost of a roll of filament I have a box where I can store reels till they are spent all nice and dry.
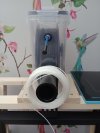
Any future builds will have the geared spindle as standard, I had to replace the original so I now have 2 spindles spare that I looking at re-purposing.
Overall I am very pleased with the boxes as they will suit my situation perfectly.
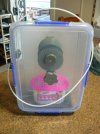
Front showing gear on the spindle
P1080262.JPG

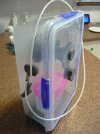
RH Side showing filament outlet and the plug that seals off the PFTE tube when the box is not in use.
P1080261.JPG

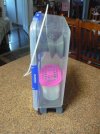
LH Side showing the dehumidifier pack

P1080263.JPG
 
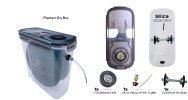
Taking into account the economies of printing the parts, including electricity cost and the expense of the filament, plus around £10.00 for the 7.5L Sistema container (price check at Tesco) opted for an off the shelf solution, which can be found for a low as £23.00, this link is for the ones I purchased, and no I didn't pay any way near the advertised price, hint for eBay, put the item on your watch list, then sit and wait, usually sometime between 24 and 48 hours an 'Offer' from the Seller will be received, then haggle!;)

Filament Dry Box.jpg


What you get for your money....as it comes pre assembled....plonk the reel of filament on the metal rollers, adjust the spacers, tip the desiccant* in the bottom, feed filament through, fit end cap** if required, configure the Hygrometer (even comes with a spare battery) for C or F (orange button on the rear), snap the lid on, job done.

*For the cheapskates amongst us, Home Bargains etc do a nice line in a cheap dehumidifiers for around 50p to 80p, for a source of desiccant, for future replacement or topping up the existing supplied quantity.
Filament Dry Box what you get.jpg

Filament Dry Box in situ.jpg

**PTFE tube cap with filament catch

Filament Box Tube Cap.JPG
 
Last edited:
Rather than all the faff of printing the parts out and the unnecessary and unneeded expense of filament and over £10.00 for just the 7.5L Sistema container (price check at Tesco) opted for an off the shelf solution, can be found for a low as £23.00, this link is for the ones I purchased, and no I didn't pay any way near the advertised price, hint for eBay, put the item on your watch list, then sit and wait, usually sometime between 24 and 48 hours an 'Offer' from the Seller will be received, then haggle!;)

View attachment 320356


What you get for your money....as it comes pre assembled....plonk the reel of filament on the metal rollers, adjust the spacers, tip the desiccant* in the bottom, feed filament through, fit end cap** if required, configure the Hygrometer (even comes with a spare battery!) for C or F (orange button on the rear), job done.

*For the cheapskates amongst us, Home Bargains etc do a nice line in a cheap dehumidifiers for around 50p to 80p, for a source of desiccant, for future replacement or topping up the existing supplied quantity!
View attachment 320355

View attachment 320357

**PTFE tube cap with filament catch

View attachment 320358
That PTFE tube, connector is the basis of Air Pneumatic point control, if only we could find a proper supplier UK with switches and Ait cylinders at a sensible price things would be ok. Sorry for thread drift.
 
Back
Top