Do I need anything else?

JungleSkipper

Registered
Country flag
Hi,
I’m just getting started with g-scale and mode railways. I am looking at building a small loop in a backgarden flower bed for my son. I have the train and the track, but I am a bit confused about whether I need other things/best practices.

My layout looks like this:
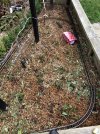
04F1DDF2-F1CA-4A01-A111-E9F64B979A2E.jpeg

It’s pretty simple. I have bought some timber to raise it off the ground (any particular height?). I plan on using some posts and the curve the timber around the posts.

Are there any best practices I should be thinking of, especially creating an outdoor track to last for a long time?

I have a couple of probably really simple questions which I can’t find an answer to:

- what are rail joiners and do I need them?
- how do you attach the track to the wood, I was thinking of nailing it in but is there a better way?
- how do you house the power supply? The track power cables don’t look that robust for a permanent in

If I’m allowed I’m hoping to break through the wood at the end and go around the rest of the garden with 2 reversing loops.

Many thanks
Daniel
 
Welcome - that looks like a good start. You can have the track at any height you like. level with the existing woodwork would look good.
The existing joiners on your rails will be OK to start with. You can get clamps, but save that for later. A joint compound in the rail joiners is a good idea - it keeps the moisture out and improves electrical continuity. LGB do a red tube of the stuff but 'copperslip' or similar will work.
Best to keep mains electric in the house. For occasional use an extension lead will be OK to your controller. Or use long leads from the controller (indoors) to the layout - I use old mains cable for this.
The controller supplied with a basic set is marginal for outdoor use - it'll work but with new and maybe larger locos you might need a bit more power.

That will get you going. Load of things to experiment with in the future but for now enjoy and get trains running.
 
Last edited:
Daniel,
That looks good for a starting point, start small and expand is a good way to go.

My answers to your questions others will add theirs I'm sure.

- what are rail joiners and do I need them?
Joiners are how the track pieces are connected, they are most definitely needed, they serve a few purposes;
1. align the rails
2.carry the electrical current between the track pieces to name a couple.
There are many types available from slide on to clamp on the choice is fairly broad.

- how do you attach the track to the wood, I was thinking of nailing it in but is there a better way?
I used screws with a button head through the sleepers into timber at intervals.

- how do you house the power supply? The track power cables don’t look that robust for a permanent in
The power Supply can be house in a close by building (shed), in a carry box with a cable that plugs into a socket that stays permanently connected to the layout ideally a weatherproof one but that would require an extension cord being run across the yard or if you wanted to go to some expense then install an outdoor power point near the layout to connect your controller.

As for the height above ground I made mine 900mm which is about waist height, I wanted no bending and crawling on the ground (mostly an age related decision).
This may give you some ideas
 
Welcome to the Forum, Daniel..

If you have not got one, buy a spirit level. Absolute minimum of 600mm long.
Try to keep the track as level as possible.
Use screws, rather than nails, and not a lot of them. - Track will expand and contract.

Keep mains in the house, unless installed by an Electrician.

PhilP
 
I would suggest a bit of reading... I have a "beginners FAQ" page here

please notice that there are TEN sub pages on various topics, and you can choose which one you want to read... all of the questions you asked and more are there.

Regards, Greg
 
Going on the title of the thread ..........

  1. A bank loan
  2. Endless patience
  3. Sense of humour
  4. ........


>:)>:)>:)>:)
 
Going on the title of the thread ..........

  1. A bank loan
  2. Endless patience
  3. Sense of humour
  4. ........


>:)>:)>:)>:)
Daniel, welcome to the forum, but watch out for the comedians :)
 
Welcome Daniel, I think most of your questions have been answered, just be prepared that what my work for some, may not be best for you, just try things out and see how it goes. One small thing, like everything else, you get what you pay for, so be careful of false "bargains "
Where abouts in Great Britain are you from?
 
Try locating a few of the available soft cover books on proven advice on Garden Railroading, also, ones on the basic knowledge of ELECTRICITY for model railway trains. No-matter what scale, the Electricity is used the same way......Then beware of "Self Anointed Experts"....!!!! Do a heck of a lot of research, before you spend much money.
Other than that, the only "Advice" that can honestly be given, is to find a club, or group of Garden Railway people, close by, where you can observe the many mistakes they have made, so you won't make the same ones, instead being able to have pride in making your own....!!
It's a great hobby, with GREAT people in it, and with care; you and your son will have a great hobby that will/can grow with you, over a lifetime.
I'm in Canada, so, as much as I'd like to; I can't be of much help to you. So it is most important to let the gang here on GGC know where in GB you are located. There might even be one a few blocks close to you....
 
Welcome to the forum, my take on your line would be to think about extensions yes even now. Just 1 point will point the way.

As for you construction, roofing felt will give your timber a longer life. Make sure it overhangs the timber as you fold it over the ends this gives rain a chance to drip off rather than a capillary job and get under the felt. Not good for timber life.

As for screws, yes they do allow removal of track for changes etc. Suggest Black round headed if you can get them, pre drill the sleepers just slightly oversize. Dab screws in a little grease before screwing in to discourage rust. Oh and no bigger than needed plus 1 each side of the sleepers outside the rail not screwed down all the way, allow say a couple of MM or so off full contact to the sleeper.

A centre screw if screwed down too tight can distort the sleepers quite badly.

Plus if your budget runs to it Clamps will make your line much more reliable and also the screws make a great place for feeding power to the rails.
 
How do you attach the track to the wood, I was thinking of nailing it in but is there a better way?
One advantage of screws over nails is you can make changes to your track plan. Most of us end up changing things about.

And like someone already said: not too many of them.
 
Thanks for all of your replies
Welcome - that looks like a good start. You can have the track at any height you like. level with the existing woodwork would look good.
The existing joiners on your rails will be OK to start with. You can get clamps, but save that for later. A joint compound in the rail joiners is a good idea - it keeps the moisture out and improves electrical continuity. LGB do a red tube of the stuff but 'copperslip' or similar will work.
Best to keep mains electric in the house. For occasional use an extension lead will be OK to your controller. Or use long leads from the controller (indoors) to the layout - I use old mains cable for this.
The controller supplied with a basic set is marginal for outdoor use - it'll work but with new and maybe larger locos you might need a bit more power.

That will get you going. Load of things to experiment with in the future but for now enjoy and get trains running.
Is this the stuff https://www.amazon.co.uk/Carlube-XC...per+slip&qid=1613992210&s=automotive&sr=1-12?

Daniel,
That looks good for a starting point, start small and expand is a good way to go.

My answers to your questions others will add theirs I'm sure.

- what are rail joiners and do I need them?
Joiners are how the track pieces are connected, they are most definitely needed, they serve a few purposes;
1. align the rails
2.carry the electrical current between the track pieces to name a couple.
There are many types available from slide on to clamp on the choice is fairly broad.

- how do you attach the track to the wood, I was thinking of nailing it in but is there a better way?
I used screws with a button head through the sleepers into timber at intervals.

- how do you house the power supply? The track power cables don’t look that robust for a permanent in
The power Supply can be house in a close by building (shed), in a carry box with a cable that plugs into a socket that stays permanently connected to the layout ideally a weatherproof one but that would require an extension cord being run across the yard or if you wanted to go to some expense then install an outdoor power point near the layout to connect your controller.

As for the height above ground I made mine 900mm which is about waist height, I wanted no bending and crawling on the ground (mostly an age related decision).
This may give you some ideas
Thanks, I assume the fishplates which come as standard are good enough for now?

I was thinking of mounting the power supply in an IP65 waterproof box with glands on either side (one for mains and another for track power. Do you happen to known is there are any restrictions to the type of wire I can use for the track power? I have some spare 3 core 1.5mm flex for a pond I assume that would be ok, or is 1.5mm to high of resistance for model trains?

Going on the title of the thread ..........

  1. A bank loan
  2. Endless patience
  3. Sense of humour
  4. ........


>:)>:)>:)>:)
Don't tell my wife how much I've spent on this so far :rofl:

Welcome Daniel, I think most of your questions have been answered, just be prepared that what my work for some, may not be best for you, just try things out and see how it goes. One small thing, like everything else, you get what you pay for, so be careful of false "bargains "
Where abouts in Great Britain are you from?
I'm about 20 mins south of Reading. There is a Model Railroad Club near me Prospect Park Minature Railway <- doesn't look like they do G-Scale though.

Welcome to the forum, my take on your line would be to think about extensions yes even now. Just 1 point will point the way.

As for you construction, roofing felt will give your timber a longer life. Make sure it overhangs the timber as you fold it over the ends this gives rain a chance to drip off rather than a capillary job and get under the felt. Not good for timber life.

As for screws, yes they do allow removal of track for changes etc. Suggest Black round headed if you can get them, pre drill the sleepers just slightly oversize. Dab screws in a little grease before screwing in to discourage rust. Oh and no bigger than needed plus 1 each side of the sleepers outside the rail not screwed down all the way, allow say a couple of MM or so off full contact to the sleeper.

A centre screw if screwed down too tight can distort the sleepers quite badly.

Plus if your budget runs to it Clamps will make your line much more reliable and also the screws make a great place for feeding power to the rails.
Thanks for the tip about roofing felt I didn't think of that. Do you have any tips for construction? I am planning on sinking in supports to the ground (just hammering them in 50 below/50 above). Then taking battens and using a mitre saw creating vertical grooves in the wood, wait for a very wet day and bending the battens around the wooden supports. I don't know how feasible this is? I'm also struggling with how to mark where the battens need to be sunk in the ground and how many I need, also ensuring the curves are correct.
 
Thanks for all of your replies

Is this the stuff https://www.amazon.co.uk/Carlube-XC...per+slip&qid=1613992210&s=automotive&sr=1-12?


Thanks, I assume the fishplates which come as standard are good enough for now?

I was thinking of mounting the power supply in an IP65 waterproof box with glands on either side (one for mains and another for track power. Do you happen to known is there are any restrictions to the type of wire I can use for the track power? I have some spare 3 core 1.5mm flex for a pond I assume that would be ok, or is 1.5mm to high of resistance for model trains?


Don't tell my wife how much I've spent on this so far :rofl:


I'm about 20 mins south of Reading. There is a Model Railroad Club near me Prospect Park Minature Railway <- doesn't look like they do G-Scale though.


Thanks for the tip about roofing felt I didn't think of that. Do you have any tips for construction? I am planning on sinking in supports to the ground (just hammering them in 50 below/50 above). Then taking battens and using a mitre saw creating vertical grooves in the wood, wait for a very wet day and bending the battens around the wooden supports. I don't know how feasible this is? I'm also struggling with how to mark where the battens need to be sunk in the ground and how many I need, also ensuring the curves are correct.
Have a look at my build linked below. Pages 3 and 4 will show how I use Postcrete with Poles in Metposts, though you can just plonk the posts in the holes but the postcrete helps things to be secure. I use this as it speeds the aseembly time.

As for curving battens, your method can work but you may find thinner timber will curve without cutting using short pieces of square where you intend to screw into baseboards and support battens. My curve construction on page 4 shows upright supports for my 4ft radius curves, inevitably you will find more sections to get round with smaller radius curves thus perhaps more uprights unless you do hidden battens across the joints thus perhaps a support batten may work every 2 or 3 sections of curve on the joint.

Another option for the curved battens would be UPVC barge boards available Wicks which you can cut to a narrower profile and use my square timber option to support the surface. This may be an even easier option as it curves very well.
 
It’s pretty simple. I have bought some timber to raise it off the ground (any particular height?).
Why not run it on that edging timber for the two sides, and build a raised track bed for the other two?

You'd need to span the corner somehow, but anything's possible ;);)
 
Why not run it on that edging timber for the two sides, and build a raised track bed for the other two?

You'd need to span the corner somehow, but anything's possible ;);)
You know I was so busy thinking about a ground line that I missed that simple option for part of the layout. That means only raised section the other side and the box will soon fill in underneath and probably go under to make a nice Pecorama type layout on plants. Save a lot of work on the initial build.
 
Sorry, I’m confused by this, could it elaborate a bit more please?
The aerial shot that you have given shows a timber edging to the proposed railway area, and this has a fairly wide and substantial capping piece - approx 6 inches?

Why not lay the track on that, and then provide a raised timber track bed for the other two sides at the same level?

That's a pretty handsome width for G scale track, and it would mean that the railway is accessible and viewable >:)
Gotcha! The one condition for me having a model railway in the garden is that my wife didn’t want to see it and it had to remain with my allotment area. Unfortunately putting it on the top it would be easily seen :(

What’s g-scale like with climbs? I could put a ramp up to it off a switch and just lay the track temporarily when needed.
 
Back
Top