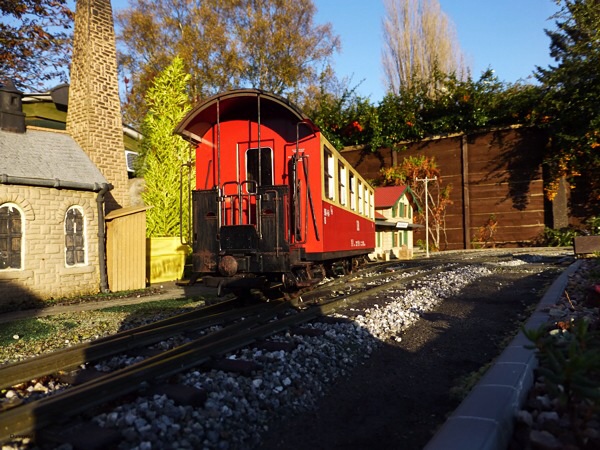
I have 4 of these plus a couple of the Full Brake Versions and they form the Main bulk of my Passenger Fleet. Now they are excellent Models, however they do fall down on one or two counts. These are obviously area`s of Strength and Cheapness of Construction.
The main things that concern me and need to be sorted are:-
- End Handrails
- Lack of Tail Plate Holders
- Need for Toilet in Some of my Fleet
- No Passengers
- Flop on the Wheels
- Shiny Plastic
All of these are sortable.
HANDRAILS
The Handrail thing was my first attack at these coaches. The first Pictures show how the Prototype looks. There is an Upright Post at each Side together with an additional Handrail plus on the coach Body there is also an additional Hand Grab. The only representation of these is a sort of Crude Wire coming out from the End Plate.

I first got the idea for this bash in a copy of Garden Bahn Profi. If you have any of these it was No 5 2007 Page 56. These missing Items were easily bent up from Copper Wire Robbed from some old Mains Light Cable. However as there are 6 Coaches Worth, it was worth While making up a simple Jig to ensure that all were bent up the same. When I was young I used to be scared stiff of the term `Jig` thinking that it was something that could only be made up by a Trained Engineer on Complex Expensive Machinery. Not so a Jig is just something that is used to ensure that a Fabrication is the same for Multiple Copies. I made up two simple Jigs for this Job. One a Lump of Ply that was Drilled with two Holes. One to bend the Coach Body Handrails, the other for the End Handrail that will eventually be soldered to the End Upright. These being somewhat more complex were bent without the use of a Jig but by reference to the Master that I made up to Test the Principle. Bear in mind that these end ones are Sided and you need 2 each side of these plus 4 of each of the Two Sizes of Handrail. Here are the two jigs, the second one has Holes which are used for Drilling into the Body for the Rails to be Superglued into.

Having bent up all my Wires I next needed to Consider the End of Train Plate. This was to be a 3mm Length of 3mm Square Copper Tube. I lucked out on this at York where Monk Bar Models had just what I needed in Stock. KS may be a source for you Locally. Here is a Picture after prior to installation with the Handrail and Holders Soldered in Place. There were quite a lot to Fabricate and the only help I can give here is just do it and use lots of patience!

To fit they are simply Super Glued into the Pre Drilled Holes, I do utilise one of the Original Holes on the End Plate. Here is a Picture of a Test Installation, it is easier to see these in the Copper Colour. In practice I paint them up Black before installation. Note the the ones on the Coach have been painted Red on the Prototype Picture. I think that this is current Practice as the Pictures were taken in 2010. In my Time I am sure that they were Black or ended up that way with use!
Test installation pic should be here, see next post!
TOILET

I have previously described in my Newquid Bash how I installed a Toilet. But to recap, it is a Simple Plasticard Bash with some White Plasticard Glued onto one Window. You will also need to cut out some seats, this is best done by removing the 2 Mouldings from one side of the Coach. They Pop out by gently prizing out with a Screwdriver between the Window and the Moulding. I used Bachman Toilets from a previous Bash. But a simple Box of Black Plasticard will suffice. Pic above shows bits of Seats that were removed.
PASSENGERS
I have used some of the Cheep Chinese Imports, with a little bit of Highlighting they are more than adequate for Coach Passengers. I have even used Standing ones waiting for access to the Toilet. A useful ploy suggesting that there are more Passengers on the Train than you can see. They are all held in place by Double Sided Tape on there Feet and Bums. Plus if part of the Body cannot be seen for Standing ones on their Back or arms etc. get good quality Double Sided for this Job. You want them to stay in place. You can just make out some of the Passengers in the Pictures of my Modified coaches.
FLOPPY WHEELS
LGB and in fact most Rolling Stock comes with considerable side play on the Wheels. As suggested by John Lythgo in his articles I use M3 Nylon Washers from Squires. At around £3 Squid for a Hundred they are a worthwhile investment for better quality running. Sometimes just 2 on each axle suffices, but you may need anything from 1 to 4 on individual axles. Just make sure that when you fit them the Wheels still spin freely. It is also worth while to put some LGB Lube in at the same time.
SHINY PLASTIC
I resolve this with subtle Weathering. A very controversial point this as it is considered to devalue the Stock. Well up to you either do it or not as is your want. I tend to use the Dry Brush method. That is to just have a small but of Acrylic Paint on the Brush, almost wipe it off then apply to the Model. This way you can build up the effect slowly. I also tend to use Propriety Weathering Solutions including Spray Cans and Powders. I think the secret to an overall fleet being realistic is to do it a Vehicle at a Time with a day or so between each one, that way you are unlikely to get a Copy of the last one that you did.
TAIL PLATES
I got some of these from Germany by RS Modelle. Link here:-
http://www.rs-modelle.de/fahrzeugteile.htm
While these were OK for my needs, I was not impressed with the Whitemetal Holders plus there were not enough for my needs so I decided to Scratch Build enough for my needs. Some of these will get lost in service so a quick and cheep build was required. This turned out to be a simple Metal Bashing and Computer Project. 10mm Square Tinplate forms the Main Basis. A Pip at the bottom formed of Flattened Mains Wire, it just has to fit into the 3mm Square Holders. A U of very fine wire for the Handle. All soldered together and painted Black. The red and white marker was run up on my CAD and printed onto self adhesive paper. The pictures show the methods quite clearly I think. In real life service these things get well abused, so my crude copy is more than adequate.

The size can be judged by the LGB Screw. The original by Rs is the White Metal one on the Left.

Finally some pictures of the completed bash, together with some with Tail Plates in place.


The final Picture is of an Unmodified Coach.
[attachimg=10]
JonD


.jpg")
.jpg")

.jpg")
.JPG")
.JPG")