HLW Mack locomotive

Mohawk Valley

Registered
Country flag
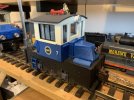
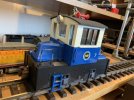
The Mohawk Valley Railroad has just acquired a MLW Mack switcher, and very nice it is too…

but…how do you get the body and roof off? I’ve tried all sort and I’m a bit scared of breaking or damaging the plastic bodywork.

Cheers

Martin
 
The Mohawk Valley Railroad has just acquired a MLW Mack switcher, and very nice it is too…

but…how do you get the body and roof off? I’ve tried all sort and I’m a bit scared of breaking or damaging the plastic bodywork.

Cheers

Martin
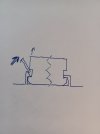
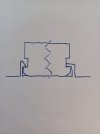
It's not hard, but a little tricky. Do NOT try to pry loose the bonnets by pressing on the tabs under the chassis behind the buffer ends. You must remove the motor block first. There is an identical slot at each end of the motor block. There is a tab on each end of the chassis that clips into the slots. One of the tabs has a flat top and the other has a beveled top. You insert a flat blade screwdriver between the motor block and the beveled tab and pry it gently away from the motor block while pulling the block away from the chassis at that end. Once the motor block has cleared the beveled tab, it will slide out from under the flat top tab. There is a thin brass tube that projects up from the motor block through the chassis into the center cab section. be careful not to bend it as you remove the motor block. You will then see two Phillips head screws which hold the center cab in place. As the center cab comes loose the two bonnets will come free as well as the two flat metal weights that are held against the chassis by the center cab. The bonnets are held in place by a tab between the chassis and the cab in the center and a tab through the chassis at the ends. The roof is removed by pushing the plastic light "tubes" out from inside the cab. At this point, you can remove the air tanks, steps and wheel bearing covers if needed.

It's a nice little engine, although somewhat noisy until the mechanism wears in. There is room for batteries, R/C and a sound card in the cab, but you would probably need to put a "sugar cube" speaker under one of the bonnets. It might be possible to stuff the electronics under the chassis if you want to detail the cab.

Enjoy your new engine!
 

Attachments

  • Mack 1.jpg
    Mack 1.jpg
    101.9 KB · Views: 0
  • Mack 2.jpg
    Mack 2.jpg
    86.6 KB · Views: 0
It's not hard, but a little tricky. Do NOT try to pry loose the bonnets by pressing on the tabs under the chassis behind the buffer ends. You must remove the motor block first. There is an identical slot at each end of the motor block. There is a tab on each end of the chassis that clips into the slots. One of the tabs has a flat top and the other has a beveled top. You insert a flat blade screwdriver between the motor block and the beveled tab and pry it gently away from the motor block while pulling the block away from the chassis at that end. Once the motor block has cleared the beveled tab, it will slide out from under the flat top tab. There is a thin brass tube that projects up from the motor block through the chassis into the center cab section. be careful not to bend it as you remove the motor block. You will then see two Phillips head screws which hold the center cab in place. As the center cab comes loose the two bonnets will come free as well as the two flat metal weights that are held against the chassis by the center cab. The bonnets are held in place by a tab between the chassis and the cab in the center and a tab through the chassis at the ends. The roof is removed by pushing the plastic light "tubes" out from inside the cab. At this point, you can remove the air tanks, steps and wheel bearing covers if needed.

It's a nice little engine, although somewhat noisy until the mechanism wears in. There is room for batteries, R/C and a sound card in the cab, but you would probably need to put a "sugar cube" speaker under one of the bonnets. It might be possible to stuff the electronics under the chassis if you want to detail the cab.

Enjoy your new engine!
Brilliant description, many thanks Ken.
Cheers

Martin
 
Brilliant description, many thanks Ken.
Cheers

Martin
You're quite welcome, although I shall require pictures of the finished product if you paint or modify it. I rather like what you have done with the LGB Steeple cab electric locos. Especially nice logo.
 
Thanks Ken. The Mack is in bits at the moment with the body parts in the paint shop. I’m still wondering if it should be all blue, or blue and cream. The lines other diesel, a Piko 25t, is all blue.
I make the logos myself and print them out on to transfer paper. I’ll have to make some more as I’ve run out of the loco sized ones. There are two more steeplecabs to be done now and a 44 tonner (USAT) with split gears that will eventually get some attention.
cheers

Martin
Minor point, the Mack was petrol powered, not diesel. But you can certainly claim yours was bought from Mack when it was retired, imported and fitted with Perkins diesel engines if you like, rule 8 and all that. (I bought one of MLS's Goose sound boards to get the petrol engine sound for mine.) The HLW model is of the No. 1, a chain driven "working prototype switchyard locomotive." It appears that only one was built. Later models were gas-electric with as many as four engines coupled to GE generators. Mack built quite a range of locomotives, detailed here Mack Rail – The Locomotives if you are interested. Looking forward to photos of the finished product. I'm going to see if you have posted a picture of the Piko 25t.
 
Yes, senior moment regarding diesel engines. I had realised that the Mack was petrol powered, I looked at their history for some time, it’s quite fascinating. Were their road going vehicles petrol? If they were diesel I’m surprised they didn’t fit diesel engines to their switchers. Either way, I think it’s an extremely cute locomotive and quite powerful for its size. I had it pulling a flat car with a steeple cab on it and it was no problem at all. As my pseudo Claremont & Concord/ Texas Transportation Co layout will only manage a maximum of two cars, (very restricted run around), it will be ideal as a standby for when the steeplecabs are being serviced or unavailable.
And now for the boring bit…the Piko 25t has had very little done to it apart from numbers and logo addition. Pic below…
Thanks for all the info, it’s really interesting.

Cheers

Martin
 

Attachments

  • 2AA27226-2A54-4953-A2F3-255A5FD3FDE2.jpeg
    2AA27226-2A54-4953-A2F3-255A5FD3FDE2.jpeg
    507 KB · Views: 0
  • A9DEC0C8-4292-4A53-A987-06DBD89AA6F3.jpeg
    A9DEC0C8-4292-4A53-A987-06DBD89AA6F3.jpeg
    558.4 KB · Views: 0
  • B49B3BCE-1E72-4160-AF5A-323E432789B9.jpeg
    B49B3BCE-1E72-4160-AF5A-323E432789B9.jpeg
    574.3 KB · Views: 0
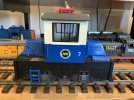
Oh, one other thing, and I’ve seen this on quite a few HLW Mack switchers is the logo on the bonnet front is turned around to make it look like #3. It is the Mack logo I believe and should represent the letter M, something that the MVR will remedy.
 
I'll have to check my engine. I certainly don't want the logo to look like a 3. What kind of transfer paper are you using? Does it end up producing waterslide decals or the type of transfers that iron onto fabric?
 
It’s a bit strange this one. I’ve seen other HLW Mack’s that have a #2 in the same font as the 3. Looking at the pics on the Mack site you sent me, there are certainly ones with the Mack logo and it looks like the #3 turned to the side to make the letter m.

I use waterside decal paper from Mr Decal, a UK supplier. There are several types either clear background, which I’ve never had much success with and white background, which is what I use for printing on an inkjet printer. The problem with clear background is the white colour isn’t printed on an inkjet, it just leaves it blank. I design the logo using publisher, save and print to the highest settings. The printed paper then gets 2 or 3 light coats of acrylic sealant and left to dry for 24 hours. You just use them as you would a normal water slide transfer remembering that there is no border, so if you cut out the shape, you have to be careful that you don’t leave any white showing at the edges.

Cheers

Martin
 
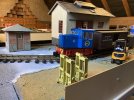
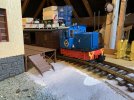
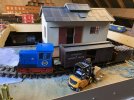
Update on the ‘lil Mack switcher.
it’s been through the paint shops, just needing the handrails painting and then it’s upstairs to the loft and revenue service…well stand by for the electric locos…
Arriving soon, an Aristocraft critter in a very work worn condition, which will probably be left in that state.
 

Attachments

  • B48F7622-E739-4536-B361-A184FCBB519C.jpeg
    B48F7622-E739-4536-B361-A184FCBB519C.jpeg
    397.3 KB · Views: 0
  • 35CDE18A-DFBB-44AB-9471-1B863A3F8B8C.jpeg
    35CDE18A-DFBB-44AB-9471-1B863A3F8B8C.jpeg
    448.1 KB · Views: 0
  • CC2935CC-69D5-4ACD-ABA7-D4FBE65213DF.jpeg
    CC2935CC-69D5-4ACD-ABA7-D4FBE65213DF.jpeg
    446.2 KB · Views: 0
I love my little Hartland Mack.

 
Update on the ‘lil Mack switcher.
it’s been through the paint shops, just needing the handrails painting and then it’s upstairs to the loft and revenue service…well stand by for the electric locos…
Arriving soon, an Aristocraft critter in a very work worn condition, which will probably be left in that state.
Very nice! And, I see you have replaced the frosted glazing with clear. What did you use?
 
Hi Ken,
I used clear plastic card, not sure what the thickness is as I bought a job lot years ago and I’m still using it. It’s not so thick as to be rigid, but not too thin as to bend everywhere. The side windows clip into the black frame and the cut needs to be precise so the clear window can bend slightly in the middle and spring into the shaped ends. The front and rear windows are all one piece and slide down the grooves to be held firmly in place.
I think the thickness of the card is dictated by the thickness of the grooves in the corners and the black frame.
Cheers
Martin
ps, I can’t see any reason why HLW couldn’t use clear plastic in the first place…
Just to hide the emptiness within, I suspect
 
Very nice! And, I see you have replaced the frosted glazing with clear. What did you use?
Nothing. Wallace wanna be likes the fresh air.....:rofl:
 
That looks great, pity I haven’t got a large enough space in my garden…the authorities probably wouldn't allow it anyway…so it’s up in the loft for me…
Cheers
Martin

Many a fine layout has been built in a small space. If I hadn't chosen to build my "O" gauge Lionel layout in my loft, I was going to build a highly detailed "G" scale display. I am still contemplating building a diorama with some of my smaller "G" scale stuff. I have two LGB field locos, one diesel and the other O&K little steam loco, which I have never run in my garden.

I ain't gettin' any younger so I must get to it. Have you seen these sites ?


Back
Top