Red Battery GRS Pecket Loco Conversion using Fosworks and NiMh Batteries with My Loco Sound.

dunnyrail

DOGS, Garden Railways, Steam Trains, Jive Dancing,
Staff member
GSC Moderator
Country flag
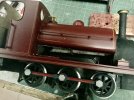
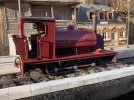
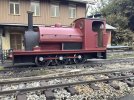
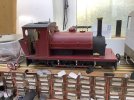
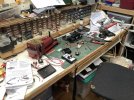
I bought this loco for around £145 back in October 2020. I had been involved with suggesting the price to a lady that had asked us for some values and as nobody appeared to be interested I took the opportunity to buy it as I thought it looked rather nice. It is a Piko 0-6-0 Chassis with what I believe to be a GRS kit built body. Rather nicely done with a good cab interior, it was set for 2 rail pick up and ran fine though as I will relate later I was surprised it ran at all. Below you can see work under way and the shambles that is my workbench when a project is under way.
DCE5D2B3-DC3E-4615-9270-99169EE85FA9.jpeg
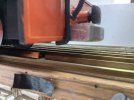
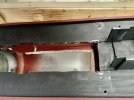
As always my intention was to convert it to Battery Operation using Fosworks kit. No fancy DCC (I do not see the worth of the loco as justifying the expense for a sound chip) so a MLS sound Unit would also be installed. But first up was to make space for the gear, battery, MLS, Rx, speed control and of course fuse and wires. Inside there was a frame top sitting just above the motor block but under this was the space for all the kit inside the boiler. So some drastic attack work with the Multi Purpose Saw got me inside the space. You can see the space made below.
AA18FAAD-1516-4CBE-8299-7E521903AC34.jpeg
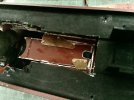
Here I have drilled and tapped the cutout using 10ba screws using some off-cut brass to hold the cutout in place, this will hold the sundry electrical bits in place. As can be seen on the left even more space had to be hacked out to get my 8aa NiMh Battery Pack to fit in.
3B57C50E-3B08-4EF4-944D-913CD71E6EFD.jpeg
 
Last edited:
JonD, what a nice loco and what a coincidence!
I also won last year a GRSUK Kit (unbuild) for an 0-6-0 chassis. Now I'm looking for a chassis that fits.
Are you happy so far with the piko gear? Is it from the BR 80 or from the Mini-Mogul (small wheels)?
And - how did you model the cylinders / valve gears?
 
That's a nice kit. I love that cab detail. No doubt you are going to model it an an inside cylinder loco so that there is no need to model the cylinders and valve gear.

Regards
Peter Lucas
MyLocoSound
 
JonD, what a nice loco and what a coincidence!
I also won last year a GRSUK Kit (unbuild) for an 0-6-0 chassis. Now I'm looking for a chassis that fits.
Are you happy so far with the piko gear? Is it from the BR 80 or from the Mini-Mogul (small wheels)?
And - how did you model the cylinders / valve gears?
It came as an inside cylinder loco so no need to add that, many small Industrials like this had inside cylinders so quite happy. Not sure of the parentage of the chassis, might be from the 0-6-0 german tank but fairly newish as it has nice plated wheels. Runs just fine though a bit of a knock which I attributed to an out of sync wheel but when I got inside for a look there are no gears to the centre wheel so I guess it is the flop in the centre of the connecting rods. Not a real issue for me as it sounds like a lightly banging big end on the real thing. Oh whilst I was inside I removed the remaining pickup wires and screws. Not needed for a battery conversion and they can cause drag.

So a bit more on the work to date.
Below you can see the amount of meat cut out below the tank. This has been made back good with the original material at the front end and new plasticard in front of the cab to represent a larger firebox. Pics later will show that work. All being slightly outside of the original location for interior space.
BA3EA785-3761-4BF3-8B42-EA23C76265C5.jpeg
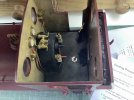
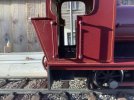
I agonised long and hard where to put the on/off switch and charging socket. Most options resulted in either having to make something to hide them or visible wire or both. A compromise was made by having the switch in the cab as the roof easily lifts off for access and the charge socket below the cab, this is partially hidden by the steps and high enough up to be pretty well invisible from normal viewing. The wires from both are inside the frame so that is fine also.
DFDA758D-EE15-4852-B2F6-B0CCE5DF23AC.jpeg
This pic shows the nicely detailed cab interior.
6BB18F49-60A6-4FE3-BE7B-64EBA9FF537E.jpeg
A couple of figures in the cab and a spot of heat shrink will nicely loose the switch.
7C671478-C774-4465-B57D-188875B087A9.jpeg
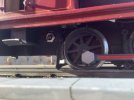
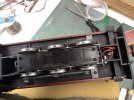
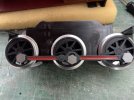
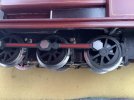
The brake levers and connecting wire were a bit of a pain, above you can see the revision but as bought they had wires across the chassis wheel holding plate thus making access to the gears impossible. You can just make out below how the wires crossed the chassis. Worse still the brake gear dragged along the track causing issues on some of the not perfect levels and joints. This can be seen above and below.
47AE13EB-F0A4-47BE-AFD2-F6A7C2C20434.jpeg
6AFDCE66-7C0F-4FCE-8343-4C2F7F0B130B.jpeg
The brake gear was fitted onto brass rod fitted in holes drilled into the chassis, something that I did not wish to emulate!
9D764B38-4FD1-452F-AFCB-27CD03C60290.jpeg
So I came up with a stunning plan to Silver Solder the small pieces to flat metal squares pre drilled for that process and cleaned up flat on the rear to PowerBond 802 onto the chassis. I first made a small key for the glue to hold using light emery where the pieces would fit just above the holes. A quick soldering job had everything held in place for the centre 2 sets of brake gear. The rear piece was left with its cross pieces which were 802’d to the rear of the chassis and secured with extra pieces of plasticard thin strips either side. That was soldered to the original wire making the whole thing pretty secure. So the lower pics show this set up as done and out on the line.0CB42049-1525-4068-8EF6-546CF6AD1064.jpeg
F50EEF6D-D0F0-4CAA-849D-693956AC4451.jpeg
Looking at the pic above she looks a little bit lacking in detail so I am now busy looking at varying pics of Locs to see what can be done. I feel the following a starter:-
Bell somewhere
Front Footsteps
Reversing Lever
Piping for the Vac setup
Brake actuating cylinder
Westinghouse?
Driver and Fireman
That is as far as I go for now, clearly there will be some painting to do and I think that matt black below the tanks on all of the bodges will be called for.
 
Last edited:
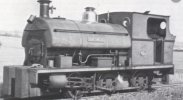
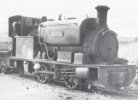
I have been working out what sort of detail to put on the little beast and as ever a look at some pics of suitable locs always gives some inspiration in addition to my list in Post the previous post. These two locs gave inspiration from a UK perspective.
49048A9A-52DF-42D5-84FD-0815B45EB569.jpeg17C58994-AAD0-471B-B396-1B3BA66BB26B.jpeg
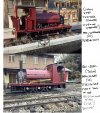
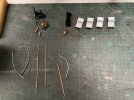
That plus my other ramblings gave me to ideas to rough up this little lot.
6A986A67-9E73-45C5-8BAF-14D6B8CFFC4B.jpeg
A trip to the loft this morning, I knew there was a reason for tidying up all that stuff in the loft and putting it in boxes. Found these bits and bobs from Stainz and the LGB US 2-4-0’s ref 20232 that had donated their chassis to my Mallet Bodge. Not sure where the white bits came from, but they were spirited away for footsteps, looks like their spday has come and I still have a small number left.
92464719-5AB5-45E5-AF64-3B202BA52B29.jpegWhen I use the silver and brass colored parts I will stuff them in small diameter bkack heat-shrink to ensure that they do indeed stay black for the rest of their days.
 
When I use the silver and brass coloured parts I will stuff them in small diameter black heat-shrink to ensure that they do indeed stay black for the rest of their days.
Jon, inspiration, I have piece of detailing I wish to fix on my 10-wheeler, and I think heat-shrink is just the fix I need, many thanks :)
 
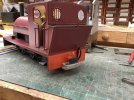
This has been in the workshop waiting for couplings which have now arrived. Being Brandbright RSA46 Loop Buffer Couplings, these are perfect for LGB and will also work for the average 16mm stock as well so are very versatile if somewhat large. They are my coupling of choice for my Live Steamers and any other locomotives that do not take LGB loops. But they do being margarine metal require some clean up and of course a good paint. They will be sprayed with etching primer first then either black or perhaps red as per the rest of the buffer beam. But they also needed a little modification to sit just below the existing buffer to couple correct to LGB hooks and the close up pic shows the abuses metered out to achieve this. But also shows the sanding with emery to give a good clean finish.
3A089DCD-62FF-4D99-8294-18AF2B61CE66.jpeg0AA7524A-8745-438F-BF26-91B651744B21.jpeg
I have drilled through the existing hole in the coupling so that a hook can be placed in to enable 16mm stock coupling. This will replicate the existing hook but be somewhat longer. Seen below using the original hook to demonstrate the job. This shows just how chunky those couplings are, in my case a need of practicality rather than looks.
3786ED88-8994-4029-8983-3D73F4ADE1DF.jpeg
Oh dear I have just noticed another job, the grills on the right rear window must have got lost at some time in the past, likely before I got the loco. Never mind that can be attended to.
 
Way back in the mists of time, we used to have fibreglass brush sticks for cleaning up white metal - I have looked for mine on a number of occasions, but it appears to be accompanying Phil's lump hammer :oops::oops:
 
Can you explain (and perhaps give a link) defining "margarine metal"? Here we have castings in "pot metal" which is usually a low grade/quality of zinc, or other low melting point metals.

Greg
:D:D

At a guess I'd say Jon is talking about what, over here, is called white metal. It used to contain lead, but the safety elves have put paid to that, so a lot of the castings are now made in pewter (equally vague description).

White metal was easy to cast and inevitably soft, but also frequently had surface blemishes. It could be soldered with 80 degree solder, and I used to construct 00 (4mm : 1ft) white metal steam locomotive kits to order for the Model Shop in Guildford as I lived in Surrey.

The 'margarine' reference is probably due to the softness of the cast item - but I'll leave Jon to confirm - I reckon it's his colloquialism for what you call pot metal :nod::nod:
 
Pewter has changed over the years, but it should follow this definition:

Pewter is a malleable metal alloy composed of 85–99% tin, mixed with approximately 5–10% antimony, 2% copper, bismuth, and sometimes silver. Copper and antimony act as hardeners but may be replaced with lead in lower grades of pewter, imparting a bluish tint.

But, often we call stuff like this "pot metal": (indicating not real consistent, high quality, etc)

Pot metal, also known as monkey metal, white metal or die-cast zinc, is a colloquial term that refers to alloys that consist of inexpensive, low-melting point metals used to make fast, inexpensive castings. The term "pot metal" came about due to the practice at automobile factories in the early 20th century of gathering up all non-ferrous metal scraps from the manufacturing processes and throwing them into one pot to be melted and then formed into cast products. A small amount of iron made it into the castings, but generally too much iron raised the melting point too much, so it was minimized. There is no scientific metallurgical standard for pot metal; common metals in pot metal include zinc, lead, copper, tin, magnesium, aluminium, iron, and cadmium. The primary advantage of pot metal is that it is quick and easy to cast. Due to its low melting temperature no sophisticated foundry equipment is needed and specialized molds are not necessary. It is sometimes used to experiment with molds and ideas before using metals of higher quality. Examples of items created from pot metal include toys, furniture fittings, tool parts, electronics components, and automotive parts.
 
Mazak? - Similar thing I think?
Used for pre-war diecasts such as Hornby locos (wheels, coupling rods) and Dinky Toys. Any impurities, even in small amounts, cause it to crumble with age and parts or items will collapse under their own weight.
 
Mazak a UK brand name for Zamak. Zamak is a high strength zinc alloy...

The alloy Zama, or rather, Zamak alloys were developed in 1929 by the New Jersey Zinc Company. The name ZAMAK is composed by the German initials of the elements that compose the alloy, namely:
Z (Zinc), A (Aluminium), MA (Magnesium), K (Kupfer - copper)

Greg
 
:D:D

At a guess I'd say Jon is talking about what, over here, is called white metal. It used to contain lead, but the safety elves have put paid to that, so a lot of the castings are now made in pewter (equally vague description).

White metal was easy to cast and inevitably soft, but also frequently had surface blemishes. It could be soldered with 80 degree solder, and I used to construct 00 (4mm : 1ft) white metal steam locomotive kits to order for the Model Shop in Guildford as I lived in Surrey.

The 'margarine' reference is probably due to the softness of the cast item - but I'll leave Jon to confirm - I reckon it's his colloquialism for what you call pot metal :nod::nod:
Yup that is the stuff, think what I had may be what it normally was but not sure. Built lots of kits in TT with it that transformed a Tri-ang Chassis into a really good runner and puller. Bec of Tooting and later North Wales were the chief architects of its use for TT, sadly the owner of the business died of lead poisoning I believe. I think that Mazak though similar is somewhat different as stated in terms of mix. Not tried soldering the stuff that Brandbright use, never hed the need as kit manufacturing has moved on some since the old margarine metal days. Who would have thought of brass etching, wood etching and now 3d printing back in the 60’s. How things have moved along.
 
Mazak a UK brand name for Zamak. Zamak is a high strength zinc alloy...

The alloy Zama, or rather, Zamak alloys were developed in 1929 by the New Jersey Zinc Company. The name ZAMAK is composed by the German initials of the elements that compose the alloy, namely:
Z (Zinc), A (Aluminium), MA (Magnesium), K (Kupfer - copper)

Greg
It may be in its purest from, but note what I said, "Any impurities, even in small amounts, cause it to crumble with age and parts or items will collapse under their own weight."
 
The word Mazak was often used in a derogatory way to describe such material as being inferior.
 
Mazak was the official name given to the equivalent to Zamak in the UK due to licensing, as Greg has already point out, and it would seem was widely misunderstood, I even recall as a youngster my father calling zinc alloy s%*t metal.
 
Back
Top