TinkerCAD

ge_rik

British narrow gauge (esp. Southwold and W&LLR)
Country flag
A thumbs-up from me for TinkerCAD. I wanted to create some window frames for my next model building and after spending a day and half drawing fairly simple frames in SketchUp and finding repeatedly they were unprintable (as was my language!) because they were internally inconsistent, I looked around for an alternative 3D drawing package which a mere mortal such as myself could use.

TinkerCAD came to my rescue.

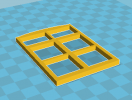
It's an online tool which has been designed for kids to use. OK - it doesn't have all the fancy bells and whistles of SketchUp or FreeCAD, but within an hour I had managed to draw my first window frame - and what's more, I exported it as a .stl file and it imported into my slicer software (Cura) with no problem. Within another couple of hours I had followed a couple of really great online tutorials and discovered it does actually have some clever tricks up its sleeve.


For fairly basic drawing tasks, I would thoroughly recommend it - it doesn't require a degree in computer engineering to learn how to use it.

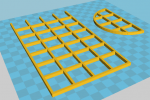
And here are the outcomes just to prove it....
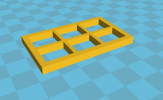
small_window.png


Medium window.png

Large window.png

Rik
 
Thanks for the info and links Rik, TinkerCad account created, on the to do list for later....
 
Thanks for that., it's a learning curve, I want to draw a line, but keep getting blocks, cubes ect.
 
Thanks for that., it's a learning curve, I want to draw a line, but keep getting blocks, cubes ect.
Hi Mike
That's one of the clever things about it. It won't let you draw a line. 3D printers don't like lines, they can't be printed, so you have to draw a 3D object which are things 3D printers can print.

My window frames were made mostly with cubes. Once you've got a cube on the workplate, you can use the handles on the edges and corners to re-size it down to a thin bar or beam. I'd thoroughly recommend watching the second of the video tutorials on the other link. These tutorials really are helpful.

Rik
 
Last edited:
I think that the problem with SketchUp is that it was designed before 3d printers were invented and so it's dead easy for its drawing tools to produce things which 3d printers can't handle, such as stray lines and hidden planes. It's a really sophisticated program and, considering it's free, it is marvellous what it can do. However, TinkerCAD has been designed specifically for producing drawings for 3d printers and so it won't let you draw something which is unprintable (famous last words!). Once you get your head around its key concepts, it really is simple to use. The first step is the biggest, but after that it's quite a shallow learning curve.

Rik
 
I would agree with Rik's sentiments on Sketch-up, I've tried it a couple of times but it became quite quickly apparent it wasn't built to do what I wanted. It seems to work fine for artsy stuff where it just needs to look good rendered on a screen (even as a 3d model in a computer game) but couldn't quite stretch to manufacturing.

I've not tried TinkerCAD but I will have a play around when I get the chance. The common method through all of the CAD programs I have used is that your 2D and 3D are seperate entities. You first draw a 2D sketch, it could be the whole window frame when looked at straight on or a single bar, and then extrude (or project) this into a 3D shape. Both the 2D and 3D can be editied seperately but once the 3D exists the program should push the 2D sketch to the back of its mind.

This is because the traditional reason for the 3D models are to build 2D engineering drawings, usually a seperate program within the program. These drawing programs usually only pick up on the edges of 3D shapes, so that 2D surfaces or sketches that might exist in the 3D model for construction purposes don't make their way onto the drawing. The same happens when creating a .stl file, all the 2D parts are ignored. The file will only convert the objects with 'mass'.

Confusingly it is possible to create 3D shapes using 2D surfaces. You can have a cube made up of 6 2D squares, like it's a folded paper box. I think this is where SketchUp falls down as it is trying to output the models as a collection of 2D sufaces. This is fine if the model is going to live in the machine forever, but not useful if you want to manufacture it. The program trying to create the .stl still can't see any 3D shapes. To make matters even more confusing, in more complex CAD programs when you extrude/project your 2D sketch, it is usually possible to swap between extruding a 3D solid and a 2D surface by clicking one button.
 
Last edited:
Hi Mike
That's one of the clever things about it. It won't let you draw a line. 3D printers don't like lines, they can't be printed, so you have to draw a 3D object which are things 3D printers can print.

My window frames were made mostly with cubes. Once you've got a cube on the workplate, you can use the handles on the edges and corners to re-size it down to a thin bar or beam. I'd thoroughly recommend watching the second of the video tutorials on the other link. These tutorials really are helpful.

Rik
Noting that thus far you have managed straight cubes, have you managed say a curved top window frame yet, or is thatbthe next learning process?
 
Noting that thus far you have managed straight cubes, have you managed say a curved top window frame yet, or is that the next learning process?
Straight cubes (or cuboids) are the easy bit. You're right, the curved part of the frame is the next step. A couple of ways to do it. You can use the tube shape and then cut it in half or use the curved roof and cut a semicircle off it.

I really like the way you make cuts - in effect you make a shape into a "hole". Then position the "hole" shape on the object you want to be sliced and then group them into a single shape. That way the hole is cut into the shape. The video tutorials demonstrate it well.

Rik
Hm sounds complicated but sure that the vids will be a great leader into doing it. YT is a great resource, one thing I would never have have got to grips with being Deltang without your YT vids.
 
I've now created a little tutorial on my blog showing how to draw a window frame - hopefully the techniques involved will be transferable to drawing other things.

Rik
 
Back
Top