You are using an out of date browser. It may not display this or other websites correctly.
You should upgrade or use an alternative browser.
You should upgrade or use an alternative browser.
08 Shunter
- Thread starter DGE-Railroad
- Start date
Many of the mad colour schemes have been created either just before and certainly since privatisation in 1994. Thus prior to that your only choices were Black, Green and BR Railblue with a selection of yellow ends depending on date. But the YE’s were not always applied at the time of requirement so pictures of the relevant date are necessary to get it right.Good grief. I thought I had sorted out colours from the various image searches I'd done - green with red rods, blue with yellow. Clearly not!
Along with the grille options there are a myriad of combinations. It's as if companies could select the colour of parts at the point of purchase
Rhos Helyg Loco Works
Registered
And for blue locos watch out too for buffer beam colour (black, yellow, blue, brown), underframe colour (black or brown), cab roof (blue or black), position of double arrows (bonnet side, cab side, battery boxes), etc., etc.Good grief. I thought I had sorted out colours from the various image searches I'd done - green with red rods, blue with yellow. Clearly not!
D4100 with brown frames, black springs, blue buffers and beams: http://rcts-shop.org.uk/cache/photographs/mystery/WRD00133.780.jpg
Rhinochugger
Retired Oik
That's interesting because, unless the camera lies, that doesn't look like the 1970s 'rail' blueAnd for blue locos watch out too for buffer beam colour (black, yellow, blue, brown), underframe colour (black or brown), cab roof (blue or black), position of double arrows (bonnet side, cab side, battery boxes), etc., etc.
D4100 with brown frames, black springs, blue buffers and beams: http://rcts-shop.org.uk/cache/photographs/mystery/WRD00133.780.jpg
Ah yes, the famous 'Arrow of Indecision' logo
Rhinochugger
Retired Oik
.......... and latterly, they didOf course you mustn't forget Rule 8, it's their engine, they can paint whatever colour they want
DGE-Railroad
The Orchard Line
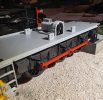
A little bit more progress


The motion is buttery smooth!
Motion test
the radiator is done and i took the precaution of printing off a second set of rods in the same colour while the filament was loaded
It will need to get its stripes when I'm feeling brave enough

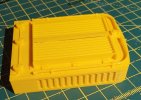
Body one of two is printing at the moment.


The motion is buttery smooth!
Motion test
the radiator is done and i took the precaution of printing off a second set of rods in the same colour while the filament was loaded
It will need to get its stripes when I'm feeling brave enough

Body one of two is printing at the moment.
Rhinochugger
Retired Oik
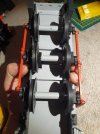
Erm, I don't know how to tell you this ....................... but the left hand (or right hand in the inverted picture) coupling rod is upside down 
While you're at it, it's worth checking that the knuckle joint in the coupling rod should be the cab-side of the centre axle

While you're at it, it's worth checking that the knuckle joint in the coupling rod should be the cab-side of the centre axle
DGE-Railroad
The Orchard Line
Corrected! Thanks for the spotErm, I don't know how to tell you this ....................... but the left hand (or right hand in the inverted picture) coupling rod is upside down
While you're at it, it's worth checking that the knuckle joint in the coupling rod should be the cab-side of the centre axle

Rhinochugger
Retired Oik
Coupling rods have been my second fetish (after wheels that is) after my unsuccessful dabblings in loco springing / sprung axle boxes and so on. The simple reason being that if your loco is going to have sprung axle boxes, then the coupling rods need to flex as per the prototype. Inevitably, once you start cogitating on those lines, the eye is drawn to such things ....................... 

For those of us with tiny minds, it keeps us amused
For those of us with tiny minds, it keeps us amused
trammayo
Interested in vintage commercial vehicle, trams, t
I'd have you know that my mind isn't tiny - it's just full of blanks!Coupling rods have been my second fetish (after wheels that is) after my unsuccessful dabblings in loco springing / sprung axle boxes and so on. The simple reason being that if your loco is going to have sprung axle boxes, then the coupling rods need to flex as per the prototype. Inevitably, once you start cogitating on those lines, the eye is drawn to such things .......................
For those of us with tiny minds, it keeps us amused
Fezwig
Just a man in the middle of a complicated plan.
Superb model, I'd find a photo of a loco you want as we're just scratching the surface of variations, some that are air and vacuum braked had an extra compressor on the right hand side, as for buffers, some had the standard sprung buffers or hydraulic Oleo buffers and locos that worked in yards with tight curves may have oval buffers to prevent buffer locking, this could vary for either end of a loco!
350s as we called them also had a top speed of 15 mph, do 20 and you risked bending the side rods had a job to take one from Warrington to Dee Marsh (Shotton steel works) took us 2 days
One thing you must add at the front is a shunting pole and a few tail lamps ready for putting on trains and as most locks had a screw coupling, a 3 link coupling hung over the coupling hook as this was easier for the shunter to swing with the shunting pole.
350s as we called them also had a top speed of 15 mph, do 20 and you risked bending the side rods
One thing you must add at the front is a shunting pole and a few tail lamps ready for putting on trains and as most locks had a screw coupling, a 3 link coupling hung over the coupling hook as this was easier for the shunter to swing with the shunting pole.
3 minutes of fame
3d printing, electronics and trams
No major issue printing flat parts like that in abs.The only red filament I have to hand is ABS, which I've never printed with but know its challenging without an enclosure. I opted for primer and paint for the red parts but may try the ABS and see how I get on. They're only small parts...
I've been specifically choosing matt filaments recently and much prefer the finish from them!
Run the bed quite hot, make sure the printer is in a nice warm environment and use a good bed surface like Print tac.
I find that abs is in some ways easier to print, as it's less stringy and easier to sand and file as well.
That being said, I think I would always make functional parts from metal or a more wear resistant material. I can foresee those rods needing replacement as the holes grow...
In BR pre TOPS days we just used to call these 350’s. But must add the Southern variant 09 (TOPS coding now) which was a modified version for higher speed Trip working 27.5 according to Wiki. Then there were class 10 variants (nit sure what the difference was with them) and finally the master and slave class 13 for hump shunting at Tinsley Yard near Sheffield.Superb model, I'd find a photo of a loco you want as we're just scratching the surface of variations, some that are air and vacuum braked had an extra compressor on the right hand side, as for buffers, some had the standard sprung buffers or hydraulic Oleo buffers and locos that worked in yards with tight curves may have oval buffers to prevent buffer locking, this could vary for either end of a loco!
350s as we called them also had a top speed of 15 mph, do 20 and you risked bending the side rodshad a job to take one from Warrington to Dee Marsh (Shotton steel works) took us 2 days
One thing you must add at the front is a shunting pole and a few tail lamps ready for putting on trains and as most locks had a screw coupling, a 3 link coupling hung over the coupling hook as this was easier for the shunter to swing with the shunting pole.
Turn the irritating sound down if you watch this!
DGE-Railroad
The Orchard Line
Fan off too?No major issue printing flat parts like that in abs.
Run the bed quite hot, make sure the printer is in a nice warm environment and use a good bed surface like Print tac.
I find that abs is in some ways easier to print, as it's less stringy and easier to sand and file as well.
That being said, I think I would always make functional parts from metal or a more wear resistant material. I can foresee those rods needing replacement as the holes grow...
This build's happening 'properly'; all moving parts are bushed! albeit with brass tubing
DGE-Railroad
The Orchard Line
Rhinochugger
Retired Oik
DGE-Railroad
The Orchard Line
And far too clean to have done any work!Very smart, but I think you'll find that it's an 09 going at that speed
