3d printed snowplough

But we all know that if you make one, we won't ever see snow again :giggle::giggle::giggle:
Take a 20 meters hose and a high-pressure cleaner, stand on a roof.
Wait for -5C, point upwards and let it go----->snow

Water needs to be at freezing point, that why the long hose.
Water needs time to crystalize, so that's why you need to stand on a roof.

Moving water wont turn to ice as long as it is moving.
Make sure before you conduct that experiment all is empty and below 0C temps before running.
How to create Ski runs in Holland. All you now need is some hills!
 
this what you need, i run out sorry, otherwise you could have some.

to give a idea.
In the need for electronics? please let me know, cous that is quite a list.
Igor,

I ordered 20 pcs P1560B and got them a few days ago! No problems with customs.
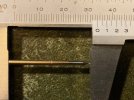
The pins are 2,5 mm diam and at the shortest 26,7 mm and the longest 34 mm , so the shortest will easily fit between the wheelaxis and the sleepers.
The max force to push them in is about 3 Newton (0,3 kgforce).
So lets assume with 4 wheels all active hitting with 4 pins on a sleeper a vertical weight of 1,2 kg should be needed to prevent the whole uplift of the loco.
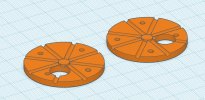
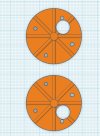
I designed the wheel that holds the 8 pins using two halves that will contain the 8 pins.
This wheel will be fitted to the loco wheel with 4 screws.

This is a 3D view of the 2 wheel halves

Two halves of a wheel for 8 pins.jpg

This is one of the pins from Ali-express at max length

Max length pin.jpg
 

Attachments

  • ScreenHunter_1470 Jan. 31 18.04.jpg
    ScreenHunter_1470 Jan. 31 18.04.jpg
    54.7 KB · Views: 0
Take a 20 meters hose and a high-pressure cleaner, stand on a roof.
Wait for -5C, point upwards and let it go----->snow

Water needs to be at freezing point, that why the long hose.
Water needs time to crystalize, so that's why you need to stand on a roof.

Moving water wont turn to ice as long as it is moving.
Make sure before you conduct that experiment all is empty and below 0C temps before running.
Create snow? Snow is best left to other countries, not England
 
Step by step I am working on my spike driven snowplow!
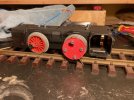
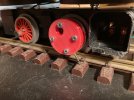
See below the red extra plastic wheel mounted to the wheel driven by the engine.
Photo at the top shows the situation when the spike gets between two sleepers and the photo below shows the spike partly impressed when the hitting the top of the sleeper.
To give the spikes enough room to move all around I had to remove part of the battery compartment.
That is no problem since it will not be in use and I plan to remove it anyway.
I also plan to remount the wheel using the bolds in a reverse direction so the nuts can be mounted at the outside more easy.

Further news: no snow yet here!

IMG_9279.jpgIMG_9281.jpg
 
But we all know that if you make one, we won't ever see snow again :giggle::giggle::giggle:
I saw snow once not that impressed with it, travelled for days just to get to the snow fields. SWMBO marked it off her bucket list; Saw snow, made snowball and threw it at hubby-Check.
I see more "snow" in my freezer when it need defrosting, mind you it does not last in the 35C heat we are having at the moment. ;););)
 
Imagine this would need a decent bit of weight in it to stick to the track, like it

Looks great! Can you show us a video with the snow plow in action?
I printed the same plough from Thingiverse - completing the print and assembly just after the latest snow had melted away. However, although the chassis print was not hugely nice, it built up well enough for a trial run, brushing a few leaves out of the way. I built it with LGB metal wheels which gives it quite a reasonable weight but I will add some lead in the back section.

A short video of the trial at WIRL WIRL snowplough trial
My pal puts his snowplough on an LGB open wagon with a brick in it to add weight! His Stainz though will not manage to get it through drifts, but double Swiss locomotives generally tend to manage ok.
 
A brick seems to me a reasonable weight for the shovel task.
The front of the shovel should keep contact with the track for preventing any ice under the wheels.
However when making the edge of the shovel too sharp it will stick in front of any significant height difference between separate parts of the track.
So still a lot of bears on the road!
 
Back
Top