Henri
refuses to grow up
Exactly these! Thanks for your correction! I have three sets in different shapes and even sizes.
Exactly these! Thanks for your correction! I have three sets in different shapes and even sizes.
A bit embarrassing: I have quite a few of these, but I've never had the imagination, patience and diligence to use them as well as Henri. Time I learned, I reckon,
We shall see if the fat fingers can manage it - this loco is my practice piece before seriously bashing the 218. Expensive thread this - I've already put in a couple of Amazon orders for the right kit, as recommended above!Chain drilling and widening out with a file also works well.
Just mark the circle with a pencil in a compas. Drill smaller holes all round just clear of inside the line BUT NICE AND SLOW so as not to melt the plastic.
Then you can carefully with a craft knife join the holes to get the centre out and then carefully file out the waste to your perfectly formed hole.
As a rule many of the quicker methods can end up with trashed or melted plastic.
Slowly slowly catchy monkey.
Interesting - like a standard step drill but with a modified profile, which I would imagine makes a more sensitive cut. I've not seen that in the UK.Hello from France. I have tried a lot of kludge but this tool is THE tool for plasticard: turn VERY slowly by hand in a first hole of 5 mm.
View attachment 304369View attachment 304369
Oh why did I forget that, have a set that I bought in Aldi plus one that Steve at Fosworks kindly sent me when I needed one for work on my Gauge 1 Terrier.Interesting - like a standard step drill but with a modified profile, which I would imagine makes a more sensitive cut. I've not seen that in the UK.

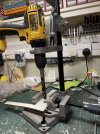
Oh Brad Point Drill, never heard that term before. I had thought that they were wood drills, certainly all of my Brad Points are in a box marked wood drills.Well, it worked! I prefer to invest in tools which can be used for several purposes in the future, and so a drill stand and new brad point drill bit seemed the most attractive option for me to try first, from all the excellent ideas above. My DeWalt cordless is designed to be used in a stand and although it does not have a latching trigger, for my first test on a gash bit of foamboard, it was easy to operate it with my left hand, achieving a really slow speed, and pull down the lever with the other. So that's the 'porthole' windows sorted, and I'll try the chain drilling and filing technique on the weirder shapes, in due course.
View attachment 304403
Possibly a term imported from over the pond, a bit like "brad", which I believe is a sort of nail or panel pin.Oh Brad Point Drill, never heard that term before. I had thought that they were wood drills, certainly all of my Brad Points are in a box marked wood drills.
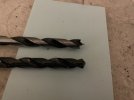
Have to say, I had never appreciated the difference, doing DIY, when one twist drill is much like another and I am usually only looking for a bit the right size which I haven't already blunted, but this is the difference, the brad point making it easier to position in a hole begun with a bradawl or punch.Oh Brad Point Drill, never heard that term before. I had thought that they were wood drills, certainly all of my Brad Points are in a box marked wood drills.

I think the brad point for wood drills is an addition to centre a hole easier as a traditional centre punch would likely cause damage with wood. Also likely that it would blunt the point of the punch as I have found using metal drills for wood is not good practice.Have to say, I had never appreciated the difference, doing DIY, when one twist drill is much like another and I am usually only looking for a bit the right size which I haven't already blunted, but this is the difference, the brad point making it easier to position in a hole begun with a bradawl or punch.
View attachment 304435
Incidentally, these are from a small set from your favourite tool supplier - Aldi
All my drill are made of metal, the wooden and plastic one just would not cut itI have found using metal drills for wood is not good practice.
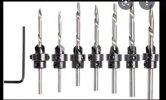
That D one is an interesting variation, never seen one of them before. One that can be added are the adjustable Countersink Wood drills and from my quick search just now many many more!The three-point drill, the most widespread and precise because they are the wicks that are used in carpentry on all small diameter holes. These drills have three points, a central point and two points on the edges that trace the circle before drilling.
View attachment 304458

The B is the big motha f(peep)r we used assembling our veranda. My neighbour had one inhertited from his grandpa. Rusted to the max but boy did it drill holes!!The three-point drill, the most widespread and precise because they are the wicks that are used in carpentry on all small diameter holes. These drills have three points, a central point and two points on the edges that trace the circle before drilling.
View attachment 304458

