You are using an out of date browser. It may not display this or other websites correctly.
You should upgrade or use an alternative browser.
You should upgrade or use an alternative browser.
Backer & Rueb RTM Steamtram loco
- Thread starter Henri
- Start date
idlemarvel
Neither idle nor a marvel
You can get plastic model rivet heads which are a pain to apply but very realistic. I forget the supplier name, maybe someone else will remember while I have a search.
EDIT found it,Cambrian Models (UK), £2 for 230
16mm Loco, Coach & Wagon Fittings
Or blobs of glue work well, see this.
EDIT found it,Cambrian Models (UK), £2 for 230
16mm Loco, Coach & Wagon Fittings
Or blobs of glue work well, see this.
Last edited:
Rhinochugger
Retired Oik
Cambrian models here in the UK - cheap as chips and easily solvent weld applied to plastikard / styrene sheet 


idlemarvel
Neither idle nor a marvel
Our postings crossed in the ether
 Rhinochugger
Fred2179G
Registered
Here in the US there is Tichy and Grandt Line making plastic rivets. Alan at G.A.L. uses them. He laser cuts the parts including the holes for the rivets.Cambrian models here in the UK - cheap as chips and easily solvent weld applied to plastikard / styrene sheet

Rhinochugger
Retired Oik
Yes, I have also been frequently tempted by the 1:20.3 box car - I haven't yet succumbedHere in the US there is Tichy and Grandt Line making plastic rivets. Alan at G.A.L. uses them. He laser cuts the parts including the holes for the rivets.

That Glue method will really work in our scale. Would not want to do it for a Tender say, but fine for a modest area. Well worth a look at the vid if you have not yet.You can get plastic model rivet heads which are a pain to apply but very realistic. I forget the supplier name, maybe someone else will remember while I have a search.
EDIT found it,Cambrian Models (UK), £2 for 230
16mm Loco, Coach & Wagon Fittings
Or blobs of glue work well, see this.
'White glue' tends to refer to PVA glue.. You would need a waterproof-type, and would only be able to do one face of the loco at a time. - It would need to be horizontal, so the glue does not run.
Others have used 'super glue' to similar effect.
The nails are a bit big.. You can get short pins, used in 'craft kits' to hold sequins on foam shapes:
craft pins for sequins | eBay
Others have used 'super glue' to similar effect.
The nails are a bit big.. You can get short pins, used in 'craft kits' to hold sequins on foam shapes:
craft pins for sequins | eBay
D
Deleted member 4232
Guest
Moved
Last edited by a moderator:
Rhinochugger
Retired Oik
The nails are a bit big..
Peco track pins are pretty good and cheap, but if you use a lot of them you end up with a very heavy model
Paulus
Registered
Great work Henry! Looks like a very sharp and clean build. I love the detail you put in it. Looking forward to see the end result.
RTM Ouddorp is building a 1:1 scale replica of the exact same engine: loc 37 - Website RTM
RTM Ouddorp is building a 1:1 scale replica of the exact same engine: loc 37 - Website RTM
Henri
refuses to grow up
Thanks! Yes, I know the '37'...
And here we have a tiny error... The TramFabriek (famous for their HO scale trams) made a few signs for my Backer & Rueb and I did order nr. 37. Not knowing then the 37 was NOT a Backer & Rueb, but a Werkspoor! With completely different shields! So now I ordered number 16, the first 'square' Backer & Rueb built for the RTM.
Oh and it looked SO GOOD already... No one would ever notice the error, but hey, I do know...

Very nice detail etchings even with the minor error. Well worthwhile for the effort you are putting into the Stoomtram.Thanks! Yes, I know the '37'...
And here we have a tiny error... The TramFabriek (famous for their HO scale trams) made a few signs for my Backer & Rueb and I did order nr. 37. Not knowing then the 37 was NOT a Backer & Rueb, but a Werkspoor! With completely different shields! So now I ordered number 16, the first 'square' Backer & Rueb built for the RTM.
Oh and it looked SO GOOD already... No one would ever notice the error, but hey, I do know...
View attachment 249628
Henri
refuses to grow up
So sometimes one little pesky detail can ruin the fun of a project. In this case it was the first roof I made. I used too thin plasticard so all kinds of wobbles appeared. Bummer!!!
Well after a very inspiring visit to the RTM museum with my dad last weekend, I decided to get the roof redone. I peeled off the old sheet and glued a thicker one. It is now waiting for the glue to dry.
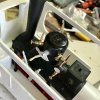
Furthermore I got a bag full of g scale parts from a friend, that included many valves. I couldnt help to add a few and two meters. As there is almost no documentation, I just went ahead and made something that looks realistic.
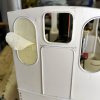
Another problem was solved by making SuC individual windows out of plexiglass. One is finished.
Oh the work. And countless hours! But it is so rewarding!!


