You are using an out of date browser. It may not display this or other websites correctly.
You should upgrade or use an alternative browser.
You should upgrade or use an alternative browser.
Battery Conversion of a Ten Wheeler
- Thread starter JimmyB
- Start date
Rhinochugger
Retired Oik
Yeah, I'm going to ask him to do mine - you don't want to look inside my battery conversionsThat's a very tidy job. Nice one.
Regards
Peter Lucas
MyLocoSound
JimmyB
Now retired - trains and fishing
JimmyB
Now retired - trains and fishing
Yep, moved it to the light, and you can see the grey primer just showing through in a couple of areas, shouldn't take long to strip for a quick spray, just need to get out and buy some paintAre you sure it was not reflected light from the wall?
Try moving the loco to natural light, and check..
JimmyB
Now retired - trains and fishing
The 10 wheeler is not quite finished, a little extra detail is needed, however as the whether is dry and bright I thought a quick play test run would be in order.
A couple of minor issues, the first is the "lightness" of the front bogie, a known issue so a little extra weight. The second was the chuff, I am using the Annie chuff sensor as advised connected to a MLS, and though the sound is aligned, occasionally usually when starting off I get a double chuff, and then it settles down, and again occasionally it misses a chuff, my assumption is that it is the sensor, being mechanical in principle, though any thoughts would be appreciated.
A short video of the test, pulling 2 JS coaches up my 1:25 gradient without issue, most of my other locos often struggle, and this is with a Li-Po 3S so only 11.1 volts
As you say, a mechanical chuff - trigger.
You will get a little contact-bounce and the occasional miss of a beat.
I have found (certainly, on brand new models) that the efficacy of the chuff, gets better over time.
Give the contacts a gentle clean. There is very little current involved, so the slightest bit of grease, will have an adverse effect.
PhilP
Rhinochugger
Retired Oik
As the chuff is principally mechanical, I don't know whether the MLS could act slightly strangely if the axle actually stops in the chuff actuating position.
If so, as the switch has a little bit of a dwell angle, it may give that double chuff - dunno, just guessing. I don't know if it happens on my Connie, as I've never been that alert
If so, as the switch has a little bit of a dwell angle, it may give that double chuff - dunno, just guessing. I don't know if it happens on my Connie, as I've never been that alert
Fred2179G
Registered
I advocate not adding weight. The problem is the rigid long wheelbase. Underneath there are 2 metal strips down the central spine that pick up power and align the axles. 2 nylon clips hold them in place - one has an arrow pointing forward, in case you are using track power. Remove the 2 nylon clips, and the whole thing becomes floppy and equalized. It will stay on any rough track. Mine worked for years without any additional weight.the first is the "lightness" of the front bogie, a known issue so a little extra weight
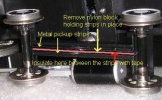
I imagine you have cut the wires. However, if you ever visit a layout with track power and want to run your loco at the same time as the track power is on, do put some insulation (electrical tape, etc.,) between the 2 metal strips, or you will upset your host by making random short circuits! Ask me how I know.
JimmyB
Now retired - trains and fishing
Fred, interesting i will look in to thisI advocate not adding weight. The problem is the rigid long wheelbase. Underneath there are 2 metal strips down the central spine that pick up power and align the axles. 2 nylon clips hold them in place - one has an arrow pointing forward, in case you are using track power. Remove the 2 nylon clips, and the whole thing becomes floppy and equalized. It will stay on any rough track. Mine worked for years without any additional weight.
View attachment 277824
I imagine you have cut the wires. However, if you ever visit a layout with track power and want to run your loco at the same time as the track power is on, do put some insulation (electrical tape, etc.,) between the 2 metal strips, or you will upset your host by making random short circuits! Ask me how I know.
Hi Jimmy
That's a really nice paint finish on your 4-6-0. Would you mind letting me know what paint you used and where you bought it from.
And secondly I was wondering who you purchased your decals from. I need some for my Connie and was hoping that I can source them in the UK. Stan Cedarleaf's decals are excellent but post and import duties are against it.
Tim
JimmyB
Now retired - trains and fishing
Hi Tim, the paint is Hycote Double Acrylic, colour is BMW Black 086 (no lacquer required) bought from The Range. The decals are from Stan, total cost inc p&p etc $58.00, the work included some page work and design, I was very happy, I just supplied my outline crest, and letting type and size. Stan then sent a proof sheet, a couple of minor adjustments. From starting an email "conversation" to receiving the finished items was less than 2 weeks.Hi Jimmy
That's a really nice paint finish on your 4-6-0. Would you mind letting me know what paint you used and where you bought it from.
And secondly I was wondering who you purchased your decals from. I need some for my Connie and was hoping that I can source them in the UK. Stan Cedarleaf's decals are excellent but post and import duties are against it.
Tim
JimmyB
Now retired - trains and fishing
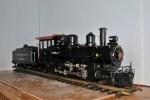
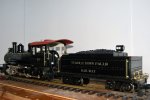
The loco has is now considered complete, a test run has been carried out but poor lighting has prevented and videos of this. Below is a photo of the complete loco, and also a link to my blog providing details, if you have any questions please ask 
Bachmann 10-Wheeler Battery Conversion – Tumble Down Falls

Bachmann 10-Wheeler Battery Conversion – Tumble Down Falls

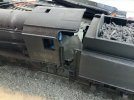
Aha Jimmy, possibly just one small job a plate between Tender and Loco. I have used Pond Liner with success, but a bit of stiff black bin liner can also work. To help with curves helpful to make the unstuck end curved. Though this is a pic of a 00 loco the concept worked on my US LGB 2-6-0.The loco has is now considered complete, a test run has been carried out but poor lighting has prevented and videos of this. Below is a photo of the complete loco, and also a link to my blog providing details, if you have any questions please ask
Bachmann 10-Wheeler Battery Conversion – Tumble Down Falls
View attachment 278416
Hi Jimmy
Sorry to keep asking, but I wonder where you sourced the ladder on the rear of the ten wheeler tender. It is just what I need.
I tried to get some paint from the Range, but they are out of stock. Will try again next week.
Lastly would you mind telling me what you used to seal Stan's decals? I just want to make sure that I don't get something that either affects the paint or the decals.
Many thanks.
Tim
JimmyB
Now retired - trains and fishing
Tim, sorry missed the question first time. The ladder came from S&D models, it is part of a kit for Bachmann Caboose, the paint is Rustoleum Crystal Clear, however having had issues previously, leave to dry for a few weeks.Hi Jimmy
Sorry to keep asking, but I wonder where you sourced the ladder on the rear of the ten wheeler tender. It is just what I need.
I tried to get some paint from the Range, but they are out of stock. Will try again next week.
Lastly would you mind telling me what you used to seal Stan's decals? I just want to make sure that I don't get something that either affects the paint or the decals.
Many thanks.
Tim
JimmyB
Now retired - trains and fishing
Having run the 10-wheeler a few times, I found that with the LiPo 3S 11.1 volts, I was running on or near full throttle, which did not mean i had any "extra" power. So I decided that I would move to a 4S Li-Ion, taking consideration of the safety concerns of the soft shell LiPo. The current Rx is a Deltang Rx66, and as most of you are aware don't like much over 13 volts, so I decided that I would go for the Micron MR001a and a Mtronix Viper 10A HV ESC. I also decided to go for the premium MLS sound card.
As advised the downside to the viper is the heavy duty wires, and fixed end connectors, however some adaptation and it still fits and works:
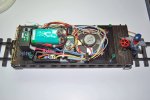
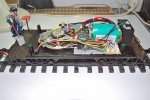
All my electronics are held in place by Velcro, which allows removal and repositioning.
As advised the downside to the viper is the heavy duty wires, and fixed end connectors, however some adaptation and it still fits and works:


All my electronics are held in place by Velcro, which allows removal and repositioning.

