G Scale Tram Project

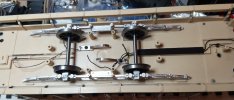
Some real progress, we now have a working truck for the Bachmann tram, sorry for the long pauses but I haven't yet been passed out as a motorman for this power unit.

A little bit of cleaning up to do before its painted tomorrow, if the weather holds, then the truck can be fitted to the tram body in its permanent arrangement.

If you could see me sat here typing you would see a very happy face.

David
 
Last edited:
Some real progress, we now have a working truck for the Bachmann tram, sorry for the long pauses but I haven't yet been passed out as a motorman for this power unit.

A little bit of cleaning up to do before its painted tomorrow, if the weather holds, then the truck can be fitted to the tram body in its permanent arrangement.

If you could see me sat here typing you would see a very happy face.

David

I presume Bachmann tram is a link, but I cannot access it for whatever reason.
 
Yesterday's link now works, I'll get the hang of this yet.

My first garden run, this was just a temporary test track to see how the tram ran with 6 rechargeable batteries, I need to push the power output up to 100% to move off in one direction and up to 70% in the other direction so later tonight I'll install the other two batteries I have.

Anyhow, I have self propelled movement making me happy with things so far.

David

ps my wife says I should mention she took the video showing how she supports me in my hobby, thanks dearest
 
Last edited:
Some real progress, we now have a working truck for the Bachmann tram, sorry for the long pauses but I haven't yet been passed out as a motorman for this power unit.

A little bit of cleaning up to do before its painted tomorrow, if the weather holds, then the truck can be fitted to the tram body in its permanent arrangement.

If you could see me sat here typing you would see a very happy face.

David
Not sure what interested me most the tram chassis mobile or the confused dog, super little beast of a hound.
 
Waiting on some heat shrink for the powered trams lights, so I thought I'd make a start on the trailer.
Apart from two very large holes to fill on what was the front platform where the motorman once stood it's all been fairly straightforward so far, or is that me just tempting fate.

Still a bit of work to do on the enclosed tram at the ends to remove the buffing beams come coupling bars, and fit the couplings but it's getting there.

Hopefully with everything I've learnt the next one will go a bit quicker. Hershey next I think.

David
 

Attachments

  • 20210520_224907.jpg
    20210520_224907.jpg
    119.4 KB · Views: 0
  • 20210520_224929.jpg
    20210520_224929.jpg
    176.3 KB · Views: 0
I knew I was tempting fate saying how well things were going, tonight it was a good job my wife was out of the house because the air was extremely blue.
Last night I did a temporary wiring of the LEDs, tonight I put them in to the driving platform front with heat shrink on the LED tags. The plan was to solder each wire in turn and heat the heat shrink on each LED connection.

Now I am about to embark on making new driving platform end guard plates (not sure of the correct name), I now know how little heat it takes to deform the plastic guards, and not just deform them but actually shrink them a bit too, aren't I bloody clever.
Aaarrrggghhh

Not a happy chappy ☹

David
 

Attachments

  • 20210521_222344.jpg
    20210521_222344.jpg
    358.3 KB · Views: 0
Last edited:
I knew I was tempting fate saying how well things were going, tonight it was a good job my wife was out of the house because the air was extremely blue.
Last night I did a temporary wiring of the LEDs, tonight I put them in to the driving platform front with heat shrink on the LED tags. The plan was to solder each wire in turn and heat the heat shrink on each LED connection.

Now I am about to embark on making new driving platform end guard plates (not sure of the correct name), I now know how little heat it takes to deform the plastic guards, and not just deform them but actually shrink them a bit too, aren't I bloody clever.
Aaarrrggghhh

Not a happy chappy ☹

David

It's all a learning curve!
 
A couple of tips...
I use leds pre- terminated to enamelled wiring. This is very thin and doesn't need any additional insulation, so no heatshrink required.

Where I do need heatshrink - connections to motors etc. I use a soldering iron set at about 150 degrees and gently pass it around the joint. This is much more controllable than hot air guns.

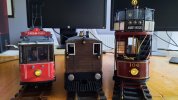
This picture shows a couple of my Occre trams with leds fitted into their supplied white metal lamps. I drill a 1mm hole in the back to pass wires through for the headlights while the top light on the double decker is supported on a length of thick brass wire with heatshrink on the outside and the wires simply run inside.

20210131_132750.jpg
 
I knew I was tempting fate saying how well things were going, tonight it was a good job my wife was out of the house because the air was extremely blue.
Last night I did a temporary wiring of the LEDs, tonight I put them in to the driving platform front with heat shrink on the LED tags. The plan was to solder each wire in turn and heat the heat shrink on each LED connection.

Now I am about to embark on making new driving platform end guard plates (not sure of the correct name), I now know how little heat it takes to deform the plastic guards, and not just deform them but actually shrink them a bit too, aren't I bloody clever.
Aaarrrggghhh

Not a happy chappy ☹

David
Probably better nextvtime to wire up the LED’s prior to fitting and do the heat shrink then fit in place. Yes I know it likely means more joints later but hopefully in a place where a little deforming is not noticeable. And yes Mr.Fame is right use the soldering iron, I find the metal body rather than the tip is the best bet.
 
If you use tight heat shrink, you don't need to do much shrinking, or use some insulation from thicker wire
 
If you use tight heat shrink, you don't need to do much shrinking, or use some insulation from thicker wire
I don't think it's the heat shrink that he's worried about ;);) t's the panel shrink :p:p

I know It's not really fair to take the **** - hiccups like this can be very frustrating - the problem is that I can't help myself :giggle:
 
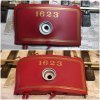
Replacement dash built, the vertical roof supports are still loose.

Fairly happy with the replacement, just need to clean it up before painting now.

I'll not make that mistake again.


David
 

Attachments

  • 20210524_212101.jpg
    20210524_212101.jpg
    75.6 KB · Views: 0
Replacement dash built, the vertical roof supports are still loose.

Fairly happy with the replacement, just need to clean it up before painting now.

I'll not make that mistake again.


David
Nice bit of metal bashing, much better than plastic. I think you should do the other end as well!
 
Unfortunately that's what I thought. Thankfully I made two dash boards and fixing plates, plus the parts for a second lamp so I don't have too much to make, I just need to build it.

Bending the half round brass section was thankfully a lot easier than I thought it was going to be after I had straightened it out, just dam fiddly.

I am now thinking the first scratch build tram might have a brass skeleton body frame and a brass underframe, not conventional I know but I can work with brass better than any other material.

I think I have found the scale I most enjoy working in, I can hold things and still see them and it's not overly difficult to make things like the new dash because of its size.


David
 
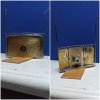
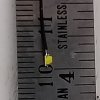
I ordered some LEDs for the tram interior because the locoremote can't power the bulbs that came with the model.

Boy oh boy are the small, and I couldn't believe the light that cam off one LED with 2 x AA batteries, when connected to 12v their is a risk they could even be too bright.

Och well, now I think I have all the parts their isn't really an excuse not to finish this one and crack on with finishing the trailer.
Must resist temptation to start another model before these are finished

David
 

Attachments

  • 20210525_095453.jpg
    20210525_095453.jpg
    106.1 KB · Views: 0
I ordered some LEDs for the tram interior because the locoremote can't power the bulbs that came with the model.

Boy oh boy are the small, and I couldn't believe the light that cam off one LED with 2 x AA batteries, when connected to 12v their is a risk they could even be too bright.

Och well, now I think I have all the parts their isn't really an excuse not to finish this one and crack on with finishing the trailer.
Must resist temptation to start another model before these are finished

David
Assuming you are using the correct resistor with these? Failure to do so will let the magic smoke out quite quickly...

I run those on my tram, which has 7.4V battery packs. I use a 220Ohm resistor, which gives them a nice glow without them looking like a small supernova glowing on the front!
 
Back
Top