But now we'll know where to look!Makes a great place to keep valuable things securely in a house, better than a safe.
You are using an out of date browser. It may not display this or other websites correctly.
You should upgrade or use an alternative browser.
You should upgrade or use an alternative browser.
HSBA Garden Railway
- Thread starter curtis
- Start date
Hmm. Can't get video to play, alas. But I like your taste in boardgames.but talking of portals to other worlds, this is how we access the garage...
Yeah but Jon is a railway buff - bigtime!But now we'll know where to look!
Do you know how many bookcases he probably has!?
curtis
Registered
Update - Christmas Week - Extensive ground and trackwork
I decided to take 2weeks off work over the festive period. It coincided well with some reasonably dry weather that allowed me to get into the garden and so some work on the railway.
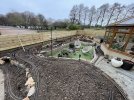
Overview
I was able to get track down for the first time since the raised beds were built. The first day I was able to get the bottom loop running (the sage advice of this forum being "just get trains running") which felt like a nice milestone. My in-laws are visiting us for Christmas and they both very much appreciated it. I also want to may a callout to Gizzy
for the loan of a rail bender to help me with the Flex Track - it works a charm!
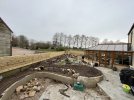
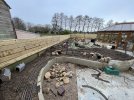
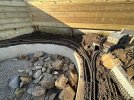
Small Station 1
Although I have a rough idea for station names. They're not finalised. This is the first small station on the layout. The track at the top of the first image will extend over a bridge to a terminus station and over a lift-bridge into the garage for storage of locos and stock. Final design was only two tracks after discussions with the Chairwoman of the Railway (although accommodation to a third has been built in).
In the picture, you'll see a previous attempt of mine to bend a rail by hand (bottom) and with a rail bender (top)
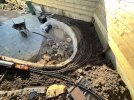
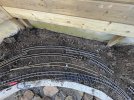
Small Station 2
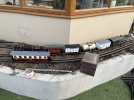
This station is after the tunnel and the crossing of the path. It curves round the bottom left of the first picture and heads around the pond.
Main Through Station
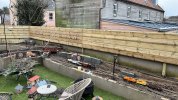
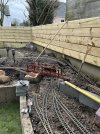
This station (where the U-Class is) is the main station. To the left you'll see a bridge (my Grandad built and gave me for Christmas) which allows to upper line (two reversing loops to cross the lower line. Above the (orange) Track Cleaning loco, you'll spot a meandering incline which joiners the upper and lower lines. The upper line will run against the wall over to the waterfall before looping around on itself.
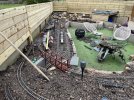
Upper Loop, Small Station 3
This will eventually be a station running around the far side of the tear drop with a short headshunt. Between the two tracks that make the reverse loop will be plants to obscure the view of each track.
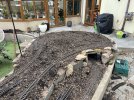
Finally, some pictures of trains running...
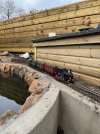
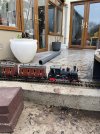
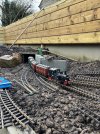
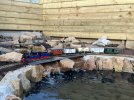
I decided to take 2weeks off work over the festive period. It coincided well with some reasonably dry weather that allowed me to get into the garden and so some work on the railway.
Groundworks
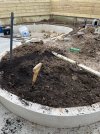
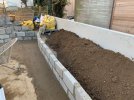
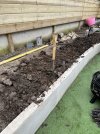
My initial challenge was the soil. In summer, the soil was wonderful to work with and home to a healthy garden (see below), several months of rain and being trodden on has produced something that when dry(ish) is like concrete and when it rains holds water on the surface. Nikki and I have always agreed we wanted a garden railway - with space for her to plant and create greenery. This wasn't looking great. So we had a tonne of compost dropped off and I spent a few of the dryish days turning this into the clay. We've now had a few days of rain and the soil is draining much better. I'll likely need to do it some more when the weather is drier but it certainly provided a good workout to hold off the Christmas chocolate and alcohol.

Track laying
Overview
I was able to get track down for the first time since the raised beds were built. The first day I was able to get the bottom loop running (the sage advice of this forum being "just get trains running") which felt like a nice milestone. My in-laws are visiting us for Christmas and they both very much appreciated it. I also want to may a callout to


Small Station 1
Although I have a rough idea for station names. They're not finalised. This is the first small station on the layout. The track at the top of the first image will extend over a bridge to a terminus station and over a lift-bridge into the garage for storage of locos and stock. Final design was only two tracks after discussions with the Chairwoman of the Railway (although accommodation to a third has been built in).
In the picture, you'll see a previous attempt of mine to bend a rail by hand (bottom) and with a rail bender (top)


Small Station 2
This station is after the tunnel and the crossing of the path. It curves round the bottom left of the first picture and heads around the pond.

Main Through Station
This station (where the U-Class is) is the main station. To the left you'll see a bridge (my Grandad built and gave me for Christmas) which allows to upper line (two reversing loops to cross the lower line. Above the (orange) Track Cleaning loco, you'll spot a meandering incline which joiners the upper and lower lines. The upper line will run against the wall over to the waterfall before looping around on itself.


Upper Loop, Small Station 3
This will eventually be a station running around the far side of the tear drop with a short headshunt. Between the two tracks that make the reverse loop will be plants to obscure the view of each track.

Finally, some pictures of trains running...


Attachments
Having had a garden that was predominantly clay with flints (Hemel Hempstead) I sympathise with you issues. What I did was to sift all the earth breaking it up as much as I could, stubborn lumps of clay were bagged for dumping. Good stuff was mixed with soil conditioner, fine rockery gravel and sharpe sand. Not sure if the sharpe sand will be easily available where you are as you certainly do not want to add salty sea sand for growing plants. The stuff was mixed up in the cement mixed to give a really good planting medium that rewarded the effort with a good rockery growing area. no gravel woukd be used where normal plants are required.
curtis
Registered
That is correct! I'm going to try the prototypical approach to start out out with. It seems the answer to, "how do I lay my track", like many questions in our hobby has a range of opinions. You can just about see in the last picture I've already tested some gravel. I'm using crushed granite as it is locale, in keeping with the colouring of the rocks on the layout and sharp to catch other pieces. The first trial seems to have gone well. I will, however, wait a while before doing this because the soil isn't ready yetAll looking very nice, though it does raise one question, I assume that the track will not be left on bare earth, slabs, blocks or bricks underneath, or a lined trench with ballast infill will support the track.
I appreciate the advice and will likely apply it! I've only been mixing compost in so far. The problem is the clay just loves to clump. You can see in some of the pictures even with extensive forking, it's still there. It wasn't too bad when I was working it after 3-4 dry days, but even a light rain makes it a pain to work with. As I said to Jimmy, I'm going to defer ballasting for now with the intention of reworking the soil when it is drier to get some of those clumps out!Having had a garden that was predominantly clay with flints (Hemel Hempstead) I sympathise with you issues. What I did was to sift all the earth breaking it up as much as I could, stubborn lumps of clay were bagged for dumping. Good stuff was mixed with soil conditioner, fine rockery gravel and sharpe sand. Not sure if the sharpe sand will be easily available where you are as you certainly do not want to add salty sea sand for growing plants. The stuff was mixed up in the cement mixed to give a really good planting medium that rewarded the effort with a good rockery growing area. no gravel woukd be used where normal plants are required.
curtis
Registered
There are two. They are both accessible but the longer one is less easy but is straight most of the way (only curving at the entrance). For the longer tunnel, under the soil, the a slab and the cover are removable. The shorter one is accessible from both sides. My plan is to add a guard rail that follows it round to derisk it.Looking good Curtis. How accessible is the tunnel? That's where de-railings always seem to happen, or animals like to nest, so easy access is a must!
Oh, to be younger, and full of energy and enthusiasm! 


Seriously though, a brilliant start, in a short time.
A few 'wrinkles' for you:
Beware of too much running, on bare loose earth.. It will stick to oil and grease, and turn into a very effective grinding-paste. - Remember LGB axles just run in the plastics of the motor-block.
You will need to keep an eye on this, and possibly have to strip and clean the worst offenders.
Clay moves.. Between the wet, cold months, and the drier, warmer, it will 'swell' and the levels will change.
It also shrinks and cracks, so ballast will disappear, unless you use a membrane. - This helps keep the ballast clean, as well.
You have a lot of freshly built-up ground.. It will settle quite a bit.
Other than solid bridge abutments etc. You will have to make levels up, possibly for two, or more years.
Still a brilliant start, though..
When can we all come round to play?
curtis
Registered
Thanks for the advice, Phil! We've definitely witness the soil settling since the summer (dropped about 5cm) and given I then turned it all I figured it would happen again. It's the main reason I don't want to ballast yet.
Regarding the membrane, how would you do it? just following the line of the track +5cm each side?
I'll keep an eye on the outdoor running on soil. It's a fair callout and something that I hadn't considered. There are a couple of locos due to dismantling (replacement bulbs, sound cards etc) so I'll take the opportunity to check the motor blocks. Question for you, and recommendation for how to clean existing grease/dirt from a block?
And in terms of visits. If you're in Jersey, you're always welcome to drop me a message to arrange something. The layout is still a WIP (e.g. no point control - yet) but we can still have some fun on it!
With luck, you won't have too much of a problem with pickup of soil/grit..
Over-oiling (so parts are 'wet') is a problem, as that is when it will stick..
If you get dried-on dirt, a stiff-brush is first. You can use LGB (or Massoth) smoke-oil, as a cleaning fluid.
There is normally too much grease (IMHO) in the blocks, so you can just use a small flat-blade screwdriver, to dig out any contaminated grease.
Search for Hobby - lube (the spelling is probably wrong) you can get a kit of several grades of oil and grease.. It does seem expensive, but you will probably still be using the same kit in 15 years time!
Less, is more, when lubricating our models.
A final tip:
Two, possibly three, drops of smoke-oil, on a 1" paint brush, brushed over the whole of a loco, will give you a very light 'sheen'. Just enough of a shine, that your loco-crews will be proud to take the loco off-shed.
Enjoy!
PhilP.
I told you the spelling was wrong..

 www.hobbies.co.uk

Hob E lube 7 Pack Workbench Assortment
Precision lubricants for craftsmen! This super-saver value includes all seven lubricants plus complete instructions that spell out precise applications and the exact lubricant to use. Be prepared. Know where and when to use which lube: nonconductive, n
trammayo
Interested in vintage commercial vehicle, trams, t
Wow! That's gone up in price since I bought mine (10 years ago)!I told you the spelling was wrong..

Hob E lube 7 Pack Workbench Assortment
Precision lubricants for craftsmen! This super-saver value includes all seven lubricants plus complete instructions that spell out precise applications and the exact lubricant to use. Be prepared. Know where and when to use which lube: nonconductive, nwww.hobbies.co.uk
JimmyB
Now retired - trains and fishing
Regarding the membrane, how would you do it? just following the line of the track +5cm each side?
My ground level track is on a membrane in a trench, and I learnt a few lessons along the way, the main one was not to skimp on the membrane, so line the bottom and sides, and them at least 5 cm each side, also consider how you will retain the ballast if your track is level or rises above the the ground.:

Tumble Down Falls
After a year I have come up with a name for my railway, as you will see from the title Tumble Down Falls. I plan to put some of my earlier photos of the railway here, and add as the railway progresses. Apologies to those that have seen the photos before, but this should keep thing together.
curtis
Registered
Thanks for sharing,My ground level track is on a membrane in a trench, and I learnt a few lessons along the way, the main one was not to skimp on the membrane, so line the bottom and sides, and them at least 5 cm each side, also consider how you will retain the ballast if your track is level or rises above the the ground.:

Tumble Down Falls
After a year I have come up with a name for my railway, as you will see from the title Tumble Down Falls. I plan to put some of my earlier photos of the railway here, and add as the railway progresses. Apologies to those that have seen the photos before, but this should keep thing together.www.gscalecentral.net
curtis
Registered
First run on the hill section!
A couple of days ago, we ran the first train up the track from the lower line to the (start) of the upper line. There is some inconsistency in gradient (the last part is steeper which I need to optimisee) but I tested some of my longest trains (x3 HSB passenger cars, x6 LGB 2 axel wagons and the Spreewald handled them all with ease)
Video below of the first test.

