LGB 12010 point motor

Eaglecliff

Registered
Country flag
One of mine has failed. The ammeter tells me there is no current passing between the terminals, although the wires between the terminals and the coil appear to be ok, as does the coil itself. Any suggestions as to:
possible cause of problem;
possible cure;
possible source of replacement parts?
I am assuming that there is actually no cure, replacement being the only answer, but I thought I'd ask. With current price about 50% above what I remember paying for the most recent ones, it's always worth a try.
 
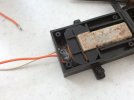
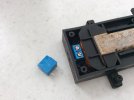
I bought an electric point marked as non working at Peterborough last week. At home, the point motor was as labelled, indeed faulty, I tried resoldering the terminals to the coil, but this didn’t work. It appears that the terminal block was so corroded that one of the pins had failed. I have had this problem before. Somewhere I have replacement terminal blocks, but in the meantime I soldered 6 inch long white and yellow wires directly to the coil with a chocolate block for connection. It now works fine. A rather temporary fix for now. Worth a go!
 
Do you have a VOM? The coil should have a resistance of about 22-25 ohms (after checking 3 EPL drives). A new motor may be in order if it's significantly different.

LIke Brixham, I've had to solder in replacements for corroded terminal blocks on a couple my LGB switch motors too. The motors were good as new afterwards.
 
Last edited:
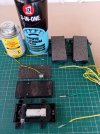
More than likely the screw terminals are shot well corroded more like. They can be cleaned up some and a few screws back n forwards with a little lube oil may help. I have resurrected many that were thought to be unrepairable, they are well built and pretty neat indestructible. The fine wires fro these to the coil can also be broken or pushed off.
 
Thanks for everyone's advice. I still think there is most likely a broken wire somewhere. I have had trouble with the terminal block, and cured it, on another motor, but using the meter on the 2 wires coming from the coil before they get to the terminal block there is nothing. Onwards and upwards...
 
Not having had one apart..
Are the wires enamelled (for insulation)?
If so, did you scrape this off, before testing?

PhilP
 
Not having had one apart..
Are the wires enamelled (for insulation)?
If so, did you scrape this off, before testing?

PhilP
Yes the wires are enameled till a small section to get to the terminal block. Here I am talking about EPL Drives, but I imagine the older ones would be similar in this respect.
 
And whilst tidying things away, found my stock of replacement screw terminals.....
EE6EB8A9-EC25-4BC6-BE37-13CAED54D599.jpeg
 
I know you’re going to ask......where did I get the terminals from?

I was making some led flasher circuits, so bought kits from eBay. These had the terminals which I didn’t bother to use. The kits make a pair of leds flash alternately, suitable for American style diesel loco ‘ditch’ lights, or for the flashers on an LGB work loco. The kits were only a couple of pounds each, complete with spare terminal blocks for LGB EPL points!

Malcolm
 
That looks depressingly familiar. I am going to put a chocolate block plug-and-socket between each of my motors and their supply wires to make it simpler to bring them in over winter.
I did that over lockdown with an indoor layout and it worked well. It's in pieces now but the wiring and chock blocks are still attached to their respective parts (point motor and power supply) so that relaying the track is quick and simple.
 
8 x 2-Way PCB Terminal Blocks

2 Way 16A PCB Terminal Block - 5mm Pitch, Vertical

Below, literally a few minutes ago prior to this posting, this particular point motor was part of Phase 3, brought in (requires the cables being extended), dismantled to see how it has fared being outside in the extremes of the North East weather for the last 15 months.

As can be seen, still in pristine condition, screws for top cover still in original condition, screws for 2 pin terminal block as good as new.


LGB Point Motor.jpg
 
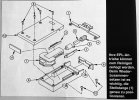
Here's an exploded diagram, from LGB Depesche, for the first version of the 12010 point motor.

The German text basically says make sure you have part 1 (the throwbar) positioned properly before attaching the cover

IMG_1749.jpeg
 
There is also a small pip on part 4 that needs to be correct as well. This pip effectively helps with completing correct travel it effectively catches parts 3 at each end ofvit’s travel so important that this is correctly placed as well. A test fit and movement if bar 4 before fitting lid will confirm correct setting, it is stopped at the top of part 3 not below.
 
Back
Top