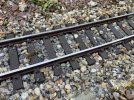
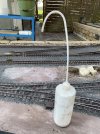
Looking for ideas about ballasting and secure the track or not

I live in a "farmers village/country side" They have a lot, but now the right one.....witch one...
Thanks
You have to experiment to find the one that suits you best.
 
Personally, I will let the track float on/in the ballast.

I think I may eventually end up with all track joints clamped, in some way. - Rather than push-fit joiners.

I will have a single fixing either side of a lifting access 'bridge'. - Obviously, the Bridge-track must be fixed, in some way, and there must be a way to align the rails when the bridge is in position.

For ballast, I intend to use crushed granite. The road-bed will be contained, with slightly raised sides (I will live with this scenic compromise). I do not intend to glue the ballast.

PhilP
 
I live in a "farmers village/country side" They have a lot, but now the right one.....witch one...
Thanks
I tend to prefer size 2-3mm which is pretty well near scale, but if not glued down can be a pain and with ally track you will likely need loose ballast. Alpine grit is an option at around 5-8mm in size.
 
I did some experiments with exterior pva and it was far from satirising, connected wood against wood outside.
I will give it a try.
What does "tight wad" means?
Not spending a lot of money, US derogatory term sorry!
 
How can you experiment alot prior to execution when you only get to choose one meal? :think:
Apparently, most American Death Row unfortunates choose cheese burger and chips for their last meal. Do they actually think that things can't get any worse than eating cheese burgers and chips?
 
I use brass screws to retain track. drilled through plastic sleepers into concrete building blocks. As the track is secured every 8 inches or so it is not easy for ballast to get underneath. I use granite dust. If the track needs to be adjusted it is not difficult to lift the rail and re set the breeze blocks below. The blocks ensure the track cannot moves and I leave about 1/16 inch gap at rail joints to allow for expansion. Tim
 
Like Tim, I fix my track to concrete (breeze) blocks with screws screwed into rawlplugs. It is important to leave gaps at rail joints for expansion and contraction.

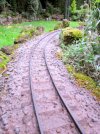
After a fair bit of experimentation, I use a 3:1 mix of horticultural grit and cement, brushed in carefully as a dry mix and then watered with the hose set as a misting spray.

IMG_7517.JPG

The grade of horticultural grit seems to be quite important, I've tried three different brand but the best I've found in the UK is Meadow Vale which seems to have very sharp sand in the mix.

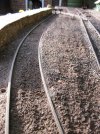
In station areas, I use a mix of grit, coarse sand, chicken grit, soil and aquarium sand held in place with SBR cement additive (which remains slightly flexible)
IMG_9156.JPG

These approaches suit me and how I want my railway to appear. There is no right or wrong way to fix down or ballast track - it all depends on what you want to achieve.

Rik
 
Last edited:
It is important to leave gaps at rail joints for expansion and contraction.
I have created a chard with a temperature scale with the required gap distance.
The range is from +40 to -15.
In theory i will have at 40C closed gaps and with -15 2mm gaps.

As always it is looking good in your garden, i must visit your blog quickly for the updates
Thanks for sharing
Best
 
Another tip about gaps, they do NOT always distribute themselves evenly along the various sections of track.

What I have found is if you try to fix your track in place, glued ballast, screwed down, etc, then gaps are important.

If you free float your track in ballast as the prototype railroads do, then assemble without gaps. This is one of the reasons I prefer free floating track.

When I started this hobby in 1999, the "common wisdom" was to screw track down every foot or less, and DCC would not work outdoors, and on and on.

Now many people use DCC outdoors, and 90% of everyone I know is free-floating ballast. The downside is you cannot use scale ballast as it washes away with 1:1 scale environment, 8" raindrops, etc.
 
I use two different types of grit, available from local hardware stores. The light brown grit is about 4-5mm and is used for gritting the roads. The black grit is about 1-2mm and sold for decorative gardening. I like it as it fits our scale.

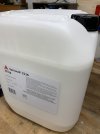
I glue down the grit with Sarnacol 2116, a flat roof waterproofing adhesive. I friend who has a landscaping business gets it wholesale for me. A plastic container costs almost £200, but it goes a long way.

Sarnacol container:

IMG_9897.jpg

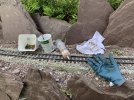
I used a syringe to apply the liquid glue between the sleepers. It is painstaking work, but it looks great.
IMG_0250.jpg


This picture is just after applying the Sarnacol. When it dries it becomes invisible.

IMG_0251.jpg

I now use a bottle that model car modelers and plane modelers use to fill up their petrol tanks. Again this picture is taken just after application. I lay the switches on plastic, so I could remove them if they have a problem without having to removed the glued ballast. The ballast can be removed quite easily with a knife if necessary. It is flexible in hot and cold weather.

IMG_2104.JPG
 
mrcheddar mrcheddar WOW
Exactly what i am looking for.
A friend of mine works in a pond rubber/foil store where they also must make rubber with grid.

Thanks! big thumb up!
 
Back
Top