Many years back in the US Garden Railway mag was an article by a lady that appeared in a pink bikini displaying her Bikini and Flamingo Railway. Needless to say a Flamingo or two (much like yours) were featured. I think the location was a warm park if the US possibly California, twas a decade or 3 ago.I have decided on a name.
After the true friend who guarded the previous layout for years, while Istrayed from the right pathpursued other interests, and who now guards the new one:
(drum roll) The Flamingo Tramway.
View attachment 325017
You are using an out of date browser. It may not display this or other websites correctly.
You should upgrade or use an alternative browser.
You should upgrade or use an alternative browser.
New beginnings
- Thread starter Jasper
- Start date
Gizzy
A gentleman, a scholar, and a railway modeller....
Jasper in a pink Mankini?Many years back in the US Garden Railway mag was an article by a lady that appeared in a pink bikini displaying her Bikini and Flamingo Railway. Needless to say a Flamingo or two (much like yours) were featured. I think the location was a warm park if the US possibly California, twas a decade or 3 ago.
Nooooooo....
Rhinochugger
Retired Oik
Bring back the Hammer FairyMany years back in the US Garden Railway mag was an article by a lady that appeared in a pink bikini displaying her Bikini and Flamingo Railway. Needless to say a Flamingo or two (much like yours) were featured. I think the location was a warm park if the US possibly California, twas a decade or 3 ago.
Jasper
Hey, I'm only being creative here!
There are no pink bikinis on my tramway (that I know of...)Many years back in the US Garden Railway mag was an article by a lady that appeared in a pink bikini displaying her Bikini and Flamingo Railway.
Yellow polka-dot, perhaps?There are no pink bikinis on my tramway (that I know of...)
PhilP
Jasper
Hey, I'm only being creative here!
Hey, I actually found a website for it!Many years back in the US Garden Railway mag was an article by a lady that appeared in a pink bikini displaying her Bikini and Flamingo Railway.
Pretty unique livery for the rolling stock.Hey, I actually found a website for it!
Jasper
Hey, I'm only being creative here!
Since the Belgian coaches have never been rolling, just posing on track without moving, I decided it was time.
I anticipated problems on my R1 curves, because although these coaches are fairly long they are four wheelers. Moreover the axles are fixed and no less than 100mm apart.
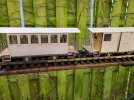
But the curves weren't the problem. The problem was that one of the couplers is not LGB, and it has a lower hanging uncoupling lever. It caught the turning knob of the variable length track.
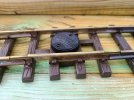
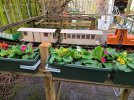
After some pushing and bending, it managed to clear, and I enjoyed the train making several laps while I tended to the primulas. A new and pleasant experience.
But in the end a derailment occurred anyway, and the train simply broke at the non-LGB coupling, leaving this part behind:
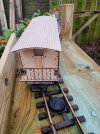
So now my plan is to get rid of both the coupling and the variable length track.
I anticipated problems on my R1 curves, because although these coaches are fairly long they are four wheelers. Moreover the axles are fixed and no less than 100mm apart.

But the curves weren't the problem. The problem was that one of the couplers is not LGB, and it has a lower hanging uncoupling lever. It caught the turning knob of the variable length track.

After some pushing and bending, it managed to clear, and I enjoyed the train making several laps while I tended to the primulas. A new and pleasant experience.

But in the end a derailment occurred anyway, and the train simply broke at the non-LGB coupling, leaving this part behind:

So now my plan is to get rid of both the coupling and the variable length track.
Last edited:
Jasper
Hey, I'm only being creative here!
Sorry to hear that, they really are everything they promised to be.I wanted to get some of those kits but found the effort of trying to make payment was just too complex for me. A missed opportunity sadly.
Strangely, I'm not at all happy with these great kits. For a few reasons. To begin with, I find that kits in general don't satisfy my need for creativity. I'm not sure if I'll ever buy any kits anymore.
But there's also the issue of them being too "luxurious" for me. These finely detailed and highly prototypical kits need fine modellers' skills and patience. I don't know if the photos show it but my crude and lazy efforts don't do them justice at all. I end up with two coaches that aren't as pretty as they're supposed to be, but do have the vulnerability that goes with such prettiness.
Lastly, I'm not sure if they even fit the theme too well. Although they are officially tram stock, to my eye they look almost more railway-ish than tramway-ish.
So it is possible that the Flamingo Tramway will decide to demolish them, salvage many parts, and use their strong frames for something different.
Last edited:
A shame you are thinking of demolishing them, they are a good kit that deserves an effort of time and patience to create a great end game. Being I believe Vicinal types they would certainly have a main line busy railway look. Paiting would I believe transform them, but you have gone beyond the paint having glazed them where I believe this would have been a viable option. The red and creme favoured on some Vicinal epochs would suit them very well, but needs to be done with patience to shine out.Sorry to hear that, they really are everything they promised to be.
Strangely, I'm not at all happy with these great kits. For a few reasons. To begin with, I find that kits in general don't satisfy my need for creativity. I'm not sure if I'll ever buy any kits anymore.
But there's also the issue of them being too "luxurious" for me. These finely detailed and highly prototypical kits need fine modellers' skills and patience. I don't know if the photos show it but my crude and lazy efforts don't do them justice at all. I end up with two coaches that aren't as pretty as they're supposed to be, but do have the vulnerability that goes with such prettiness.
Lastly, I'm not sure if they even fit the theme too well. Although they are officially tram stock, to my eye they look almost more railway-ish than tramway-ish.
So it is possible that the Flamingo Tramway will decide to demolish them, salvage many parts, and use their strong frames for something different.
Jasper
Hey, I'm only being creative here!
Okay, I've given this some more thought, and here's what I propose to do.A shame you are thinking of demolishing them, they are a good kit that deserves an effort of time and patience to create a great end game.
It is too late for extensive painting, as you said, but the "bare wood" look isn't at all bad on them. So I'll look into pinstriping, and I generally need to do some detailing.
The passenger coach gets passengers (duh) and maybe then I'll glue the roof on. I left it loose but this is impractical: it comes off too easily and is difficult to put on correctly.
For the mail coach, the main thing is to stop the doors from swinging back and forth as they are doing now. I still want them to open, because I want an interior that's fit for sorting the mail during the journey. Sorting the mail is something that happened on the majority of Dutch intercommunal tramways.
Next thing, I'll create a loco that visually fits the coaches. I think I may be able to use parts of my Otto for this.
Finally, give this set a more prototypical type of couplers, which also means they will truly remain a set as I don't plan on replacing the LGB couplers on other stock.
I think that with these measures I'll have something that belongs on my tramway. Thank you for defending my coaches.
Last edited:
Jasper
Hey, I'm only being creative here!
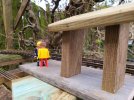
I built some tram stops. They need detailing, like seats and time tables and so forth, but it's a start.
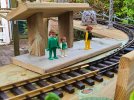
This curved one was actually the first I made, because that piece of wood just happened to be there.
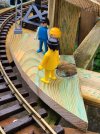
I'm not yet sure where each tram stop should go, so I may still move them around. (For real life tramways, moving stops around is an established way to annoy the public.)
Tina and Tim don't seem to mind, though.


This curved one was actually the first I made, because that piece of wood just happened to be there.

I'm not yet sure where each tram stop should go, so I may still move them around. (For real life tramways, moving stops around is an established way to annoy the public.)
Tina and Tim don't seem to mind, though.


Last edited:
playmofire
Registered
This is getting really interesting.I built some tram stops. They need detailing, like seats and time tables and so forth, but it's a start.
View attachment 325472
This curved one was actually the first I made, because that piece of wood just happened to be there.
View attachment 325473
I'm not yet sure where each of them will go. (For real life tramways, moving stops around is an established way to annoy the public.)
Tina and Tim don't seem to mind, though.
View attachment 325474
View attachment 325475
Tina and Tim will need to get a room!This is getting really interesting.
(you will need to build a hotel, next).
PhilP
Jasper
Hey, I'm only being creative here!
Tina and Tim will need to get a room!
Tina and Tim are too young for that.
Stealing a kiss on a tram stop is the most I will allow.
Jasper
Hey, I'm only being creative here!
After the rain, there were a few spots where little pools of water remained, while the rest of the woodwork had dried rather well. I'm not sure what causes this.
Of course this was always going to be the drawback of horizontal planking.
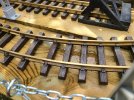

To help drainage I drilled some holes in these locations, 5mm as I think anything smaller will probably be clogged by a raindrop.
Let's see if it helps any.
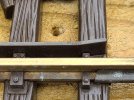
Of course this was always going to be the drawback of horizontal planking.


To help drainage I drilled some holes in these locations, 5mm as I think anything smaller will probably be clogged by a raindrop.
Let's see if it helps any.

Rhinochugger
Retired Oik
It's worth observing 1:1 scale bridges - they tend to only have decks where they go over public thoroughfares, although the Western main line bridge at Reading (west of the station) always seemed to leakOn second thought, maybe the plants above the layout are channeling the rain into certain spots?
View attachment 325557

