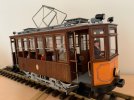
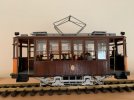
OcCre tramvia de Sòller

AWESOME BUILD and a great break down of the construction,excellent!!!:cool::clap::clap::clap:
 
lots of photos..

I finish the roof.

P3290214.jpg


new lanterns for LED
P3290213.jpg


not easy sand with wires.. lot of dust everywere..
P3290218.jpg


I start looking how cabin fit on wheels

P3300219.jpg


P3300220.jpg


P3310222.jpg


this piece transfer the current from the wheels to the cab

P3310224.jpg


P3310227.jpg


P3310228.jpg


wiring led lights

P3310232.jpg


P3310234.jpg


4 diode bridge is needed for led lights when motor turn forward reverse

P3310233.jpg


black

P3310236.jpg


P3310237.jpg


sticker on front

P4010239.jpg


I have tested the tram on an elecrified railway and it work well also at very low speed, all lights are on and max speed is enough

that's all for now..
 
Just realised I have a photo of No 2 pulling a trailer through the streets of Soller, on its way to Puerto Soller, 22.6.2010

dig 100622065.JPG

David
 
I was following this as I have also seen the tram firsthand, and I must say you have definitely done the model justice, it looks fantastic! Well done!
Have a photo of the tram as well as the electric train I took while on holiday :) IMG_2541.JPGIMG_2543.JPG
 
Now that is what I call inspiration, do we have many tramway modellers on here?

David
There are a few, even a couple of Tram threads to feast your eyes on. This next one has been in the go for a while now.


Love how you wired up the tram for light! I had this kit for years, started it and then left it in a box. However during the first lockdown I searched it out and completed it using a motorised spud (not a potato) so it would move. I didn't put the couplings on to avoid foul ups when running it on my layout... However I did add some passengers and a motorman / driver or whatever the equivalent is in Spanish.IMG_0132.jpgIMG_0131.jpg
 
Love how you wired up the tram for light! I had this kit for years, started it and then left it in a box. However during the first lockdown I searched it out and completed it using a motorised spud (not a potato) so it would move. I didn't put the couplings on to avoid foul ups when running it on my layout... However I did add some passengers and a motorman / driver or whatever the equivalent is in Spanish.View attachment 280748View attachment 280747
That's a nice looking car, I am pondering which one to get first.

Where did you get the figures from?

Out of interest, what were you worried about the couplings fouling?

Does the kit come with any paint if not what did you use to paint/stain the model?

David
 
That's a nice looking car, I am pondering which one to get first.

Where did you get the figures from?

Out of interest, what were you worried about the couplings fouling?

Does the kit come with any paint if not what did you use to paint/stain the model?

David
The passenger figures were a mixture of LGB, Preiser and cheap ones from eBay. The driver is actually from a Bachmann model 22190 set of two figures; originally he was pushing a truck!

The couplings issue was only because I have tight radius curves on the layout and as they poke out and down I wasn't sure if I was going to have issues. I may add them in the future.

The kit does not come with any paint or stain. The wood you see is real wood strips that are provided as part of the kit and which you glue in place. I used a clear varnish afterwards just to seal them and bring out the wood colour some more. The orange ends come with the kit printed on paper which you cut out and stick in place.

Clive.
 
We ended up in Soller on Majorca the day before the Pandemic was declared last year. We had ridden the electric railway from Palma before lunching in Soller, and then a coach trip back across the island. Sadly we could only watch the tram, we didn't have time to take a ride :(
 
The passenger figures were a mixture of LGB, Preiser and cheap ones from eBay. The driver is actually from a Bachmann model 22190 set of two figures; originally he was pushing a truck!

The couplings issue was only because I have tight radius curves on the layout and as they poke out and down I wasn't sure if I was going to have issues. I may add them in the future.

The kit does not come with any paint or stain. The wood you see is real wood strips that are provided as part of the kit and which you glue in place. I used a clear varnish afterwards just to seal them and bring out the wood colour some more. The orange ends come with the kit printed on paper which you cut out and stick in place.

Clive.
Thanks, help advice.

David
 
Back
Top