Playmobil Diesel transformation

Having got mine for £90 all in, the above post comes the day after I got mine. Ah well its only Money you cant take it with you.

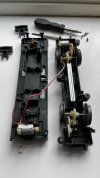
Anyhow following Paul's advice I set to on removing well trying to remove the body with the 16 Clips and Cocktail Sticks. I wanted to remove the chassis first and this was a bit of a task till I realised the the 4 Screws and 4 BLACK clips (2 each end) allow the chassis out. Even then it is a job to remove the body and I decided to razor saw all the clips off as they became visible. The last 4 pretty much behind the wheels central position that hold the Cab Portion are the real pain and you do not get to see 2 of them till the Chassis is out. What a palava. Still the body is now off and it still works. So I can at least get round to doing what I want. What this will be is to be sorted, but I think either yellow as a Harz Track Maint Loco or perhaps Red and Creme ala Kamel. But certainly with the Diode Slow Down Job for a slower speed.

Im an idiot mode on.

Paul trying to fully understand the Diode Alterations. Do they actually slow and make the speed steps better without the switch. If so what exactly is the effect of the switch. I think you may have said i but I still do not quite grasp it - sorry.

Im an idiot mode not entirely off but not as on as it was.
JonD
 
Yes the switch is an optional extra that allows you to switch in different amounts of diodes, say if its still used by kids you can give it rapid movement again at the flick of a switch.
To be honest for most modellers though just do the diodes and ignore the switch option.
I went for four pairs which means step one now only changes over the lights and you get three speeds.
3 pairs of diodes gave 4 speeds but the front light only comes on as it moves off.
 
Paul, many thanks for the clarification.

I went a bit further with the destruction (demolition) of the beast. I now have the body in its 2Hoods, Cab, Windows and Cab Inside bits. Much further use of Cocktail Sticks brute force, copious quantities of ignorance and just some luck I guess.

What do the manufacturers think that kids are going to use to pull theses apart - a lump hammer? Still it is ready for the mods now.

JonD
 
dunnyrail said:
Paul, many thanks for the clarification.

I went a bit further with the destruction (demolition) of the beast. I now have the body in its 2Hoods, Cab, Windows and Cab Inside bits. Much further use of Cocktail Sticks brute force, copious quantities of ignorance and just some luck I guess.

What do the manufacturers think that kids are going to use to pull theses apart - a lump hammer? Still it is ready for the mods now.

JonD
You under-estimate the ability of young children to destroy almost anything, if they put their minds to it!
:bigsmile::impatient::thumbdown::rolf:
Of course, 'Grandad' is always expected to be able to repair it. - I do admit I find their blind-faith in my abilities endearing!
:love::bigsmile:
 
Is there any way to replace the plastic wheels with metal ones?

Or that is nearly impossible? :-\
 
I don't need to just wanted :) but since it doesn't look like an easy task, I won't bother now.
 
hi all, is this a proper radio control or line of sight control like a tv remote please? we have a "my first train" for my grandson and its infra red line of sight and not very accurate. considering getting one of these next but see the pad on the roof and not sure if its aerial or infra red sensor. grateful for any info please, thanx, mart....
 
I have one of these locos that I left as is. I like it as do my grandchildren. The locos are almost bullet proof. The only thing I would have liked would if Playmobil had put clear window in the cab. The engineer figure is almost meaningless with the windows as they are.
 
And it is R/C as opposed to IR
 
hi guys, mine took a tumble off the track and since then the diesel sound does not work. the horn still does so the sounds must be on different chips i wonder? i have since taken it apart and put the electronics into a little green scratch built shunter running on a playmobile 040 chassis. works fine but wish i could get the engine sound again. any ideas please? cannot see anything loose on pcb's. thought i found a loose wire but its the aerial. thx, mart...
 
Paul, many thanks for the clarification.

I went a bit further with the destruction (demolition) of the beast. I now have the body in its 2Hoods, Cab, Windows and Cab Inside bits. Much further use of Cocktail Sticks brute force, copious quantities of ignorance and just some luck I guess.

What do the manufacturers think that kids are going to use to pull theses apart - a lump hammer? Still it is ready for the mods now.

JonD

You under-estimate the ability of young children to destroy almost anything, if they put their minds to it!
:bigsmile::impatient::thumbdown::rolf:
Of course, 'Grandad' is always expected to be able to repair it. - I do admit I find their blind-faith in my abilities endearing!
:love::bigsmile:

(Slight) apologies for reviving this 10yo thread (especially as past photos have disappeared)

I came here looking for advice on dismantling/servicing/(maybe) altering my 5258

There are warnings upthread that it’s not easy to get at the motors and transmission, so I was apprehensive

Actually it wasn’t too bad

Top and bottom held together with 4 screws - too tight for a screwdriver with a small handle

Then the tabs

Yes, probably designed more for assembly than disassembly

Easily moved with a small screwdriver

Then the trick - twist the chassis slightly to stop the tab re-engaging and do the same with the other tab

Of course at this point I realised nothing would happen without removing the couplings!

Small tabs, so, easy

Then back to the bigger tabs and repeat at other end

Two electrical connectors to separate then you have two parts

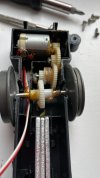
The top and bottom of the motors compartment are held together with 7 tabs, but by this time you know what you’re doing

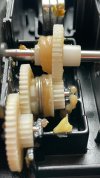
Was a bit surprised how much grease there was doing nothing

Fortunately it hadn’t attracted any dirt

Will clean off and spray some MX3

Pix of all the internals on the Great Walt’s site (fortunately archived) - quite far down - click for bigger


Attachments

  • IMG_5935.jpeg
    IMG_5935.jpeg
    251.3 KB · Views: 0
  • IMG_5936.jpeg
    IMG_5936.jpeg
    242 KB · Views: 0
  • IMG_5937.jpeg
    IMG_5937.jpeg
    299 KB · Views: 0
Interesting. It doesn't seem to be only the photos that have disappeared. The first post in this thread is one of mine complimenting Paul for whatever it was he's done. I wonder what it was .... and which Paul it was.....:wasntme::)

Rik
 
Interesting. It doesn't seem to be only the photos that have disappeared. The first post in this thread is one of mine complimenting Paul for whatever it was he's done. I wonder what it was .... and which Paul it was.....:wasntme::)

Rik
I think the older pics were lost in a forum update, the Paul is PaulRHB who rarely posts these days his interest being in smaller scales these days. Sadly his 2 G scale exhibition lines have departed the circuit.
 
Back
Top