I sometimes wonder where is best to Post some of my Ramblings. Should they be on my New Line Thread or as this is where it may be more easily found as here in the Scenery Section. Hm Tricky question I guess. Anyhow for the moment it is here in the Scenics.
Those of you who have been following the ramblings of my new line may have noted that I was Planting Poles a week or so ago. This is what I did.
Having had 2 sets of Bachman Telegraph Poles to hand I decided that the time was now ripe to install them on the new line. In fact one of the sets has been out on Two Lines already and were looking somewhat beaten up. In part this is due to weakening of the plastic after exposure to the Air. The other certainly the effects of 2 House Moves. This old set had been installed by the simple expedient of Nailing the Bases into the Ground or Wood Baseboards and planting the post therein. I have cut down the base somewhat as this was just too big for purpose. I also cut off the top two Cross Poles as these are somewhat too main line for my eye. Plus I modified the Poles to only have 2 Pots and be somewhat thinner. I have 2 basic kinds now, one where the Pots are the original Outside ones and others where the Pots Left are the 2 Middle ones. The excess cross Post being cut off. My reasons for these Mods are twofold. First I think that the Poles as supplied are just too Main Line looking. Plus my research of the Selketalbahn suggested somewhat less Pole was required.
The repair works required this time round were somewhat extensive as there were very few of the Pots that were really viable. So I cut them all off, filed off the little Pips both on the Pots and the cross Poles. Drilled both for Peco Track Pins and Superglued back in place but with the Pots the other way round. The Production Line is seen in the first pic together with one of the New Unmodified Poles for Comparison. The final job is to paint the Pots White. I did not go overboard with this wanting them to look as if they had been around for some years. Whilst I would not normally trust Superglue outside, I now use PowerBond 806. I got this from a Demonstrator at the Ally Palley Show some 3 or so years ago, kept in the Fridge it is as fresh today as the day I bought it. Plus I also like the belt and braces mechanical of the Peco Track Pins.
Production Line

Waiting to be installed

Next job was to start planting the old Poles to see how many more would be required. But before that I needed to decide the Spacing. I researched this by looking at the DVD`s of the Selketalbahn that I have. In the end a Train with a Mallett, a Coach and two Wagons appeared to be just about within two poles separation. This equated to around 6 feet, so that became my distance more or less. On Curves this needs to be slightly different as the lines would not normally overhang the line.
The new Poles were similarly modified, except that I did not do any work with the pots except paint them as being new they are all sound. Though I did distress them somewhat by pulling an old bit of Hacksaw blade along the Pole itself to represent Wood. This could be possible on the old ones too, as just being planted in the Base they are fully removable. These were similarly Planted around the line.
I now find myself probably in need of another set to complete some of the Garden. Anyone have a set or just some unused ones they do not want? Have looked at ebay but the prices but the price for a new set is just silly.
There are none indoors as yet. These however may be Scratch Built with Wood using Ramin. B&Q old gits day today so I may be out there making a purchase. These will of course be round to match the existing ones. But perhaps with more detail. More on this when they are done. Another job to be done is to Plant some Supports. Posts tend to have supports that take the Strain on both Curves and Straight Track. These can be at almost any angle to the Track with the exception (I think) of actually facing the Track. I may even give them some Grey Weathering.
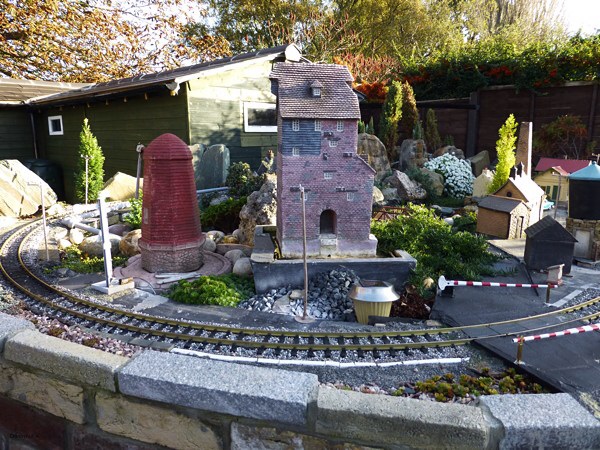
In the meantime here are some pictures of the Poles in the Great Outdoors. Some of the one-offs can also be seen, particularly note the Cross Post only on the Factory side, plus the one with the Pots to the Right of the Poles on the Sharp curve.
Pics of the installation so far.


JonD
Those of you who have been following the ramblings of my new line may have noted that I was Planting Poles a week or so ago. This is what I did.
Having had 2 sets of Bachman Telegraph Poles to hand I decided that the time was now ripe to install them on the new line. In fact one of the sets has been out on Two Lines already and were looking somewhat beaten up. In part this is due to weakening of the plastic after exposure to the Air. The other certainly the effects of 2 House Moves. This old set had been installed by the simple expedient of Nailing the Bases into the Ground or Wood Baseboards and planting the post therein. I have cut down the base somewhat as this was just too big for purpose. I also cut off the top two Cross Poles as these are somewhat too main line for my eye. Plus I modified the Poles to only have 2 Pots and be somewhat thinner. I have 2 basic kinds now, one where the Pots are the original Outside ones and others where the Pots Left are the 2 Middle ones. The excess cross Post being cut off. My reasons for these Mods are twofold. First I think that the Poles as supplied are just too Main Line looking. Plus my research of the Selketalbahn suggested somewhat less Pole was required.
The repair works required this time round were somewhat extensive as there were very few of the Pots that were really viable. So I cut them all off, filed off the little Pips both on the Pots and the cross Poles. Drilled both for Peco Track Pins and Superglued back in place but with the Pots the other way round. The Production Line is seen in the first pic together with one of the New Unmodified Poles for Comparison. The final job is to paint the Pots White. I did not go overboard with this wanting them to look as if they had been around for some years. Whilst I would not normally trust Superglue outside, I now use PowerBond 806. I got this from a Demonstrator at the Ally Palley Show some 3 or so years ago, kept in the Fridge it is as fresh today as the day I bought it. Plus I also like the belt and braces mechanical of the Peco Track Pins.
Production Line

Waiting to be installed

Next job was to start planting the old Poles to see how many more would be required. But before that I needed to decide the Spacing. I researched this by looking at the DVD`s of the Selketalbahn that I have. In the end a Train with a Mallett, a Coach and two Wagons appeared to be just about within two poles separation. This equated to around 6 feet, so that became my distance more or less. On Curves this needs to be slightly different as the lines would not normally overhang the line.
The new Poles were similarly modified, except that I did not do any work with the pots except paint them as being new they are all sound. Though I did distress them somewhat by pulling an old bit of Hacksaw blade along the Pole itself to represent Wood. This could be possible on the old ones too, as just being planted in the Base they are fully removable. These were similarly Planted around the line.
I now find myself probably in need of another set to complete some of the Garden. Anyone have a set or just some unused ones they do not want? Have looked at ebay but the prices but the price for a new set is just silly.
There are none indoors as yet. These however may be Scratch Built with Wood using Ramin. B&Q old gits day today so I may be out there making a purchase. These will of course be round to match the existing ones. But perhaps with more detail. More on this when they are done. Another job to be done is to Plant some Supports. Posts tend to have supports that take the Strain on both Curves and Straight Track. These can be at almost any angle to the Track with the exception (I think) of actually facing the Track. I may even give them some Grey Weathering.
In the meantime here are some pictures of the Poles in the Great Outdoors. Some of the one-offs can also be seen, particularly note the Cross Post only on the Factory side, plus the one with the Pots to the Right of the Poles on the Sharp curve.
Pics of the installation so far.


JonD