You are using an out of date browser. It may not display this or other websites correctly.
You should upgrade or use an alternative browser.
You should upgrade or use an alternative browser.
Land grab
- Thread starter idlemarvel
- Start date
idlemarvel
Neither idle nor a marvel
If you're thinking about joining the two loose ends to form another loop, think again. There are productive pear and fig trees in the way, not shown. If I felled those without permission, I'd have to leave the country.
You would need to make more track!If you're thinking about joining the two loose ends to form another loop, think again. There are productive pear and fig trees in the way, not shown. If I felled those without permission, I'd have to leave the country.
Shame cant you wiggle round them?If you're thinking about joining the two loose ends to form another loop, think again. There are productive pear and fig trees in the way, not shown. If I felled those without permission, I'd have to leave the country.
Streetcar tracks in the path?I reckon, if you put the track where the path is, and move the path to where the track is.....
idlemarvel
Neither idle nor a marvel
Thanks for the various suggestions
P
Paul M
 dunnyrail
P
phils2um
They are all certainly possible with varying degrees of difficulty and cost but the clearances around the various obstacles, particularly the greenhouse / potting shed are just too close for comfort. I can remember to tuck my knees and elbows in but I'm not the only rider or driver! If I could clear the whole garden and start again then it would be a different story.
Meanwhile the work progresses. I have built all the required track panels (4 straight 2 curved) and completed the excavation of the cutting to join up to the existing loop.
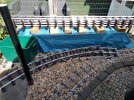
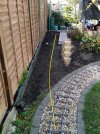
I'm getting perilously close to being able to lay some track. I did some rudimentary levelling and there is a slope down the straight alongside the fence shown but it is only about 1 in 80 so shouldn't present any problems. I could raise the track bed to make it all level but I thought having a gentle gradient would make driving more interesting. The gap between the fence and the new stone retaining wall on the right is quite tight at about 30 inches, but that's enough from my experience with the current loop, even with the bulkiest of passengers.
This is turning into a bit of a blog but some of you said you were interested and the others can ignore my ramblings!
Meanwhile the work progresses. I have built all the required track panels (4 straight 2 curved) and completed the excavation of the cutting to join up to the existing loop.


I'm getting perilously close to being able to lay some track. I did some rudimentary levelling and there is a slope down the straight alongside the fence shown but it is only about 1 in 80 so shouldn't present any problems. I could raise the track bed to make it all level but I thought having a gentle gradient would make driving more interesting. The gap between the fence and the new stone retaining wall on the right is quite tight at about 30 inches, but that's enough from my experience with the current loop, even with the bulkiest of passengers.
This is turning into a bit of a blog but some of you said you were interested and the others can ignore my ramblings!
idlemarvel
Neither idle nor a marvel
Thanks Jon that sounds like good advice.Nice pile of track, could almost be PECO. As for the grade on the siding. Always have the loco on the down most end and safety should be assured.
idlemarvel
Neither idle nor a marvel
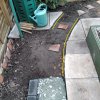
Current state of play. I got my angle grinder out, with the usual amount of fear and trepidation, and cut these curves out of various slabs:
Next I did some work on the "bridge" where the line crosses the garden path. Second picture shows the bridge base in place:
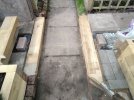
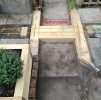
I did think about using concrete lintels for the side supports along the path, but the timber goes with the "trestle bridge" look I am aiming for when it is finished.
Finally I laid out the level for the final curve into the new station:
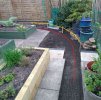
It continues the 1 in 100 slope into the station which is itself level. The two lighter slabs with grey bricks alongside will lead onto a barrow crossing for passengers to cross the track.

Next I did some work on the "bridge" where the line crosses the garden path. Second picture shows the bridge base in place:


I did think about using concrete lintels for the side supports along the path, but the timber goes with the "trestle bridge" look I am aiming for when it is finished.
Finally I laid out the level for the final curve into the new station:

It continues the 1 in 100 slope into the station which is itself level. The two lighter slabs with grey bricks alongside will lead onto a barrow crossing for passengers to cross the track.
idlemarvel
Neither idle nor a marvel
Some fine weather yesterday so I started laying the track. Here is the track laid and ballasted through the station (provisionally called Trellis Parkway) over the "bridge" and onto the head shunt. The track is screwed down on the removeable bridge section, and the two end sleepers are bolted in place.
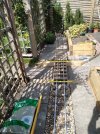
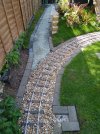
The rest of the track bed is laid. Here is the area around the point. There is a bit of a zigzag as there wasn't enough room between the existing track and the fence to have a smoother curve. Not ideal but it shouldn't matter at the speeds we go around the Circle Line. The inset bottom right is for the point lever.
I'm hoping to lay the rest of the track this week then there will be a few days of tamping, levelling and other adjustments before I can start driving trains over it.

The rest of the track bed is laid. Here is the area around the point. There is a bit of a zigzag as there wasn't enough room between the existing track and the fence to have a smoother curve. Not ideal but it shouldn't matter at the speeds we go around the Circle Line. The inset bottom right is for the point lever.

I'm hoping to lay the rest of the track this week then there will be a few days of tamping, levelling and other adjustments before I can start driving trains over it.
playmofire
Registered
I've just caught up with this, Dave. Looking great and you appear to be a dab hand with the angle grinder.Current state of play. I got my angle grinder out, with the usual amount of fear and trepidation, and cut these curves out of various slabs:
View attachment 297251
Next I did some work on the "bridge" where the line crosses the garden path. Second picture shows the bridge base in place:
View attachment 297252
View attachment 297253
I did think about using concrete lintels for the side supports along the path, but the timber goes with the "trestle bridge" look I am aiming for when it is finished.
Finally I laid out the level for the final curve into the new station:
View attachment 297254
It continues the 1 in 100 slope into the station which is itself level. The two lighter slabs with grey bricks alongside will lead onto a barrow crossing for passengers to cross the track.
Indeed he is making a great job, oh dab hand angle grinder (and lump hammer as well?). I thought these were the qualifying attributes to join this illustrious forum.I've just caught up with this, Dave. Looking great and you appear to be a dab hand with the angle grinder.
idlemarvel
Neither idle nor a marvel
Thanks Gordon and JonD, but if I have to do any more angle grinding it will be too soon! I have used various mallets (wooden and rubber) and a sledgehammer but I don't think I've had to use a lump hammer, which I guess is a smaller version of a sledgehammer. Either way I'm not sure wielding a mallet or lump/sledge hammer takes much skill, but it can be very enjoyable! The only qualification to join this forum is to be certifiable. 
Chris Vernell
Three score and nineteen
Indeed he is making a great job, oh dab hand angle grinder (and lump hammer as well?). I thought these were the qualifying attributes to join this illustrious forum.
OK, maybe I can stay, 'coz I meet that qualification fully and to spareThe only qualification to join this forum is to be certifiable.
idlemarvel
Neither idle nor a marvel
Golden Spike moment - I've inserted the point into the existing loop and joined it up to the extension. Just need to add the ballast now and we (grandson and me) can commence testing. My main concern is "loading gauge" particularly side clearances, but I think it will be alright.
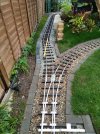
The spirit level is miraculously showing level - you'll have to take my word for it! The downhill grade starts after the curve.
My approach to track laying with this 5" stuff is very much like "set track". If I had more space and fewer obstacles I would use a track bender in situ and have some transition curves, curves bigger than 8' radius, and I wouldn't have the dog-leg shown above. Instead I cut up straights and pre-built 8' radius curves to fit around the obstacles. But needs must and it seems to work.
playmofire
Registered
I'm sure railways have dog legs in real life, Dave.
Rhinochugger
Retired Oik
One of the things about track laying is if it looks right ........................ and it certainly doesn't look wrongGolden Spike moment - I've inserted the point into the existing loop and joined it up to the extension. Just need to add the ballast now and we (grandson and me) can commence testing. My main concern is "loading gauge" particularly side clearances, but I think it will be alright.
View attachment 298020
The spirit level is miraculously showing level - you'll have to take my word for it! The downhill grade starts after the curve.
My approach to track laying with this 5" stuff is very much like "set track". If I had more space and fewer obstacles I would use a track bender in situ and have some transition curves, curves bigger than 8' radius, and I wouldn't have the dog-leg shown above. Instead I cut up straights and pre-built 8' radius curves to fit around the obstacles. But needs must and it seems to work.

