You are using an out of date browser. It may not display this or other websites correctly.
You should upgrade or use an alternative browser.
You should upgrade or use an alternative browser.
Playmobil Turntable
- Thread starter Polarblair
- Start date
Polarblair
Registered
After reading about a lot of issues people have with wood filaments I was a bit worried. Unrelated while printing the last of the copper frames my machine also broke down 3 times resulting in a complete teardown of the hot end.
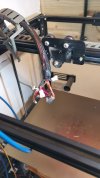
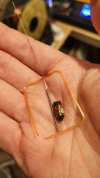
She no happy.
Had to replace the nozzle and both the sharbite type fittings that hold the Bowden tube in as the tube was being ejected mid print. The printer doesn't realise anything is wrong so just keeps feeding filament. Thankfully this spaghetti mess could just be rewound back onto the spool. Particularly proud of myself managing to do the tube and fittings one handed while shoogling my youngest
Took the opportunity to upgrade with a couple of light strips and an improved part cooling duct.
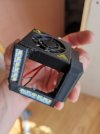
I don't mean to put people off the ender 5 plus. It's the first failure in years of operation with zero maintenance on my part. I should probably not have neglected it and given the hotend a service long before now. Lesson learned.

Some fine tuning was required on the frames to let them just drop in without any sanding.
Back to the wood filament. Initially I ran into one failed print that was my fault. Feed rate was much too high. Once this was reduced it's spat out the 3 duckboards without issue.
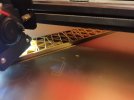
Print settings were 210C, 120% flow, 50mm/s and a bed temp of 60C.
No warping, bed separation or any other artifacts to speak of. Layers have bonded well and it snaps perfectly into place.
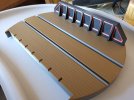
The boards were printed face down to the printed for a nice smooth finish. I also aligned the filament path lengthways with the boards. Tempted to not bother sanding it and leave as is.
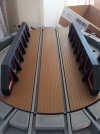
It's come out looking very Playmobil
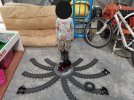
We did a quick function test and wee man is delighted.
The matte charcoal PLA I used is a bit old. The diagonal struts that click into the duckboards require some fettling but thats easy enough.
In summary I can wholeheartedly recommend that wood filament. See previous posts for details. The supporting joists are being printed and should be ready this evening.


She no happy.
Had to replace the nozzle and both the sharbite type fittings that hold the Bowden tube in as the tube was being ejected mid print. The printer doesn't realise anything is wrong so just keeps feeding filament. Thankfully this spaghetti mess could just be rewound back onto the spool. Particularly proud of myself managing to do the tube and fittings one handed while shoogling my youngest
Took the opportunity to upgrade with a couple of light strips and an improved part cooling duct.

I don't mean to put people off the ender 5 plus. It's the first failure in years of operation with zero maintenance on my part. I should probably not have neglected it and given the hotend a service long before now. Lesson learned.

Some fine tuning was required on the frames to let them just drop in without any sanding.
Back to the wood filament. Initially I ran into one failed print that was my fault. Feed rate was much too high. Once this was reduced it's spat out the 3 duckboards without issue.

Print settings were 210C, 120% flow, 50mm/s and a bed temp of 60C.
No warping, bed separation or any other artifacts to speak of. Layers have bonded well and it snaps perfectly into place.

The boards were printed face down to the printed for a nice smooth finish. I also aligned the filament path lengthways with the boards. Tempted to not bother sanding it and leave as is.

It's come out looking very Playmobil

We did a quick function test and wee man is delighted.
The matte charcoal PLA I used is a bit old. The diagonal struts that click into the duckboards require some fettling but thats easy enough.
In summary I can wholeheartedly recommend that wood filament. See previous posts for details. The supporting joists are being printed and should be ready this evening.
Polarblair
Registered
Me too, I want this turntable too.
I was wondering if this version is big enough for loco 4010 or 4052 ?
It is impressive job anyway
We could think this turntable is coming from Playmobil shop, which is great
We are going to find out as I found a cheap 4010 on fleabay and it's due any day now.
Did they make an RC version of the 4052?
I have the original brass track version but I'm pretty sure it's too long.
I'm going to remodel the turntable with lessons learned from this prototype and to make it more modular to let people have blank plates instead of track all round to better suit their layouts.
playmofire
Registered
The 4052 is 54cms over the couplings.We are going to find out as I found a cheap 4010 on fleabay and it's due any day now.
Did they make an RC version of the 4052?
I have the original brass track version but I'm pretty sure it's too long.
I'm going to remodel the turntable with lessons learned from this prototype and to make it more modular to let people have blank plates instead of track all round to better suit their layouts.
Brilliant! I can imagine a few folks would be interested in thatAfter reading about a lot of issues people have with wood filaments I was a bit worried. Unrelated while printing the last of the copper frames my machine also broke down 3 times resulting in a complete teardown of the hot end.
View attachment 318028
View attachment 318026
She no happy.
Had to replace the nozzle and both the sharbite type fittings that hold the Bowden tube in as the tube was being ejected mid print. The printer doesn't realise anything is wrong so just keeps feeding filament. Thankfully this spaghetti mess could just be rewound back onto the spool. Particularly proud of myself managing to do the tube and fittings one handed while shoogling my youngest
Took the opportunity to upgrade with a couple of light strips and an improved part cooling duct.
View attachment 318032
I don't mean to put people off the ender 5 plus. It's the first failure in years of operation with zero maintenance on my part. I should probably not have neglected it and given the hotend a service long before now. Lesson learned.
View attachment 318027
Some fine tuning was required on the frames to let them just drop in without any sanding.
Back to the wood filament. Initially I ran into one failed print that was my fault. Feed rate was much too high. Once this was reduced it's spat out the 3 duckboards without issue.
View attachment 318029
Print settings were 210C, 120% flow, 50mm/s and a bed temp of 60C.
No warping, bed separation or any other artifacts to speak of. Layers have bonded well and it snaps perfectly into place.
View attachment 318030
The boards were printed face down to the printed for a nice smooth finish. I also aligned the filament path lengthways with the boards. Tempted to not bother sanding it and leave as is.
View attachment 318031
It's come out looking very Playmobil
View attachment 318033
We did a quick function test and wee man is delighted.
The matte charcoal PLA I used is a bit old. The diagonal struts that click into the duckboards require some fettling but thats easy enough.
In summary I can wholeheartedly recommend that wood filament. See previous posts for details. The supporting joists are being printed and should be ready this evening.
PhilP
G Scale, 7/8th's, Electronics
I need to find someone who has printed in wood - infused PLA, and has a scrap print kicking about..
I know very little about the material, except it supposedly biodegrade, and might be prone to warping.. - I want to see how it takes an internal thread, and then leave it out on the patio.
Get a first-hand idea of durability.
PhilP
I know very little about the material, except it supposedly biodegrade, and might be prone to warping.. - I want to see how it takes an internal thread, and then leave it out on the patio.
Get a first-hand idea of durability.
PhilP
Xav204
Registered
Unfortunately Playmobil did not make an RC version of 4052.
As 4052 became rare and expensive, we have to think twice before convert it to RC.
And it is better to convert tender too , in order to keep bollard pull.
But you already have huge stuff and you take advantage of it
with this very functional layout and its many possibilities of traffic lane.
As 4052 became rare and expensive, we have to think twice before convert it to RC.
And it is better to convert tender too , in order to keep bollard pull.
But you already have huge stuff and you take advantage of it
with this very functional layout and its many possibilities of traffic lane.
-bbbb
Registered
You are welcome to accept the challenge.I'm positive I've seen those as an stl but would be a 5min job to recreate. It's also a good 3D printing candidate with the stresses on the part going perpendicular to the layers.
Polarblair
Registered
If you have an STL in mind I'm happy to do you a test print. Technically all PLA is "biodegradable" but I've seen real world tests on YouTube where people have printed plant pots and found no appreciable degradation years later. But I wouldn't use it for structural parts personally.I need to find someone who has printed in wood - infused PLA, and has a scrap print kicking about..
I know very little about the material, except it supposedly biodegrade, and might be prone to warping.. - I want to see how it takes an internal thread, and then leave it out on the patio.
Get a first-hand idea of durability.
PhilP
I think UV damage will be a much bigger issue. The Playmobil RC train sets are generally seen as indoor play and I think I would make that clear if I ever get this to a point where it's a saleable product. An easy alternative would be to offer an ASA printed version at a higher price point for those who wish to use it outside. That being said, depending on source and quality ASA filament can be up to twice as expensive as PLA.
ABS would probably be best but warping becomes an issue. I have a Bambu Lab X1 arriving tomorrow so will see how well it handles ABS.
For the moment this project has taken a backseat. Have spent the last week working long hours building a steel frame garage in some of the hottest days this year. Client just had to have a black shed too! Spent many a delightful RMR weekend getting thrashed at Barry buddon during the summer months and can honestly say the last week was tougher
Polarblair
Registered
Unfortunately Playmobil did not make an RC version of 4052.
As 4052 became rare and expensive, we have to think twice before convert it to RC.
And it is better to convert tender too , in order to keep bollard pull.
But you already have huge stuff and you take advantage of it
with this very functional layout and its many possibilities of traffic lane.
Thank you! I really wanted to make it easy for the boys so they could both have at least two locos running at the same time without colliding
So the absolute brain surgeon rocket scientist level intellect royal mail delivery driver managed to deliver the 4010 to someone - still don't know who. Have opened a case with RM and hope they can recover the parcel.
I feel very fortunate to still have my childhood 4052 boxed in the attic now! Yesterday found a RC motor unit and remote on eBay for less than £30 posted so planning on printing myself either a 4052 or more likely the old red diesel goods train.
I've invested in an entry level 3D scanner which should make things a bit easier!
Polarblair
Registered
Challenge acceptedYou are welcome to accept the challenge.
Polarblair
Registered
Cheapest I've seen is an incomplete 4025 for £80 which to me feels expensive, As for the RC version, only one I've seen on ebay is £128.66 + £19.56 postage. I'm slightly out of touch but that feels like a lot. The complete 4085 set is up for sale at £685.32The old red diesel goods train still can be found , not so expensive.
( You might need only cabin, and create RC frame with 3D if you do not like the Orange version which exists in RC already )
But I understand why your 4052 will stay in the attic for the moment.
By contrast I picked up a complete 4018 set in box for £70 and just today replaced the nicad batteries with higher capacity cells.
Managed to spy another incomplete 4018 without track but with motor unit and remote for £25 which will become the base for my DIY 4025
playmofire
Registered
If you're talking about the 4085 RC set, I think that was quite rare. If you're wanting a track powered one as here, http://www.walts-playmobil-collection.me.uk/4025C.jpg, message me.Cheapest I've seen is an incomplete 4025 for £80 which to me feels expensive, As for the RC version, only one I've seen on ebay is £128.66 + £19.56 postage. I'm slightly out of touch but that feels like a lot. The complete 4085 set is up for sale at £685.32so not on the cards for me.
By contrast I picked up a complete 4018 set in box for £70 and just today replaced the nicad batteries with higher capacity cells.
Managed to spy another incomplete 4018 without track but with motor unit and remote for £25 which will become the base for my DIY 4025
Polarblair
Registered
Yep, was hoping to find either a cheap 4025 I could use as a donor to convert to RC or the ready to play 4085 but as you say quite rare hence the price. Thank you for the offer but very luckily I still have my childhood 4025 set in the attic but it's too precious to me to hack apart. Short of finding a cheap fairly busted 4025 I think I'll have to go the 3D scan modelling route but that will be a fun project.If you're talking about the 4085 RC set, I think that was quite rare. If you're wanting a track powered one as here, http://www.walts-playmobil-collection.me.uk/4025C.jpg, message me.
Would be a shame to ruin a perfectly good 4025 anyway.
Edit - Walt's website is fantastic and a very helpful resource as I had no knowledge whatsoever of the RC locos before my son got his first set from my parents.
Very handy to find out for example that the radio crystals can be had cheap from Amazon!
GAP
G Scale Model Trains, 1:1 Sugar Cane Trains
I have had PLA test pieces (supports removed from other prints) sitting out on my layout for over well 12 months now they have endured 2 Australian summers with extreme UV levels plus a lot of rain and they show little sign of degradation.If you have an STL in mind I'm happy to do you a test print. Technically all PLA is "biodegradable" but I've seen real world tests on YouTube where people have printed plant pots and found no appreciable degradation years later. But I wouldn't use it for structural parts personally.
I think UV damage will be a much bigger issue. The Playmobil RC train sets are generally seen as indoor play and I think I would make that clear if I ever get this to a point where it's a saleable product. An easy alternative would be to offer an ASA printed version at a higher price point for those who wish to use it outside. That being said, depending on source and quality ASA filament can be up to twice as expensive as PLA.
ABS would probably be best but warping becomes an issue. I have a Bambu Lab X1 arriving tomorrow so will see how well it handles ABS.
For the moment this project has taken a backseat. Have spent the last week working long hours building a steel frame garage in some of the hottest days this year. Client just had to have a black shed too! Spent many a delightful RMR weekend getting thrashed at Barry buddon during the summer months and can honestly say the last week was tougher
I'm confident enough to plan putting PLA printed structures out on the layout and if they do fail I'll just print new ones.
I will most likely paint them so anticipate a life of around 4-5 years.
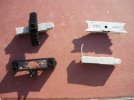
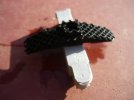
This couple have been glued together with "plastic magic"
Last edited:
Polarblair
Registered
Who needs sleep when you have a new printer. I designed this turntable for my single material ender 5 plus so was going to print the tiny drop Shadow pieces and use a stencil to hold in place while gluing. But realised that I can now print the letters almost like a sticker. I could in theory print them directly to the bridge but there would be a lot more wasted filament. With this method it's more labour but the purge tower is more of a purge plate even for all 8 characters printed simultaneously.
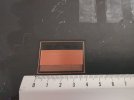
Letters came out great with a bit of ironing something which the ender struggled with.

Both boys initials for some joint ownership/partnership!
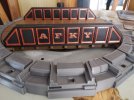
Click right between the rivet frames. Revell Contacta takes more time to dry but doesn't give the white haze discolouration of super glue and the increased working time is a bonus. Needle applicator tip is a huge benefit too.
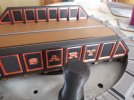
Going to give it a few hours to fully set and we're ready for playtime!
For those interested, the turntable has a track length of 265mm.
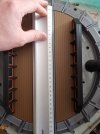
As mentioned already, I'll be doing a major redesign with lessons learned. I'll need to source a repeatable supply of bearings and ideally a single size that can work across different diameter turntables.
But first I'll be jumping on to the plastic to brass track adapter and getting that ready for sale. While looking for a brass track in the attack I also came across this:
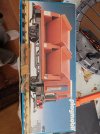
Totally forgot I had this. Having kids can be pretty fun

Letters came out great with a bit of ironing something which the ender struggled with.

Both boys initials for some joint ownership/partnership!

Click right between the rivet frames. Revell Contacta takes more time to dry but doesn't give the white haze discolouration of super glue and the increased working time is a bonus. Needle applicator tip is a huge benefit too.

Going to give it a few hours to fully set and we're ready for playtime!
For those interested, the turntable has a track length of 265mm.

As mentioned already, I'll be doing a major redesign with lessons learned. I'll need to source a repeatable supply of bearings and ideally a single size that can work across different diameter turntables.
But first I'll be jumping on to the plastic to brass track adapter and getting that ready for sale. While looking for a brass track in the attack I also came across this:

Totally forgot I had this. Having kids can be pretty fun
Last edited:
Polarblair
Registered
Very pleased with the final result. Pleasantly surprised to find out the 4010 diesel fits on the turntable! Slightly less relevant given that you can't tell if it's going forwards or backwards but I still call it a win 
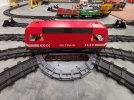
Even if it completely dwarfs the turntable and looks a bit silly
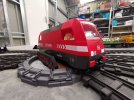
Just barely on.
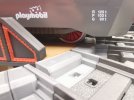
And the other end:
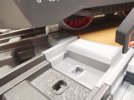
But larger locos have made me realise the turntable has to have some form of indexing.
Easiest way to implement would be a sprung ball bearing and detent.
The lazy susan bearing I had to hand is also far from perfect. It's partially sprung and so has some vertical movement.
So time to redesign.
Wish list:
1. Indexing.
2. Better bearing.
3. Low cost low detail version.
4. Higher price point detailed version.
5. Compatibility with motors for automation.
In terms of making it motorised what are your thoughts? Being fairly new to G scale I don't know if people have gone as far as automating RC tracks. Im assuming perhaps incorrectly that automation would only kick in for brass track. Happy to be educated.
Lastly I'm looking for criticism - anything that should be added to the wish list?

Even if it completely dwarfs the turntable and looks a bit silly

Just barely on.

And the other end:

But larger locos have made me realise the turntable has to have some form of indexing.
Easiest way to implement would be a sprung ball bearing and detent.
The lazy susan bearing I had to hand is also far from perfect. It's partially sprung and so has some vertical movement.
So time to redesign.
Wish list:
1. Indexing.
2. Better bearing.
3. Low cost low detail version.
4. Higher price point detailed version.
5. Compatibility with motors for automation.
In terms of making it motorised what are your thoughts? Being fairly new to G scale I don't know if people have gone as far as automating RC tracks. Im assuming perhaps incorrectly that automation would only kick in for brass track. Happy to be educated.
Lastly I'm looking for criticism - anything that should be added to the wish list?

