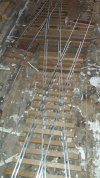
Igor, I tested out on Peco 4ft rad points, LGB R3 points and TrainLine R2 points. I never think in terms of 1:whatever and never haveWOW
That sound very big to me, but it makes sense, if you give it a thought or two.
A lot of different manufacturers want to roll on different tracks.
I think i will settle with 3mm instead of 4mm, i would like to get away with 2mm, but with the big ones? i dont think 2 mm gap wiil stand a chance.
Even on your biggest turnout? i dont know what your biggest is? 1:6?
Or does this not matter on what size turnout you have?
It would be logical for me that when the turnouts are getting bigger the gaps are getting smaller?
Thanks for this information, i am very happy with it.
With best regards Igor
You are using an out of date browser. It may not display this or other websites correctly.
You should upgrade or use an alternative browser.
You should upgrade or use an alternative browser.
Track making/making tracks: the good, the bad and the ugly, advice and thoughts wanted, explanation is giving(incl mistakes)
- Thread starter justme igor
- Start date
Greg Elmassian
Guest
The wider flangeways at the frog (the rails there next to the frog are called wing rails) must be matched by narrower back to back (and thus gauge) to keep the wheels from hitting the point of frog.
This is the interaction necessary and one of the reasons LGB is this way, their flanges are also "thicker", along the axle shaft axis.
Igor's experimentation on changing the gauge some and varying back to back also throws more variables into the mix, it will, I predict, throw more complications coming into a solution.
We shall see what works on the "monster" locomotive.
Greg
justme igor
Registered
After a year with my 3d printed in abs siccors turnout.... i would not do it again.(just like my 5 way switch in abs 3d printed....just dont do it)
Reason is pretty simple, the abs is good for a single track, but NOT for more advantage track.
It will harden within one year beyond repair, and it will shrink a little.
If you want to print track in 3d, stick to just sleepers for straight tracks and curves.
Or try with what other did, just don't do mine or simulair .
All my experiments with more than a straight or a simple curve.....: FAILED big time, it will take time but it will fail.(it will take 12 months....and i am testing a lot, remember!)
For the duration for strait and simple curved tracks, i simply still have no answer, those test are "still going good?)
Sorry for all those abs experiment, for those who have tried them, and for those that went into my thingyverse account, sorry, it will not work for long.
With wooden sleepers/ties i found two new putties, i will post results soon, but for now after two years, polymax is still the big winner...It is still going very very good and strong
I think i will stay with that one and finaly going to build MY railroad.....finally.(after bricklayer is done with my new house...)
With best regards Igor
justme igor
Registered
We had some "heatwaves" in the Netherlands, so i could put some track of mine into the direct sunlight.
I think one of the last experiments i needed to do.
The track was a experimental piece of 3x 1.25 meters was placed in direct sunlight surrounded by concreet slabs and brick waling, the worst possible heat scenario for Dutch environment.
So from 15C to 56c (air temp was 36C) it grows 8 full mm, meaning i have to maintain a gap of 2mm when i am placing them below 15c temps and a gap of one mm with temps below 25C.
Just to avoid expansion problems.
The rails are going to be joined with 12mm wide sleepers instead of the usual 10x10mm sleepers just to guide the expansion (no glue on the connectors).
I am not sure to "screw" down the connecting sleepers or just one screw in the middle of the rails.
Probably i will not screw anything to secure.
Just use a sand bottom and some sharp 2 to 4mm pebbles to keep all in track?
But this is a other experiment.
Just some thoughts for next month? year?
justme igor
Registered
With the previos writing: I had the guts to make something that WILL be on my garden layout, incl the knowledge that was giving on this and other forums.
I think this one is for real.
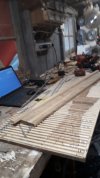
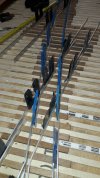
Cutting all the sleepers to there right seizes.
And cutting the slots where the alu strip must go with help of my new jigs.
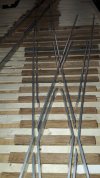
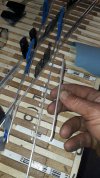
pre bending and making sure everything is oke before glue
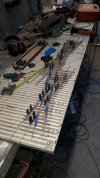
Some fine adjustments with a fine cutter.
The black fillers(3mm) are for normal locomotives, the blue fillers(4mm) are for those oversized locomotives.
This is the curve (5meter radii) that can run the really big ones, it will be a separate track/road for them.
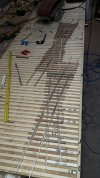
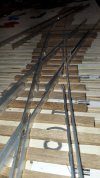
So this was the dry fitting of the rails.
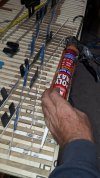
I tried some other putties in the last year...but polymax still wins. this discussion is closed!
I tried i the mean time around 25 different putties on top of the ones i tried before, but a ms polymere, beats all
There are two othere ones beside polymax, also ms polymere based, they are cheaper but also promising.
I will round them all up for one picture incl the ones that are not up to this task.
With glue i am done with experimenting, picture of all will follow.
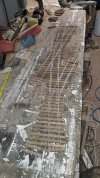
Not bad dont you think?
4mm spacing and 5 meter radii and for normal locomotives 3mm spacing and 3 meter radii
The nmra1 standards where really happy, no bumping derail or whatever, when i extended it in the garden as experiment
With best regards Igor K
I think this one is for real.

Cutting all the sleepers to there right seizes.
And cutting the slots where the alu strip must go with help of my new jigs.

pre bending and making sure everything is oke before glue

Some fine adjustments with a fine cutter.
The black fillers(3mm) are for normal locomotives, the blue fillers(4mm) are for those oversized locomotives.
This is the curve (5meter radii) that can run the really big ones, it will be a separate track/road for them.


So this was the dry fitting of the rails.


I tried some other putties in the last year...but polymax still wins. this discussion is closed!
I tried i the mean time around 25 different putties on top of the ones i tried before, but a ms polymere, beats all
There are two othere ones beside polymax, also ms polymere based, they are cheaper but also promising.
I will round them all up for one picture incl the ones that are not up to this task.
With glue i am done with experimenting, picture of all will follow.

Not bad dont you think?
4mm spacing and 5 meter radii and for normal locomotives 3mm spacing and 3 meter radii
The nmra1 standards where really happy, no bumping derail or whatever, when i extended it in the garden as experiment
With best regards Igor K
Attachments
justme igor
Registered
I need to test this one better and make 2 other ones as well.
The frame and wheels of the AA20 is "ready" for a test run.
If she and the frame of the crocodile and the terrier locomotive will run with some cars, without problems....
Then some real project: a piece of adam central from 1936!
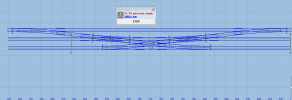
Yes i would like it to make it with electric motors with simple dc switch controle.
Templot is a great program, but it cannot do everything, the safety rail and the guard rails incl frog must be done manually.
For those who went to adam cs yes this piece was changed, remember i am building pre catenaries era. Steam locos require bigger radii.
The switches where in scale 5 meter radii, now they are 2.20 meter in scale radii.
With best regards Igor
The frame and wheels of the AA20 is "ready" for a test run.
If she and the frame of the crocodile and the terrier locomotive will run with some cars, without problems....
Then some real project: a piece of adam central from 1936!

Yes i would like it to make it with electric motors with simple dc switch controle.
Templot is a great program, but it cannot do everything, the safety rail and the guard rails incl frog must be done manually.
For those who went to adam cs yes this piece was changed, remember i am building pre catenaries era. Steam locos require bigger radii.
The switches where in scale 5 meter radii, now they are 2.20 meter in scale radii.
With best regards Igor
justme igor
Registered
Ps Due to the length of this set i must make some expansion gabs every 1 meter 25 cm.
But i will be build as one.
But i will be build as one.
justme igor
Registered
yes Amsterdam central station 1936
NorthwestGarrattGuy
Some young foamer from seattle
on second thoughts...
have a look at the pics below.
using simple strip iron and hardwood ties (with grooves) you could make simple and durable track, that holds up very long time.
(and curve-making would be so much easier)
the second and third pic are more than five years older,
its temperate not sub tropical our winters get down to about 28-32 degrees F and last year was quite cold it got all the way down to 22 degrees hasn't gotten that cold since the 1950s and it looks like we might get some snow next if the rain continues and it keeps getting colde.......... what a minute lets check how old this thread isLast time I went to Staver in was located in a former factory building in North West Portland, Oregon. Admittedly it get more than its share of damp there, the PNW being a sub-tropical rain forest, but it ain't no SFBA.
justme igor
Registered
I started this tread several years ago, and i keep it fresh with the experiments i am doing.what a minute lets check how old this thread is
In the hope to help and inspire others.
It is growing and getting more professional. If i can say....I like the end result very much.
Look at the first page how i started, follow the whole journey to the end result.
Currently i am building my own house, so lack of some time, sorry
How I would have loved to build my own house, trouble is land expensive and tricky to find in UK. Then when I was young and able enough even if you found the land planning permission was against you. Now that has changed massively due to housing shortage in uk. Perhaps if things had been more enlightened years ago we may not be in the gross housing shortage that exists in uk. Still we are where we are, good luck with the house built and as Henri has shown with his makeover there would be a lot of interest in how your build goes ahead.I started this tread several years ago, and i keep it fresh with the experiments i am doing.
In the hope to help and inspire others.
It is growing and getting more professional. If i can say....I like the end result very much.
Look at the first page how i started, follow the whole journey to the end result.
Currently i am building my own house, so lack of some time, sorry
NorthwestGarrattGuy
Some young foamer from seattle
ah yes well some of the information in this thread is quite helpful, except the lack of a formula for calculating the geometry of turnoutsI started this tread several years ago, and i keep it fresh with the experiments i am doing.
In the hope to help and inspire others.
It is growing and getting more professional. If i can say....I like the end result very much.
Look at the first page how i started, follow the whole journey to the end result.
Currently i am building my own house, so lack of some time, sorry
justme igor
Registered
Good luck with your house Igor, I assume you've planned a whole floor to accommodate your railway?
justme igor
Registered
Its a monumental piece, mainly i rebuilt the whole house, according to the new demands, but as i have a own insulation ess and construction companies i do it times 2...regarding insulation batts and longlife...brickwork is done in 4 weeks from now, except for the details, but we light up a candle and its warm inside plus no more gas usage or Electra usage, next year two evs....How I would have loved to build my own house, trouble is land expensive and tricky to find in UK. Then when I was young and able enough even if you found the land planning permission was against you. Now that has changed massively due to housing shortage in uk. Perhaps if things had been more enlightened years ago we may not be in the gross housing shortage that exists in uk. Still we are where we are, good luck with the house built and as Henri has shown with his makeover there would be a lot of interest in how your build goes ahead.
But believe me....you dont want to do this, even if it is your occupation for the last 4 decades.....
But we live grid free and the house will live for a other 200 years, even the windows i made of palisander wood...only the best and finest.
No more things must be done for the rest of my life, only hire a painter and play with trains and do some fishing and hunting.
justme igor
Registered
I dont calculate anymore.....ah yes well some of the information in this thread is quite helpful, except the lack of a formula for calculating the geometry of turnouts
Templot Home
Welcome to this web site about my Templot computer program for the design of hand-built model railway track.
templot.com
I think you can download it here.
There is a steep learning curve!!
But when you master that.....ALL is possible, your wildest dreams, the most difficult real-life situations....easy...
The rest is up to you.
I recommend rmna1 standards, not fine scale, go to
Soon i will post a topic with all the succes for all to "copy and paste" incl how to cut a piece of wood to make your moulds and jigs, with cheap tools only suited for this hobby.....you dont have to have "my" "professional" tools or very dedicated tools
So gents/gals keep an eye out for hardwood, any will do.
And please buy alu or iron/steel strip per 250 meters, and cut it on a "fixed" temp... every time the same temp.
In my case it must be in the shed exact 20C for alu...A table with temps for placing them with spacers when it is a certain temp outside will follow.
Almost done...i am waiting on 0 or - 5 to have practice and not theoretical measurements....but your strip can deviate in composition....
Yes i experimented and it went not so good with the expansion of the alu

