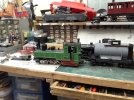
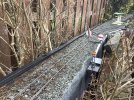
What happened at your workbench today?

MMmmm - if I can't work out what the board does, I tend to remove it. I work on the simple basis that if I ever have to do any re-work / upgrade, if I know what things do, then I can sort it :nerd::nerd:

If there's some inertia, will it reduce running time to any great degree? Probably not, but it's worth asking the question :emo:
Ah you are quite knowledgable with battery conversions. Looking at the vid on this link Buck Converters vs Voltage Regulators, I assume the Buck would give better battery life when using LED’s as lighting? Though I reckon reversible lights could be an issue, though for me just clear lights each end will be better than none.

 
Ah you are quite knowledgable with battery conversions. Looking at the vid on this link Buck Converters vs Voltage Regulators, I assume the Buck would give better battery life when using LED’s as lighting? Though I reckon reversible lights could be an issue, though for me just clear lights each end will be better than none.

As far as I know, a buck converter is just a ready-made voltage control unit that is easily adjustable to the voltage you need.

Directional lighting is fairly simple, depending on which ESC you use, but if you can't use the ESC, and if the lighting is from grain-of-wheat bulbs, then it just needs a diode in each circuit to work on the same principle as an LED.
As suggested by Tony Walsham on here many moons ago, I use a relay wired as a DPDT switch, in conjunction with bi-colour LEDs, powered by the converter. Forward/reverse power from the the ESC flips the polarity of the relay output to give white and red indications as appropriate, or white only for a headlamp. I like that arrangement as it separates lighting from motor speed, being at constant voltage.
 
As suggested by Tony Walsham on here many moons ago, I use a relay wired as a DPDT switch, in conjunction with bi-colour LEDs, powered by the converter. Forward/reverse power from the the ESC flips the polarity of the relay output to give white and red indications as appropriate, or white only for a headlamp. I like that arrangement as it separates lighting from motor speed, being at constant voltage.
Yep, as I say, it depends on the ESC - some have the necessary outputs for lighting at constant voltage nowadays.
 
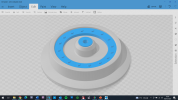
I wanted some more detailed wheels for my tram coach, so this is the result. They run very well, despite being 3D printed plastic. I mount them onto a 2mm stainless steel axle and ball races to give them the best chance of free running. More pics of the bogies to follow..

1673204330247.png
 
I wanted some more detailed wheels for my tram coach, so this is the result. They run very well, despite being 3D printed plastic. I mount them onto a 2mm stainless steel axle and ball races to give them the best chance of free running. More pics of the bogies to follow..

View attachment 308643
Occures to me that 3D printed inserts to normal LGB and Bachmann wheels could be done to represent Mansell type wheels.
 
Occures to me that 3D printed inserts to normal LGB and Bachmann wheels could be done to represent Mansell type wheels.
Interesting, thank you.
I didn't know the history of the wheel in question, but that's very much what I'm trying to create. Due to the side frames of the bogies, the inner detail will not be visible, so I've only modelled the outer part of the wheel. This could easily be updated however.
 
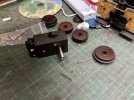
A little more work on my Bachmann Railtruck conversion, photos to follow :)
 
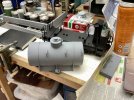
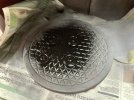
Finished spraying the Tank Wagon and sprayed the new Roundhouse Wheels that will be used for Russell when I fit the SloMo, that should be next in the bench.
77B21B53-69B0-417B-BCC5-79E429F07FFB.jpeg6C2ECC53-CECF-4807-A155-6F13B19E56EE.jpeg2921CE6B-B0A5-4FF6-97DA-27012CE19C6D.jpeg
 
Another job arrived, bought this U2 via a forum member as a non runner. Will be doing a full strip down, repairs and battery job on it. Oh and yes a signal that has been broken, quite what has damaged it is anyones guess as it was very well soldered. My thoughts are a cat at night on a headlong dash along the Railway but who knows, certainly not a Fox even though they are found in next doors garden on occasion, they do tend to leave foul smelling residue beloved by dogs. Russell had a bit of adjustment to the RC arm and looks fine, to be tested when weather stops hissing down for a day. Oh and Wagon Numbers plus Wagon Card created for the Tank Wagon.
CDC19DE1-A0F6-43DB-B613-B47EA72CC961.jpeg
 
Brew required..
Then off to Berlyn. - Hopefully, light at the end of the tunnel wire.. :nerd: :giggle:

PhilP
 
Another job arrived, bought this U2 via a forum member as a non runner. Will be doing a full strip down, repairs and battery job on it. Oh and yes a signal that has been broken, quite what has damaged it is anyones guess as it was very well soldered. My thoughts are a cat at night on a headlong dash along the Railway but who knows, certainly not a Fox even though they are found in next doors garden on occasion, they do tend to leave foul smelling residue beloved by dogs. Russell had a bit of adjustment to the RC arm and looks fine, to be tested when weather stops hissing down for a day. Oh and Wagon Numbers plus Wagon Card created for the Tank Wagon.
View attachment 308845
A badger, maybe?
 
George's site does not have a schematic for the board, but it does show the wiring connections. Looking at the board, it seems that at most there is possibly a regulated voltage for lights.

None of this should affect the motor, in fact I would be very surprised if the motor was not directly connected to the rail pickups (and perhaps their common "polarity DPDT switch", the switch i see may just be a motor and lights on off).

I'd double check the "inertia" reading, but I'd jettison the board, really not needed and takes up valuable space in the limited space you have.

Greg
 
A badger, maybe?
We have had Badgers in the Street but not thus far in my Garden, they do tend to leave tell tale scoops out of grass when hunting for grubs so will look around some. That would not be good news if it were, they can be quite destructive as lovely as they are.
 
We have had Badgers in the Street but not thus far in my Garden, they do tend to leave tell tale scoops out of grass when hunting for grubs so will look around some. That would not be good news if it were, they can be quite destructive as lovely as they are.
Their destruction is often accidental as they just blunder about because of their poor eyesight. Like hedgehogs, they tend to travel in straight lines! I have a number of videos of hungry badgers overturning the ground feeder cages to get at the bird seed, but that's easily corrected just by putting the cage right way up next day.
 
Repaired the signal vandalised by some kind of nature, needed quite a bit of heat to re solder it so fired up the Brulee burner for the heat required at the base. Cross arm managed ok with my 75w iron. Installed, tested with some minor adjustments to the linking wires all is now well. Hopefully for another 15 years or more as it was first installed on the Ruschbahn back in 2006 or so. Only change made by me since installing here around 2013 has been to replace the plastic film canister lids used to make the larger disks with brass ones. The plastic ones did quite well lasting over a decade.
CF05A438-23DF-4BFA-B78C-89C43AC40EC6.jpeg
 
Had the LGB 3-way out of the (mostly complete) layout as I am having some issues with de-railments when shunting over these points (and occasionally driving through).
Some parts from Heyn turned up this week, so have outfitted the 3-way with Heyn extended check rails, plus I have added a check rail to the 'centre' point blade - looks like my point is quite old - I did buy it something-hand and in a very old yellow LGB box. On closer inspection, most 3-ways I can find on a google search have a moulded check rail for the centre. Not sure how effective this is as it has to allow for the blade movement, which leaves it looking like it is quite a way off the rail.

Had some spare 1.5mm thick brass strip, made up some little tabs, drilled and tapped the blade, added a modified Heyn R3 cross over check rail. Hopefully that should keep the stock on the rails - we will see.

1lxGk4P.jpg


y3N6rwG.jpg
 
Not only the extended length helping, but moreover the fact these inserts narrow the too-wide flangeway, and keep the wheels from "picking the point" (of the frog). Basically better controlling the wheelset as it transitions to-from the frog.

One of the first modifications for many off the shelf switches.

One proviso, double checking and setting back to back spacing on wheelsets will be more critical, since you reduced the "tolerance". On the other hand you should enjoy much improved reliability.

Greg
 
I have what are certainly later versions of these from LGB so if you would like photos of them if this might help, just let me know.
 
Back
Top