You are using an out of date browser. It may not display this or other websites correctly.
You should upgrade or use an alternative browser.
You should upgrade or use an alternative browser.
What happened at your workbench today?
- Thread starter Henri
- Start date
David1226
Registered
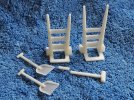
My 3D printed purchases from SLR Models have arrived. I bought two sack trollies, a pair of shovels and a sledge hammer with which to 'accessorise' my coal staithes. They are made to 16mm scale and so are slightly oversize for G Scale. The sack trollies are dimensionally perfect for hailing around my Modeltown coal sacks, except for the height. I have reduced the height of the one on the left to a more acceptable size for G Scale for comparison. The other one will be similarly reduced. One trolley will be placed in the coal staithes and the other will go outside the yet to be built coal office. Similarly I have reduced the length of the sledge hammer shaft to be more in scale. I cannot do anything about the slightly oversize shovels but once everything is painted the difference should be less noticeable, especially with some careful placement.
David

David
Hm I wonder if they could be tasked to make closer to our scale, with 3D printing it ought to be a simple process of resizing the drawing. No doubt 3D experts will comment.My 3D printed purchases from SLR Models have arrived. I bought two sack trollies, a pair of shovels and a sledge hammer with which to 'accessorise' my coal staithes. They are made to 16mm scale and so are slightly oversize for G Scale. The sack trollies are dimensionally perfect for hailing around my Modeltown coal sacks, except for the height. I have reduced the height of the one on the left to a more acceptable size for G Scale for comparison. The other one will be similarly reduced. One trolley will be placed in the coal staithes and the other will go outside the yet to be built coal office. Similarly I have reduced the length of the sledge hammer shaft to be more in scale. I cannot do anything about the slightly oversize shovels but once everything is painted the difference should be less noticeable, especially with some careful placement.
View attachment 270918
David
Northsider
Modelling the Northern half of the Isle of Man
I know it can be done on our 3D printers at work: there are set resizing scales which require just a mouse click or two.Hm I wonder if they could be tasked to make closer to our scale, with 3D printing it ought to be a simple process of resizing the drawing. No doubt 3D experts will comment.
Chris Vernell
45.29 N, 75.75 W
Trollies, shovels and sledgehammers come in many shapes and sizes, so once you have them painted and weathered most people won't noticeMy 3D printed purchases from SLR Models have arrived. I bought two sack trollies, a pair of shovels and a sledge hammer with which to 'accessorise' my coal staithes. They are made to 16mm scale and so are slightly oversize for G Scale. The sack trollies are dimensionally perfect for hailing around my Modeltown coal sacks, except for the height. I have reduced the height of the one on the left to a more acceptable size for G Scale for comparison. The other one will be similarly reduced. One trolley will be placed in the coal staithes and the other will go outside the yet to be built coal office. Similarly I have reduced the length of the sledge hammer shaft to be more in scale. I cannot do anything about the slightly oversize shovels but once everything is painted the difference should be less noticeable, especially with some careful placement.
David
The Shed
Citizen of the Republic of the North East.
Massoth Service Tool, latest up to date version, several changes, most are only relevant for designing decoder templates.
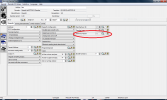
This particular addition is welcome, as shown, is for the Read & Write values of CV’s as in the bit-wise binary code (blank box indicates a Zero, tick equals a One).
Anyone who has had first hand experience of using a Navigator to manipulate multiple CV’s and upwards of eight digits for each single CV, will appreciate any, if no matter how small the improvement is, that makes this task easier.
* LGB decoder Reset is no longer available as a functioning option, has been disabled as the Massoth CV 7 also uses the 55 value, when activating part of a decoder Reset.
The option to enter manually, or via a decoder template, either as CV 55 with a value of 55, or CV 6 with 55, then CV 5 with 55, none of the above options will have any effect, and they will not force a decoder reset, it may appear from the motor jerking that indeed a Reset has taken place , a READ back will prove otherwise.
Using Register Mode from within the Navigator Decoder programming Option will force a decoder to carry out a reset**.
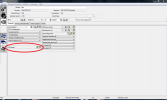
Use of the improved decoder template program, redesigned an existing LGB 55021 template, with a few extra additions.
Also used for investigative look at the decoder in the LGB Track Cleaning Loco (20670),update to the existing manual will follow at some point**.
**Notes about this, and how it effects CV’s will be included in the revised documentation.
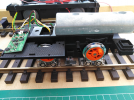
Both of which were tested using, either the Massoth PC Module*, or the PIKO Central Station with a PIKO Navigator, with it’s ability to use the different programming modes, Service, POM and Register Mode, on a set of roller bearings with steel balls.
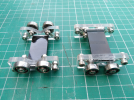
Speaking of balls, these were on display and for sale at the G Scale event in Nottingham, parts are available to make further units up, guideline price will be around £15.00 a pair, hopefully in the not to distant future Area Meets and Local Exhibitions will start to take place, welcome to see, and try before you buy, hands on experience of the PIKO DCC system in operation using the various programming modes.
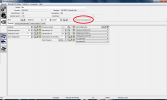
Modified Massoth M decoder template using the new CV 7 reset dialogue box.
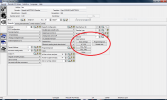
Slightly related, working on decoder templates for the following Dietz DLE G, DLE 2M, & DLE2M-S, PIKO 3612x, and Uhlenbrock 77310 decoders.
Test of a PIKO 3612x decoder template, using genuine Massoth rollers, and a LGB 55045 Programmer, which ultimately turned out, was the source of the problem of not being able to READ & WRITE CV’s correctly, and unlike the Massoth unit it is not reconfigurable, and in nut shell, it just ain’t man enough for the task for newer decoder types, the LGB unit will however, be used for older type LGB and Massoth decoders.
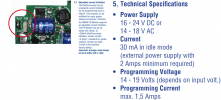
Batteries, gleaning knowledge from ge_rik
,
M
Michael
and
 dunnyrail
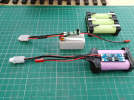
, put together a 2S Lithium polymer battery pack and a 2S Lithium-ion battery pack, balance boards, balance leads, etc.
Constructed a Plasticard container for the Lithium polymer batteries for added protection (and since then discovered a 3D printed version).
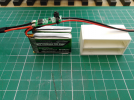
The plastic cover on the plugs are known as a Balance Plug Saver Clip.
A great device which makes plugging or un-plugging the balance charge lead, much safer and more convenient.
The re-usable Balance Plug Saver simply snaps onto the JST-XH balance plug to give a decent finger grip, no more yanking on balance plug leads.
The 2S Li-ion pack was constructed using the 18650 Battery Spacer a blend of ABS and plastic.
Perfect for creating battery packs for every use.
3S pack still to make, for use with the Tam Valley DRS1 Receiver.
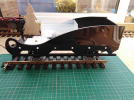
And finally……………...well it had to done, and time is creeping forwards!
This particular addition is welcome, as shown, is for the Read & Write values of CV’s as in the bit-wise binary code (blank box indicates a Zero, tick equals a One).
Anyone who has had first hand experience of using a Navigator to manipulate multiple CV’s and upwards of eight digits for each single CV, will appreciate any, if no matter how small the improvement is, that makes this task easier.
* LGB decoder Reset is no longer available as a functioning option, has been disabled as the Massoth CV 7 also uses the 55 value, when activating part of a decoder Reset.
The option to enter manually, or via a decoder template, either as CV 55 with a value of 55, or CV 6 with 55, then CV 5 with 55, none of the above options will have any effect, and they will not force a decoder reset, it may appear from the motor jerking that indeed a Reset has taken place , a READ back will prove otherwise.
Using Register Mode from within the Navigator Decoder programming Option will force a decoder to carry out a reset**.

Use of the improved decoder template program, redesigned an existing LGB 55021 template, with a few extra additions.
Also used for investigative look at the decoder in the LGB Track Cleaning Loco (20670),update to the existing manual will follow at some point**.
**Notes about this, and how it effects CV’s will be included in the revised documentation.

Both of which were tested using, either the Massoth PC Module*, or the PIKO Central Station with a PIKO Navigator, with it’s ability to use the different programming modes, Service, POM and Register Mode, on a set of roller bearings with steel balls.

Speaking of balls, these were on display and for sale at the G Scale event in Nottingham, parts are available to make further units up, guideline price will be around £15.00 a pair, hopefully in the not to distant future Area Meets and Local Exhibitions will start to take place, welcome to see, and try before you buy, hands on experience of the PIKO DCC system in operation using the various programming modes.

Modified Massoth M decoder template using the new CV 7 reset dialogue box.


Slightly related, working on decoder templates for the following Dietz DLE G, DLE 2M, & DLE2M-S, PIKO 3612x, and Uhlenbrock 77310 decoders.
Test of a PIKO 3612x decoder template, using genuine Massoth rollers, and a LGB 55045 Programmer, which ultimately turned out, was the source of the problem of not being able to READ & WRITE CV’s correctly, and unlike the Massoth unit it is not reconfigurable, and in nut shell, it just ain’t man enough for the task for newer decoder types, the LGB unit will however, be used for older type LGB and Massoth decoders.

Batteries, gleaning knowledge from
Constructed a Plasticard container for the Lithium polymer batteries for added protection (and since then discovered a 3D printed version).

The plastic cover on the plugs are known as a Balance Plug Saver Clip.
A great device which makes plugging or un-plugging the balance charge lead, much safer and more convenient.
The re-usable Balance Plug Saver simply snaps onto the JST-XH balance plug to give a decent finger grip, no more yanking on balance plug leads.
The 2S Li-ion pack was constructed using the 18650 Battery Spacer a blend of ABS and plastic.
Perfect for creating battery packs for every use.
3S pack still to make, for use with the Tam Valley DRS1 Receiver.

And finally……………...well it had to done, and time is creeping forwards!

Last edited:
I spent the last couple of days putting a Massoth XLS and speaker into the RhB Ge 4/4 III that came as part of the No. 70642, 30 years of LGB set released in 1998. I picked up the set off Ebay at a very attractive price about four months ago and am finally getting around to putting it in service. The set was practically unused but had been sitting out on display and had a pretty decent coating of dust to clean off. I'm glad to have the additional Era IV/V first and second class passenger wagons that came with the set.
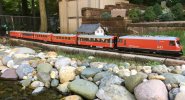
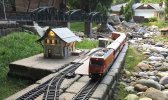
I bought a Massoth Pantograph Control Board but did not have the courage to rip out the existing decoder interface board. So the pans are manually operated for the time being. They could have been operated using the old LGB serial decoders but I wanted sound, a more modern 28 speed step decoder and long addresses. If anyone out there knows how to make them work without replacing the existing board I'd welcome their insight.


I bought a Massoth Pantograph Control Board but did not have the courage to rip out the existing decoder interface board. So the pans are manually operated for the time being. They could have been operated using the old LGB serial decoders but I wanted sound, a more modern 28 speed step decoder and long addresses. If anyone out there knows how to make them work without replacing the existing board I'd welcome their insight.
casey jones snr
Registered
I have a similar set from MacAllister:-Getting to grips with Deltank again, got it all working but not all the sounds are right with the buttons. Some are turning on/off with the thrash handle. Hm confused.com. But will get it right eventually even if I have to call Andy at Micron again!
View attachment 270789
This rather nice Screw Driver set obtained from Aldi yesterday now part of the Workbench Armory, hope you can read the sizes of the attachments from the pic. Nice extension piece that Gives a reach of 4.5 inches, often useful and that part has a magnetic tool holder as well. Great value for £4.99.
View attachment 270788
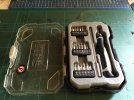
Purchased from a BP garage for £3.99 last year.
casey jones snr
Registered
I popped into my local Aldi today and picked both of these sets:-Getting to grips with Deltank again, got it all working but not all the sounds are right with the buttons. Some are turning on/off with the thrash handle. Hm confused.com. But will get it right eventually even if I have to call Andy at Micron again!
View attachment 270789
This rather nice Screw Driver set obtained from Aldi yesterday now part of the Workbench Armory, hope you can read the sizes of the attachments from the pic. Nice extension piece that Gives a reach of 4.5 inches, often useful and that part has a magnetic tool holder as well. Great value for £4.99.
View attachment 270788
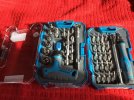
Oh never had the left hand one in my local Aldi, but not so sure I would heve needed it as I already have one of them hand held drivers. But for any short of good tools they are a good buy.I popped into my local Aldi today and picked both of these sets:-
View attachment 271102
casey jones snr
Registered
The two Aldi’s in Loughborough didn’t have any of either sets, however my local Aldi in Coalville had both sets. I’m a sucker for small tool sets.Oh never had the left hand one in my local Aldi, but not so sure I would heve needed it as I already have one of them hand held drivers. But for any short of good tools they are a good buy.
I also purchased a bottle of “Clear” Gorilla glue and a tub of 20 tubes of assorted acrylic paints.
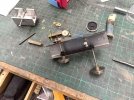
Continuing work on the PeppaPig thing. A fair bit of work today has been around sorting out the gears on the IP Engineering Budget Metal Chassis. I thought I had heard that they were doing some Metal ones, but talking to Ivan they do not match this for reasons of contamination of metal gears in the Garden environment. But he reckoned his newer Heavy Duty 30:1 set were pretty well near indestructible. So I ordered a Couple of sets today (have 2 of these chassis) and no doubt they will be here in a day or two. That prompted thoughts again about removing the wheels and gears rather than the crude punch and big hammer method that I have already used a couple of times on these chassis. Thus I made a G Scale Wheel and Gear puller today. Did not have any suitable sized U channel but found a length of good strong ally so this was used.
The 2 pieces were put together and drilled for 4ba nuts and bolts to hold together, a hole drilled then hacksawed out for the chassis to fit in. Another 4ba hole was drilled for tapping to make the pusher. I think the pics should show the construction ok. Not the strongest or best engineered piece of engineering (I hasten to use that word) but it did the job on light nylon gears and insulated with nylon wheels.
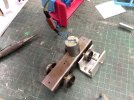 Proof that it works below. The squares were used as packing pieces after the first push so will be cut to size square, drilled and tapped to make their use much easier. They fit behind the wheel as you can see the screw has gone to its extent and packing pieces behind assist. Too long scres may be ok but I needd to machine a little bit of the thread off the pusher screw so that it goes inside the wheel. That prooved impossible in the longer screw. All in all a satisfactory couple of hours work.
The 2 pieces were put together and drilled for 4ba nuts and bolts to hold together, a hole drilled then hacksawed out for the chassis to fit in. Another 4ba hole was drilled for tapping to make the pusher. I think the pics should show the construction ok. Not the strongest or best engineered piece of engineering (I hasten to use that word) but it did the job on light nylon gears and insulated with nylon wheels.
 Proof that it works below. The squares were used as packing pieces after the first push so will be cut to size square, drilled and tapped to make their use much easier. They fit behind the wheel as you can see the screw has gone to its extent and packing pieces behind assist. Too long scres may be ok but I needd to machine a little bit of the thread off the pusher screw so that it goes inside the wheel. That prooved impossible in the longer screw. All in all a satisfactory couple of hours work.
Diesel2000
Registered
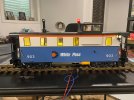
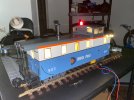
Added a Light-It decoder with 8 interior LEDs and a beacon to the roof of the cupola on this WP Caboose. I then consist the caboose decoder with the loco for on/off DCC light control. This was a really fun and frustrating project that took 2 weeks to work out. The Light-It can only power 3 LEDs directly, so it needed a booster in order to handle 12.


Rhinochugger
Retired Oik
Continuing work on the PeppaPig thing. A fair bit of work today has been around sorting out the gears on the IP Engineering Budget Metal Chassis. I thought I had heard that they were doing some Metal ones, but talking to Ivan they do not match this for reasons of contamination of metal gears in the Garden environment. But he reckoned his newer Heavy Duty 30:1 set were pretty well near indestructible. So I ordered a Couple of sets today (have 2 of these chassis) and no doubt they will be here in a day or two. That prompted thoughts again about removing the wheels and gears rather than the crude punch and big hammer method that I have already used a couple of times on these chassis. Thus I made a G Scale Wheel and Gear puller today. Did not have any suitable sized U channel but found a length of good strong ally so this was used.
The 2 pieces were put together and drilled for 4ba nuts and bolts to hold together, a hole drilled then hacksawed out for the chassis to fit in. Another 4ba hole was drilled for tapping to make the pusher. I think the pics should show the construction ok. Not the strongest or best engineered piece of engineering (I hasten to use that word) but it did the job on light nylon gears and insulated with nylon wheels.
View attachment 271103Proof that it works below. The squares were used as packing pieces after the first push so will be cut to size square, drilled and tapped to make their use much easier. They fit behind the wheel as you can see the screw has gone to its extent and packing pieces behind assist. Too long scres may be ok but I needd to machine a little bit of the thread off the pusher screw so that it goes inside the wheel. That prooved impossible in the longer screw. All in all a satisfactory couple of hours work.
View attachment 271104
Delrin gears with brass worms, and delrin chains are all pretty hardy, but bare axles with no bearings is a bit riskyAre there no bearings, and just a bucket-load of washers for centring the axles in the 'block', Jon?
The Shed
Citizen of the Republic of the North East.
The Light-It can only power 3 LEDs directly, so it needed a booster in order to handle 12
Nice lighting effects, vaguely familiar with the NCE Light-It, would you kind enough to supply further details on the 'booster'?
Diesel2000
Registered
Nice lighting effects, vaguely familiar with the NCE Light-It, would you kind enough to supply further details on the 'booster'?
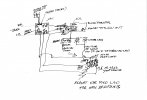
I'm using a separate controller and sl-amp from Shourt Line. The controller is wired to the daisy chain outputs on the Light-it so it gets unfiltered track voltage and then connect the positive side of the additional LEDs to the controller output. The negative side of the LEDs goes to the Load on the sl-amp device. You then connect the +5 from the Light-It as well as the actual output from the Light-It to the sl-amp. For the red beacon I bypassed just used one of the Light-It outputs and the +5 connection. Be sure to add the recommend capacitors to the Light-It board as well as the controller or it will flicker on track. 2 powered axles are also recommended.
Here is a schematic James did for me that shows how its all connected:
trammayo
Interested in vintage commercial vehicle, trams, t
The two Aldi’s in Loughborough didn’t have any of either sets, however my local Aldi in Coalville had both sets. I’m a sucker for small tool sets.
I also purchased a bottle of “Clear” Gorilla glue and a tub of 20 tubes of assorted acrylic paints.
I got a tub of those paints on Sunday but didn't see any glue!

