You are using an out of date browser. It may not display this or other websites correctly.
You should upgrade or use an alternative browser.
You should upgrade or use an alternative browser.
What happened at your workbench today?
- Thread starter Henri
- Start date
Henri
refuses to grow up
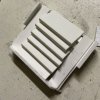
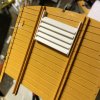
I needed to make a couple of louvres for the RTM wagons. So I started making a ‘glue mould’ to get everything straight. Here’s the first example. It has a tiny error, one ‘blind’ was too short, didn’t stick to the side so I had to apply glue by hand... see the result... out of line! (Second from top)


Converted my Piko Kamel to Battery DCC operation Using Fosworks kit, another that needs no track power. Next in line will be my Black LGB Mallett.
Not much to report re the work, pretty simple bog standard conversion that matched my other Fosworks DCC Installations. Though surprisingly the Kamel is not a spacious inside as one might imagine. The great lumpy weights do not help but they cannot be removed as the loco sans those weights is a lightweight machine. I have put in the 12 x AAA set in this loco that was not correct for one of my Steam Trams that has Deltang kit. I did have to do some work to secure the batteries and drilled out the centre weight to enable a strap made of Butyl pond liner as seen below. I drilled out larger 2 holes each end if the strap and used a washer to hold the strap in the enlarged holes. Hopefully the pic will make that work clear. As can be seen things are quite busy inside as I made my own new lighting looms during the original DCC conversion that was written up in old GCMad days. Massoth XL decoder on the left, the Fosworks boards have been stuffed into the depression in the centre which in real life is a very large Fuel tank.


All ready for you next visit Doug!
Not much to report re the work, pretty simple bog standard conversion that matched my other Fosworks DCC Installations. Though surprisingly the Kamel is not a spacious inside as one might imagine. The great lumpy weights do not help but they cannot be removed as the loco sans those weights is a lightweight machine. I have put in the 12 x AAA set in this loco that was not correct for one of my Steam Trams that has Deltang kit. I did have to do some work to secure the batteries and drilled out the centre weight to enable a strap made of Butyl pond liner as seen below. I drilled out larger 2 holes each end if the strap and used a washer to hold the strap in the enlarged holes. Hopefully the pic will make that work clear. As can be seen things are quite busy inside as I made my own new lighting looms during the original DCC conversion that was written up in old GCMad days. Massoth XL decoder on the left, the Fosworks boards have been stuffed into the depression in the centre which in real life is a very large Fuel tank.


All ready for you next visit Doug!
Henri
refuses to grow up
The Shed
Citizen of the Republic of the North East.
PaulRhB
This Way Up
Ta, it’s just the guts to be honestIf I only had the guts (and mastered the techniques)...
amazing!!!!
It's always sounds easy though, but no one mentions how long it takes to master the skillsTa, it’s just the guts to be honestI use washes, thinned Tamiya paint with water and on with a one inch brush then wipe off most of it with a cloth or towel roll. By gradually building it in layers and dabbing at it, wiping hard or soft in different passes the effects just build. There are a couple of browns, couple of greys, black and light grey used. And if it’s too thick a second brush in a pot of water straight on thins it out

PaulRhB
This Way Up
First time I did it with that technique? About 5 minutes! It literally is having the guts to give it a go as you build it up gradually. Wash on wipe off, sit back and contemplate does it need more?It's always sounds easy though, but no one mentions how long it takes to master the skills
I usually do a wash on one side with a half inch or inch brush, paint the consistency of milk so it really just tones it down a bit. Wipe 80% off again in downward motion to simulate rain washing it down so it’s a bit streaky. Sit back and look, it won’t look done or consistent. Do another wash in certain places, especially where there’s something on the roof that could trap moisture leading to rust. Wipe off again. Now do the same with thin washes of grey or black and once all dry you can highlight with a bit of dry brushing where you’ve wiped 95% of the paint off on a towel roll and just flick it over details, too much and rub off with a finger or tissue
For light weathering 1 or two washes with different colours will work, on the hopper I did about four washes with 3 colours, two browns, dark and light grey.
Find an old wagon or even a bit of plasticard that’s painted and have a play. I learnt it on an old HO freight car and just used a bigger brush for G
Ralphmp
Registered
Working solution to this conundrum.
Automated Rack Railway Conundrum - G Scale Central
View attachment 263901
Please could you explain - I can't make out from the picture exactly what you've done and what I would need to do to implement.
Thanks.
The Shed
Citizen of the Republic of the North East.
Please could you explain - I can't make out from the picture exactly what you've done and what I would need to do to implement.Thanks.
Will do a write up, schematics, from the test circuit shown, and put together a working model with a video.
Only requires three "reed triggers" as per the original idea, would like to experiment with an idea of using "current sense" detectors as an alternative method.
Experimentation and testing with an Arduino based DCC single point decoder, likewise an Arduino DCC Decoder to operate a Solenoid Air Valve for point control.
The "conundrum" was getting "switch 1 point motor" to operate correctly, basic idea "reed trigger 1" sets the route for the point to be "thrown" when activated by "reed trigger 2a", "reed trigger 3" sets the route for "reed trigger 2b" to activate for the point to return to normal.
The solution although at first glance appears complex, it's operation is in real terms, quite simple.
Present lockdown is hampering progress a little, but where there is a will, will always find a way!
Last edited:
GAP
G Scale Model Trains, 1:1 Sugar Cane Trains
Started to dismantle the first of 3 Bachmann clerestory roofed passenger cars to de Americanise them so that they will not stand out on an Australian theme railway.
Started to trash a 3 Stainz to convert it into a tank engine.
Commenced planning on trashing another 2 Stainz, along with a Newquida loco and other bits from the scrap parts bin into a Garret type loco .
Trying to figure out how to fit a Newquida chassis under a Stainz body to make a plausible engine.
All this involves a large amount of hacking and painting, between the construction of the next stage my layout but with the lockdown I have all the time in the world to go ballistic.
Scored a bargain with 4 cans of spray paint for $10 ($20 worth bought).
musket the dog
Registered
It sounds so easy...
As long as you can use a paint brush, and wipe with a cloth, you've got all the skills it takes
I use artist's acrylics, the type that come in the larger squeezy tubes. When the plan is to wipe most of it off, it works out a lot cheaper than the little Humbrol tins. Mix together a few shades of browns, greys, blacks; thin with a bit of water and dab onto the wagon. I tend to work with about half a inch square at a time. Put it on thick and wipe it off. Don't worry about running out of a particular colour mix, muck is very rarely consistent. I use blacker shades on roof to make up for the greater amount of soot. Browner mixes lower down for mud and rust washing off the track.
I started on cheap OO gauge stuff that I had repainted anyway. The first couple didn't turn out perfect but you can only get better with practice
Last edited:
PaulRhB
This Way Up
Have a play it’s amazing how easy it is. I made a mess with this one tho morning .
Was happy with the first wash but put on too thick a light grey wash.Wiped off what I could and did another rust colour wash followed by dark grey and patchy black washes.
phew! Got away with it!
As it dries I do feather the edges of any blobs with the wet one inch brush in the photo.


Was happy with the first wash but put on too thick a light grey wash.Wiped off what I could and did another rust colour wash followed by dark grey and patchy black washes.
phew! Got away with it!
As it dries I do feather the edges of any blobs with the wet one inch brush in the photo.


Ralphmp
Registered
Will do a write up, schematics, from the test circuit shown, and put together a working model with a video.
Only requires three "reed triggers" as per the original idea, would like to experiment with an idea of using "current sense" detectors as an alternative method.
Experimentation and testing with an Arduino based DCC single point decoder, likewise an Arduino DCC Decoder to operate a Solenoid Air Valve for point control.
The "conundrum" was getting "switch 1 point motor" to operate correctly, basic idea "reed trigger 1" sets the route for the point to be "thrown" when activated by "reed trigger 2a", "reed trigger 3" sets the route for "reed trigger 2b" to activate for the point to return to normal.
The solution although at first glance appears complex, it's operation is in real terms, quite simple.
Present lockdown is hampering progress a little, but where there is a will, will always find a way!
Excellent. Thanks v much.


