What happened at your workbench today?

Progress on the Gernise End Station, lighting added. Before adding the roof and platform canopy I decided to add some internal and external lights to the building. I added an outside lamp to the end wall above the door. This was the same as the lamp used on the front of the Toilet Block, a 3 Volt LED lamp purchased from China, via eBay. For the internal lighting I used 5mm clear white 3 Volt LED bulbs, again sourced from China, via eBay. The lights came with connecting wires attached and supplied with bulb holders to secure them. I glued in 3mm plywood struts, along the centre line of the building, and drilled them to take the bulb holders, one in each end room and two in the larger centre room. The wiring for the lights was also taped to these struts. I was looking for a means of locating some lamps on the outside of the building located to shine down from the underside of the platform canopy. I was concerned that the bulb holders supplied with the LEDs might be too deep. A couple of days after my Birthday I noticed a Birthday Cake Candle Holder on a kitchen worktop. It proved to be ideal for my needs. I drilled two holes in the base, to take the bulb wires. The LED was a perfect fit. The spigot on the candle holder can then be trimmed to an appropriate length to be glued into a hole on the underside of the canopy roof.

View attachment 280980

View attachment 280981

View attachment 280982

The wires for all seven lamps were wired to a switchable 2 x AA battery holder, held in a cradle with a movable securing arm, to facilitate battery changes.

View attachment 280983

View attachment 280984

View attachment 280985

View attachment 280986

View attachment 280988

David
Yep like that,watching with interest;):clap:
 
Progress on the Gernise End Station, lighting added. Before adding the roof and platform canopy I decided to add some internal and external lights to the building. I added an outside lamp to the end wall above the door. This was the same as the lamp used on the front of the Toilet Block, a 3 Volt LED lamp purchased from China, via eBay. For the internal lighting I used 5mm clear white 3 Volt LED bulbs, again sourced from China, via eBay. The lights came with connecting wires attached and supplied with bulb holders to secure them. I glued in 3mm plywood struts, along the centre line of the building, and drilled them to take the bulb holders, one in each end room and two in the larger centre room. The wiring for the lights was also taped to these struts. I was looking for a means of locating some lamps on the outside of the building located to shine down from the underside of the platform canopy. I was concerned that the bulb holders supplied with the LEDs might be too deep. A couple of days after my Birthday I noticed a Birthday Cake Candle Holder on a kitchen worktop. It proved to be ideal for my needs. I drilled two holes in the base, to take the bulb wires. The LED was a perfect fit. The spigot on the candle holder can then be trimmed to an appropriate length to be glued into a hole on the underside of the canopy roof.

View attachment 280980

View attachment 280981

View attachment 280982

The wires for all seven lamps were wired to a switchable 2 x AA battery holder, held in a cradle with a movable securing arm, to facilitate battery changes.

View attachment 280983

View attachment 280984

View attachment 280985

View attachment 280986

View attachment 280988

David
That's a vast improvement on the stations that we have out our way - they don't open them after dark :devil: :devil: :punch::punch:
 
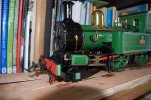
Round up of activity this week, relay Dimmocks curve to Piko R3 from LGB R2/R3
DSC_0089.JPG
Which then allowed me to fit the Accucraft Chopper couplings direct to the buffer beam and fit a shorter Swift sixteen chopper to Mona
DSC_0093.JPG
And a bit of paining on Mona, the number 5 now has a green back ground and the tyres painted black with the wheel centres painted green.
DSC_0094.JPG
 
Round up of activity this week, relay Dimmocks curve to Piko R3 from LGB R2/R3
View attachment 281053
Which then allowed me to fit the Accucraft Chopper couplings direct to the buffer beam and fit a shorter Swift sixteen chopper to Mona
View attachment 281054
And a bit of paining on Mona, the number 5 now has a green back ground and the tyres painted black with the wheel centres painted green.
View attachment 281055
Lord Ailsa would take his hat off to you!
 
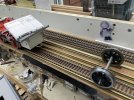
Just a small derisory excersize to alter my workshop test track so that Gauge 3 can use it. This required a 4th rail to make 32,45 and 63.5. Fortunately the 00 track sat neatly between the 32mm gauge rails thus leaving space for the Gauge 3 at 63.5. In the picture you can see a set of Gauge 3 wheels on the track, my LGB chassis that is altered to Gauge 3 and my rough n ready gauge for doing the work. Perfection of P4 standards is not required in Gauge 3! Behind this are the TT and N gauge Tracks, have a little bit of most gauges except for the Perfection ones IE P4, S7 true 2mm scale etc. Prior to this work the Gauge 3 by a happy coincidence sat on the 00 Rail but was a little lop sided and tended to rattle over the sleepers.9879F2C5-2800-4C12-8F8D-68988D0C9F0D.jpeg
 
And a bit of paining on Mona, the number 5 now has a green back ground and the tyres painted black with the wheel centres painted green.
DSC_0094.JPG
I love the green wheels! They give the "19th century" look.
 
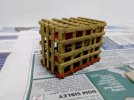
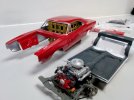
The fellas at Revell were kind enough to give me a choice of 2 engines for the bus kit so one was going spare and what to do with it,the box (huge) was thrown out yesterday much to the joy of SW so a sprue of engine parts left,I built the parts into a nice in line straight 6 diesel but no gearbox so left a "short" engine.so what about putting in a crate as a new motor for a truck/flatcar load,some modifications made taking the belts and alternator off and so on and the spare indicators made good engine mounts so threw a crate together.Metal base and wooden sides and top,still some more to do but waste not want not as they say?;);)View attachment 280931View attachment 280932View attachment 280933View attachment 280934View attachment 280935View attachment 280936
I have finished this off now as I thought a new engine would turn up in a newer crate so toned down the wooden part a little,pleased with it now.Ready for delivery,who knows the railroad might have ordered it to put a straight 6 in our railtruck?
:clap:;);) IMG_20210221_181027.jpg
 
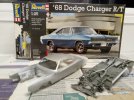
Messing about now with another kit,engine built but not in properly yet as some more on the chassis to do,Sw is pleased as another box out of the way,this one will go outside on diesel days and bring the railroad on 10 years,cars a great way to time scale a line,all cars out there now are `58 or earlier,now on certain days it can be at least `68,and a IMG_20210221_181136.jpgfew more planed,;);)the crate makes a good drying aid!IMG_20210222_032355.jpg
 
Last edited:
Messing about now with another kit,engine built but not in properly yet as some more on the chassis to do,Sw is pleased as another box out of the way,this one will go outside on diesel days and bring the railroad on 10 years,cars a great way to time scale a line,all cars out there now are `58 or earlier,now on certain days it can be at least `68,and a View attachment 281109few more planed,;);)the crate makes a good drying aid!View attachment 281110
Will Daisy Duke be appearing too?
 
Will Daisy Duke be appearing too?
Not Bo or Luke,oh no you just thought of Daisy!!,,,,,,,,,,,,,,Rio thinking now,,,,,,,,,,,,,,,OH ,yes I see your point:h:;););););):rofl:
 
Last edited:
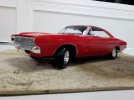
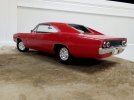
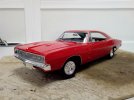
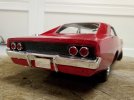
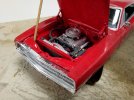
Some more done,just some more chrome to go on,decals and finish paint,just wanna hear that gurgling V8 now but alas,,,,,,,,,,,,:cry:IMG_20210223_011333.jpgIMG_20210223_011253.jpgIMG_20210223_011220.jpgIMG_20210223_011813.jpgIMG_20210223_011701.jpg
 
Some more done,just some more chrome to go on,decals and finish paint,just wanna hear that gurgling V8 now but alas,,,,,,,,,,,,:cry:View attachment 281159View attachment 281160View attachment 281161View attachment 281162View attachment 281163
Surely there must a sound card that you can use? With a nice little battery and speaker hidden in the boot it'll be the business. You could even try and get some engine movement, and how about a small smoke unit for exhaust?
 
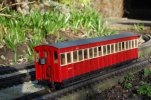
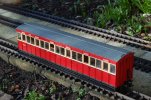
As promised yesterday, the Bowaters Small F coach has been finished last night and drawn out of the workshops for official works photos below, needless to say, I am very pleased with the result:)
DSC_0096.JPG
DSC_0097.JPG
 
Surely there must a sound card that you can use? With a nice little battery and speaker hidden in the boot it'll be the business. You could even try and get some engine movement, and how about a small smoke unit for exhaust?
Yes Paul maybe I could but I meant the REAL one,two sounds that have no equal,chime whistles and gurgling V8`s,well IMHO anyway.:clap::clap::cool::cool:
 
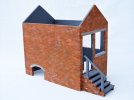
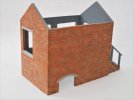
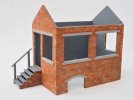
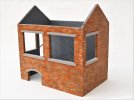
Having completed the toilet block and the station building for Gernise End on the Claptowte Railway, I am next moving on to the signal box.

When it came to painting the brickwork, I wanted to paint all four buildings, the toilet block, station building, signal box and coal office, at the same time, for continuity of colour and appearance. It was my intention to try and replicate the colour and appearance of the 1/24th scale textured brick paper that I had used on various scratch built structures.

I started with the toilet block as it was the smallest building and would be a good test piece, not having painted brickwork before. I was very pleased with the result and immediately moved on to the largest building, the station. Both of these models were by the same manufacturer, Kippo Models, so the brick modelling and texture, and therefore the result, was identical. I moved on to the coal office, by GRS, which had similar brick texture. The result was very similar.

The last building, that I painted the brickwork on, was the signal box by Thorley Miniatures. The texture of the brickwork on this kit was unlike the other models, being very low relief by comparison, and it just did not take the paint and colour up in the same way as the other models. I eventually obtained an appearance that I was happy with, but the finish and colour was not the same as the other models, but then, not all buildings use the same bricks and look the same.

Having painted the brickwork, including the chimney stack and the walls of the steps up to the door, I tackled the lintels and the sills. The window frames would be painted in the corporate cream. For the lintels/sills, I could not decide whether to paint them brown, to represent unpainted timber, the corporate maroon colour, or, a concrete grey to represent, you’ve guessed it... concrete. In the end, I opted for concrete.

I was not happy with the appearance of the window apertures, as the brick modelling did not wrap around into them. To rectify this, I cut mortar lines into the sides of the window recesses, using a razor saw. This necessitated a quick touch up of the paint of course.

The steps have not yet been attached, they are just posed for these photos. I have decided that the steps will be painted brown to represent timber baulks, to ring the changes colour wise.

I was going to worry about modelling an interior at some time in the future, but I have a number of ideas for various modifications, so I will probably crack on and do a complete number on it and finish it.
dig 210226001.JPG

dig 210226002.JPG

dig 210226003.JPG

dig 210226004.JPG

David
 
I have been asked by the one of the larger local garden centers to go and take a look at the railway they have running in their model village again to see if I could get it working ready for the easing of restrictions. Another local family have volunteered to step in and repair a few of the buildings and the masonry.

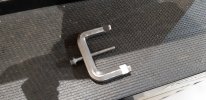
I remembered that last time I was there, there were a couple of nasty kinks in the track where two pieces of flexi-track had been joined. They mainly use the large scale Thomas stuff which seems to pick the bad sections quite badly. To try and cure it, I made myself a Jim crow to persuade a little more curve into the ends of the rails.

20210225_160847.jpg
 
Back
Top