What happened at your workbench today?

It seems odd to be putting this under 'What Happened at Your Workbench?', when the subject is not only bigger than  my workbench, it's bigger than any workbench that I've ever used!
The main task was to fit the turntable well that I've made. I had cut a template out of hardboard, which was pinned to the baseboard, the positioning being largely dictated by the framework underneath.
View attachment 335915
I then cut around the template with a craft knife
View attachment 335916
...and drilled a 10mm diameter hole to take the jigsaw blade:
View attachment 335917
Heart in mouth, I started cutting; it may not be as high-risk as cutting the roof of a car to fit a sunroof, but it doesn't bear thinking about how much work will be needed if I get it wrong...
View attachment 335918
Before too long, I have that 'no going back now' moment:
View attachment 335919
A test fit shows all is in order: the edge needs a little bit of fettling, but otherwise I'm very pleased with it.
View attachment 335920Even the rail height is within a mm or so, although the turntable tilts a little under load; a (prototypical) block on the well wall will cure this.
View attachment 335922
But it does the job it was intended to. The circle that I removed needs a little work to turn it into a cover for the well when not in use.
View attachment 335921
A bit of black mastic painted round the edges should help out with water keeping out. Strangely I did a similar job for my Gauge 3 indoor line recently, much smaller just big enough to turn Coal Wagons and other similar sized ones onto the 90 degree offset sidings. I got away with a standard cheepo lazy suzan thingy.IMG_8286.jpeg
 
It seems odd to be putting this under 'What Happened at Your Workbench?', when the subject is not only bigger than  my workbench, it's bigger than any workbench that I've ever used!
The main task was to fit the turntable well that I've made. I had cut a template out of hardboard, which was pinned to the baseboard, the positioning being largely dictated by the framework underneath.
View attachment 335915
I then cut around the template with a craft knife
View attachment 335916
...and drilled a 10mm diameter hole to take the jigsaw blade:
View attachment 335917
Heart in mouth, I started cutting; it may not be as high-risk as cutting the roof of a car to fit a sunroof, but it doesn't bear thinking about how much work will be needed if I get it wrong...
View attachment 335918
Before too long, I have that 'no going back now' moment:
View attachment 335919
A test fit shows all is in order: the edge needs a little bit of fettling, but otherwise I'm very pleased with it.
View attachment 335920Even the rail height is within a mm or so, although the turntable tilts a little under load; a (prototypical) block on the well wall will cure this.
View attachment 335922
But it does the job it was intended to. The circle that I removed needs a little work to turn it into a cover for the well when not in use.
View attachment 335921
Brew in view! I approve :)
The turntable is all right as well!!
 
Well done! It's always nerve racking to cut into boards like that. A router and string is a good way of doing things, but if you only do it once, it's a bit expensive
 
Last edited:
A bit of black mastic painted round the edges should help out with water keeping out. Strangely I did a similar job for my Gauge 3 indoor line recently, much smaller just big enough to turn Coal Wagons and other similar sized ones onto the 90 degree offset sidings. I got away with a standard cheepo lazy suzan thingy.View attachment 335925
Only just noticed, probably because I last looked on the mobile, your going for shunting with chains and capstans, The coal terminal at Deedale, Preston used them to draw the empty wagons out for us until it closed in the mid 90's, very strange to be sat on the loco waiting to push the loads in, to see the empties silently pass you on the next road!!
 
Only just noticed, probably because I last looked on the mobile, your going for shunting with chains and capstans, The coal terminal at Deedale, Preston used them to draw the empty wagons out for us until it closed in the mid 90's, very strange to be sat on the loco waiting to push the loads in, to see the empties silently pass you on the next road!!
I have still to work out how to get the capstans working, ok for off the turntable plus to and from it but back onto it……. Been trying to find pictures for ideas and inspiration, do you have any from Deepdale please?
 
I have still to work out how to get the capstans working, ok for off the turntable plus to and from it but back onto it……. Been trying to find pictures for ideas and inspiration, do you have any from Deepdale please?
Sadly not Jon, the railway there was like an alley way between 2 fences with the capstans against the fence, couldn't safely get off the loco

Edit, looking towards the coal depot.
Screenshot 2024-12-16 090344.png
 
Last edited:
Sadly not Jon, the railway there was like an alley way between 2 fences with the capstans against the fence, couldn't safely get off the loco
Thanks, between posts looking yet again and found a suitable pic from Farringdon which reminded me that I have a bookzine somewhere about the place which may help.
 
Well done! It's always nerve racking to cut into boards like that. A router and string is a good way of doing things, but if you only do it once, it's a bit expensive
I've got a router, but it would have removed more wood than I would have liked; the removed disc is going to be used as a well cover when the railway is out of use, so needs to be a close fit...
 
Found this on You Tube dunnyrail dunnyrail
Bristol Docks, and even better, this one from Huntley Archives
Superb, great to see this and my use of nails for Bollards not too far from the mark. All I need to do now is sort out an electric Capstan. Clearly only 1 needed for my line but a few Bollards. I may even resort to Polling in the main station!
 
Last edited:
Superb, great to see this and my use of nails for Bollards not too far from the mark. All I need to do now is sort out an electric Capstan. Clearly only 1 needed for my line but a few Bollards. I may even resort to Polling in the main station!
Interesting height adjuster on the front of that switcher loco - I don't feel too bad about all the different height couplings on the WWNR :nerd:
 
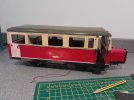
I picked up an LGB Wismar 'pigsnout' railcar last month, with the intention of making it look more like a small County Donegal-ish item. I'm sure someone has done this, but can I find the article/build log? No, of course not.
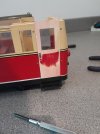
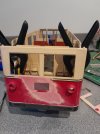
So the first thing to do is flip it upside-down and remove one of the bonnets; it made sense to leave the one at the driver's end. This then gave front and rear ends. The rear end was removed, and the sliding doors removed, along with handles, grab rails and windows. The sliding doors were cut down in width by 1mm, had the sliding parts removed and all surface detail cut away with a sharp knife before flatting down.
20241220_110137.jpg
20241220_110157.jpg
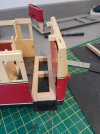
The floor is lower in the driver's cab area, so a false floor was made from 8mm strip wood and 1mm plasticard.
20241220_113435.jpg
20241220_113533.jpg
Although not very clear in the picture, all moulded detail of the driver's controls and jump seats have been removed from the front wall of the cab at this end, too. Then the rear steps were removed, as they will serve no purpose without any rear doors!
20241220_114046.jpg
The rear centre buffer mount was also cut off, and all the printed detail on the sides was sanded off.
20241220_122440.jpg
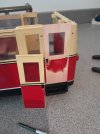
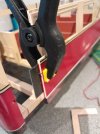
The doors were trimmed to height and then the uprights were cut away from one side of the door and the railbus body. Ideally, I would make the rear windscreen surround vertical, but doing so would generate a huge amount of work for a minor visual benefit, so I'm leaving it. For now, at least.
A quick dry assembly with clamps shows progress so far.
20241220_123828.jpg
 
I picked up an LGB Wismar 'pigsnout' railcar last month, with the intention of making it look more like a small County Donegal-ish item. I'm sure someone has done this, but can I find the article/build log? No, of course not.
So the first thing to do is flip it upside-down and remove one of the bonnets; it made sense to leave the one at the driver's end. This then gave front and rear ends. The rear end was removed, and the sliding doors removed, along with handles, grab rails and windows. The sliding doors were cut down in width by 1mm, had the sliding parts removed and all surface detail cut away with a sharp knife before flatting down.
View attachment 336331
View attachment 336332
The floor is lower in the driver's cab area, so a false floor was made from 8mm strip wood and 1mm plasticard.
View attachment 336333
View attachment 336334
Although not very clear in the picture, all moulded detail of the driver's controls and jump seats have been removed from the front wall of the cab at this end, too. Then the rear steps were removed, as they will serve no purpose without any rear doors!
View attachment 336335
The rear centre buffer mount was also cut off, and all the printed detail on the sides was sanded off.
View attachment 336336
The doors were trimmed to height and then the uprights were cut away from one side of the door and the railbus body. Ideally, I would make the rear windscreen surround vertical, but doing so would generate a huge amount of work for a minor visual benefit, so I'm leaving it. For now, at least.
A quick dry assembly with clamps shows progress so far.
View attachment 336337
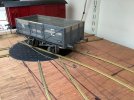
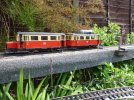
I wonder if you were thinking of my 2 car pig snout with a nose each end?P1050499.jpeg
 
I did something similar, but not as much detail as you have put into yours, about ten years ago.

Thanks for the complement, but I did very little other than putting sound in it. The luggage on top was to hise a sound chip. Covered with fabric of a suitable density and colour.
 
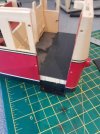
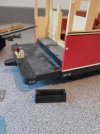
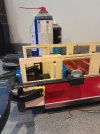
A bitsa day in the workshop. Having removed the motor and powertrain (a clever solution involving floating, two-wheeled power bogies), the whole lot was dismantled and the grease, which resembled toffee, was removed and everything degreased before greasing and reassembly. The wires were disconnected from the power pickups, although these seem to have been moulded in place, so have been left. A quick test showed that everything turns easily but, as expected, one bogie is slightly noisy. And Sod's Law dictates that this happens when going forwards, of course...
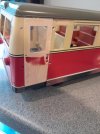
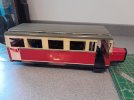
The remaining time was spent filling anf flatting, before gluing the doors -now part of the body- in place. The next jobs will be filling assorted holes, and fitting seats in the extended accommodation...
20241221_151142.jpg
20241221_151150.jpg
20241221_152655.jpg
20241221_153518.jpg
 
Back
Top