G Scale Tram Project

With all the rail in stock used and until the next delivery arrives I thought it time to complete a tram or two, trailer 2259 with its completed dashboard, it doesn't look like I've done much but the roof lighting has been replaced with LEDs, it's been fitted with it's own batteries for the lighting, socket added the the directional tail lamp, and new couplings fitted followed by a generally touched up after being in my less than delicate hands.

I'm not too displeased with the conversion.

David
 

Attachments

  • 20211003_130424.jpg
    20211003_130424.jpg
    64.8 KB · Views: 0
  • 20211002_204003.jpg
    20211002_204003.jpg
    190.2 KB · Views: 0
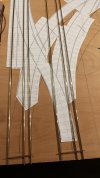
I've been playing with a few templates today to see how the adjacent corner board track plan would look in reality.
The total baseboard size works out at 1.3m x 1.13m, this will eventually have a single straight baseboard 330mm x 1.3m long with the single turnout on it's own board.

Now to get it all the templates squared up before I start track laying.

David

edit: Track plan update
 

Attachments

  • 20211009_225847.jpg
    20211009_225847.jpg
    236.8 KB · Views: 0
Last edited:
Looking at the trams sat on track and realised my indoor line is out and back with no loops, this means in one direction the crew will be at the wrong end.
So some head scratching and ding, all I need to do is make the crew removable, that's simple enough but when the tram moves they'll fall over, another ding in the greys cells.

Let's fit wee magnets to the shoes of the crew and stick a metal plate under the platform ends, and hey presto another challenge resolved.

Tip, if you want to buy tiny magnets get them from China and pay an extra 50pence postage, that way they will arrive quicker than buying them from england, crazy but true.

David
 

Attachments

  • 20211012_144111.jpg
    20211012_144111.jpg
    70.5 KB · Views: 0
Looking at the trams sat on track and realised my indoor line is out and back with no loops, this means in one direction the crew will be at the wrong end.
So some head scratching and ding, all I need to do is make the crew removable, that's simple enough but when the tram moves they'll fall over, another ding in the greys cells.

Let's fit wee magnets to the shoes of the crew and stick a metal plate under the platform ends, and hey presto another challenge resolved.

Tip, if you want to buy tiny magnets get them from China and pay an extra 50pence postage, that way they will arrive quicker than buying them from england, crazy but true.

David
MMm, I'm sure that I've seen arrangements for automatic pivoting crew somewhere - can't think where now, but I don't think I've been smoking anything strange :think::think:

However, I suppose on trams you want crew in different poses front and rear :emo:
 
MMm, I'm sure that I've seen arrangements for automatic pivoting crew somewhere - can't think where now, but I don't think I've been smoking anything strange :think::think:

However, I suppose on trams you want crew in different poses front and rear :emo:
Pivoting the crew would have been easy enough, It was having the different crew at the correct end for direction of travel I wanted.

Does it effect running, naw, it's just another thing that I didn't like and now I don't need to worry about bothering me.

Apart from other things that are slowly getting done, the next challenge I have for myself is how to have a bell which I can operate from the locoremote unit .

David
Yes some of the LGB Tram crews had magnetic bases and some metal on the cab floor or other way round.
 
Someone on this forum has now caused me a dilemma, there garden line has inspired me and I now need to include an arc viaduct on my garden line.

My line isn't built yet which saves me having to de-construct anything which is a positive.

I am perfectly happy to make formwork in to which I could pour concrete, and as the viaduct will effectively be against a fence I only need to consider the finish I want to achieve on one side plus the arches.

But, how or what is the best and easiest way to get a stone looking finish to the viaduct with having to site and carve the concrete after it's been poured. Has anyone done this before?
I suspect the easiest way would be to put something on the inside of the formwork but what, or could it be simpler to clad the concrete with something after removing the formwork.

As always any advice would be much appreciated.
 
Looking at the trams sat on track and realised my indoor line is out and back with no loops, this means in one direction the crew will be at the wrong end.
So some head scratching and ding, all I need to do is make the crew removable, that's simple enough but when the tram moves they'll fall over, another ding in the greys cells.

Let's fit wee magnets to the shoes of the crew and stick a metal plate under the platform ends, and hey presto another challenge resolved.

Tip, if you want to buy tiny magnets get them from China and pay an extra 50pence postage, that way they will arrive quicker than buying them from england, crazy but true.

David
I see that you've borrowed my method of tiny magnets from China. The idea came to me a few years ago. Before then, I first used the glue down method for figures in my garden railway. The little ones undid those figures from the positions they were placed in.....:rolleyes:

Then the method of choice was to insert brass rods up the butts of figures and stick them in the ground. It worked okay but still wasn't the best solution. Besides, if resale was in the future, it compromised the value to some hobbyists.

Finally a brainstorm struck. Tiny magnets that I happened across while searching for magnets to place in between the rails to activate my Railboss system. Viola !!!!!

Now if a figure gets knocked over or one of the little ones picks one up, it's simply a matter of placing it back on the steel fender washer that sits in whatever position I have it. The fender washers are not in fixed positions either. This way the citizens are free to move about, of course by the hand of God.....:)
 
Someone on this forum has now caused me a dilemma, there garden line has inspired me and I now need to include an arc viaduct on my garden line.

My line isn't built yet which saves me having to de-construct anything which is a positive.

I am perfectly happy to make formwork in to which I could pour concrete, and as the viaduct will effectively be against a fence I only need to consider the finish I want to achieve on one side plus the arches.

But, how or what is the best and easiest way to get a stone looking finish to the viaduct with having to site and carve the concrete after it's been poured. Has anyone done this before?
I suspect the easiest way would be to put something on the inside of the formwork but what, or could it be simpler to clad the concrete with something after removing the formwork.

As always any advice would be much appreciated.
There are a few ways, a car rubber mat can sometimes give a stone or brick effect, or some plastic moulding that suits. These would need to be glued to the form and cut to shape before that. The other option is to laboriously cut out each stone in the form. Best to accept a Concrete Bob version with no stone work, much simpler but do not underestimate the strength needed in the mould, nor the weight. Mike thought we could mould it elswhere and lift it in, well 10 of us may have but the risk of breakage would have been high, these things can take a few weeks to fully cure but mould can be removed after a day or three.

Having competed one last year for my friend it would have been very tricky without access to the other side but I guess could be done with some planning and screwed central cross beams. Have a look at this link which describes my friends on from post 1.

Jon,

Did you know that some of the very early viaducts Concrete Bob built in Scotland were brick faced because people of the time didn't trust that concrete was strong enough, so he put a brick facing on the viaduct to say it was strengthening them, when in actual fact it was purely for show and he was probably laughing at folk.

Thank you for the link, that is one link I wont be sharing with my wife, My beloved is already struggling to imagine what I have planned and I think that link would tip her over the edge, but thanks, its does have some good ideas.

I work in the construction business and I have witnessed people not listening to what they have been told when erecting shuttering, once the concrete pour starts theirs no going back, only stopping, having a cry then starting again, a few dwag bars will be borrowed from a contractor me thinks.

It's all schienenkönig fault for sharing the pictures of his tramway anyhow and giving me ideas, I knew we should have moved to somewhere with a bigger garden :)

Car mats eh, we use something like that but much bigger in the entrance to our offices, I wonder if they would notice 1) if I borrowed one over a weekend and 2) the concrete spall when I returned it, or 3) if I could get away with a permanent relocation of said mat??? The problem is when obscure things go missing they have a bad habit of asking me if I know where an item could be first. But that has definitely got the thinking juices flowing, thanks.

David
 
Putting the lump hammer aside.. - I wish!

5mm foamboard.. Put it on the road, and run over it a few times...
It will take an impression from the road surface.
Simmples! :)
 
Putting the lump hammer aside.. - I wish!

5mm foamboard.. Put it on the road, and run over it a few times...
It will take an impression from the road surface.
Simmples! :)
Now that's not the silliest idea, I would definitely get the neighbour's curtains twitching with curiosity, thanks.

The only thing that bothers me is why I haven't thought of these ideas, the sawdust obviously needs a good shake to get the thinking side of things working again.

Thanks, if anyone else has an idea to share please do, mo such thing as a silly idea if applied correctly.

David
There is thread somewhere of using a hot glue gun to make the reverse pattern on the formwork. When cast it leaves an impression. Can be used a few times before needing a renew.
 
There is thread somewhere of using a hot glue gun to make the reverse pattern on the formwork. When cast it leaves an impression. Can be used a few times before needing a renew.
The main trick is to use a release agent in the moulds before concreting.

I'm not sure what is available for DIY use in small quantities as we used to use mould oil in industrial quantities on construction sites - smells horrible and stinks yer clothes out.
 
Putting the lump hammer aside.. - I wish!

5mm foamboard.. Put it on the road, and run over it a few times...
It will take an impression from the road surface.
Simmples! :)
Good idea but how do you get the joints of stonework to show, remember they need to be raised on the master!
 
The main trick is to use a release agent in the moulds before concreting.

I'm not sure what is available for DIY use in small quantities as we used to use mould oil in industrial quantities on construction sites - smells horrible and stinks yer clothes out.
I've already had a chat with one of our contractors about some carefully removed second hand ;) F1 form work, told him what its for and he asked how much support timber I'll need and to be care with the mould oil because the can is open, one of the steel fixers has already asked what shape I need the 16mm bars, all ethically declared to my boss who just thinks I'm one of the worst people for scrounging he has ever met and also told me I can't be borrowing the contractors small lorry again, but who cares, no me, I just need to borrow a small plant trailer :giggle:

I won't actually need any of this for a few months but I'm not stopping folk while they are on a roll.

Still pondering my own best option to make the stone courses but I'll get there.

David
 
Good idea but how do you get the joints of stonework to show, remember they need to be raised on the master!
I would use this to clad the concrete.. See any of Mike's posts for the way to embellish the stonework..

This way, you have greater control of decoration and finish.

Otherwise, I think you would be into carving a section of the design, making mould-sections from this, and then casting in concrete..

PhilP
 
Back
Top