G Scale Tram Project

A bit of a rhetorical question really, sort of.

Do many folk scratch build there own track?
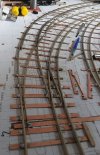
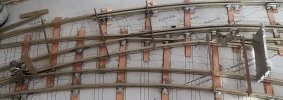
I can normally fabricate all the rails for a 7mm scale turnout in one evening; working with the larger mass of peco code 200 rail its taking me one evening to profile what is effectively a switch rail just over 200mm long, do others have any clever ways to profile a long switch rail in less than 4-5 hours, crossing noses are quite quick but this long switch is taking some time.
I am serious contemplating code 124 rail for any future S&C work, it'll be buried anyhow so wont matter too much.

Updates on progress could take a wee while at my present rate.

Short video of a test run, progress is still progress after all.


David
I did in 0 Gauge, but haven't bothered in G
 
I only make my own turnouts, not plain track, but I've found I can make a complete turnout in Code 180 or 200 in about 3-4 hours.

I use a mini drill with grinding disk to do the rough shaping and then finish it off with files. My points are all brass, while my trackwork is stainless. Making the turnouts in stainless would be a chore, as the cutting and filing would take me 3 times as long and getting the right shape would be much harder. It looks like you are using nickel silver, is that correct? Cliff barker sells machined switch blades in nickel silver in code 200 for a quite reasonable price. These might make sense if you need to make any sort of quantity.

 
Last edited:
A bit of a rhetorical question really, sort of.

Do many folk scratch build there own track?
I can normally fabricate all the rails for a 7mm scale turnout in one evening; working with the larger mass of peco code 200 rail its taking me one evening to profile what is effectively a switch rail just over 200mm long, do others have any clever ways to profile a long switch rail in less than 4-5 hours, crossing noses are quite quick but this long switch is taking some time.
I am serious contemplating code 124 rail for any future S&C work, it'll be buried anyhow so wont matter too much.

Updates on progress could take a wee while at my present rate.

Short video of a test run, progress is still progress after all.


David
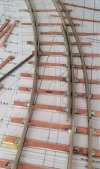
I ended up building about 17 sets of points (so far) in the current track layout, mostly from code 332 brass rail. A battery powered angle grinder with a cutting disc is the best tool for getting that sort of thing done quickly, very easy to cut long tapered point blades, Admittedly a lot of the point blades are actually made from flat aluminium bar rather than rail profiles, though same tool is useful there as well.
 
Thanks for the feedback, I'll finish the present blade with the file, it's almost finished anyhow, but number 2 the slitting disk is coming out.

Just re-reading what I originally typed, it's the machined section of the blade which is more than 220mm long not just the switch blade, the whole thing is on a tight curve and I am trying to keep track radii down to a minimum which is why the machine length of the blade is soooooo long.

Obtuse and common crossing I can do in jig time it's just having to remove so much material for the long switch, only one more to do though.

David
 
Not a great deal done aver the last week due to needing bedrest.

One end of the narrow gauge change over rails laid and tested, a home made spring fell off the top of one axle box so I thought this would make a good test, if you watch the start and end of each short run you'll notice a wee nod at the far end due to the missing spring, the lack of a physical switch seems to work fine.

David
 

Attachments

  • 20210915_133956.jpg
    20210915_133956.jpg
    171.5 KB · Views: 0
Well folks I'm a happy modeller, apart from one wee tight spot that's the down line from the headshunt test track operational.
One small adjustment to the wheel back to back which wasn't entirely unexpected, the back to back is now set at 41.5mm not the planned 42mm but I can live with that considering the tight radii of the curves.

The single switch blade works, I just need to give some thought as to it's long term operation.

Quiz question for folk (no prizes), how many track gauges and how many different types do folk think I've needed to make so far.

Very happy I can run a tram from one end of the corner board to the other, it may not seem very far but it's a huge mile stone for me.

All future point work will however be built off the layout on the modelling table.

David
 

Attachments

  • 20210919_192823.jpg
    20210919_192823.jpg
    289.2 KB · Views: 0
Last edited:
Well folks I'm a happy modeller, apart from one wee tight spot that's the down line from the headshunt test track operational.
One small adjustment to the wheel back to back which wasn't entirely unexpected, the back to back is now set at 41.5mm not the planned 42mm but I can live with that considering the tight radii of the curves.

The single switch blade works, I just need to give some thought as to it's long term operation.

Quiz question for folk (no prizes), how many track gauges and how many different types do folk think I've needed to make so far.

Very happy I can run a tram from one end of the corner board to the other, it may not seem very far but it's a huge mile stone for me.

All future point work will however be built of the layout on the modelling table.

David
Loads?
 
Sorry you have the better of me - Loads?

What I cannae believe is that I stripped 2 lengths of flexi track, ordered 12 yards of rail, (britain hasn't joined the metric age yet?) and I still need more rail, the outer curve alone is 1.64m long x 3, plus 3 x 1.5m for the crossover plus 3 x 1.45m, very approximately that's 14m of rail just for the corner board, or for those not yet converted to metric roughly 46ft or 15.3 yards.
I know people who have built a whole 0 Gauge layout using less rail!

No point in bleeting, need to crack on and get this finished so I can build the opposite corner board.


David

I was going to say if you buy LGB rail you will be able to buy in metric. But then I converted their code 332 (thou") rail height to mm and got 8.4328 mm. How did that happen ? Some days you just can't win :D Then again, why does my fresh ground coffee come in 227/554 gram bags from the big supermarket down the road? (Think it through). I think this is called thread drift........Max
 
Sorry you have the better of me - Loads?

What I cannae believe is that I stripped 2 lengths of flexi track, ordered 12 yards of rail, (britain hasn't joined the metric age yet?) and I still need more rail, the outer curve alone is 1.64m long x 3, plus 3 x 1.5m for the crossover plus 3 x 1.45m, very approximately that's 14m of rail just for the corner board, or for those not yet converted to metric roughly 46ft or 15.3 yards.
I know people who have built a whole 0 Gauge layout using less rail!

No point in bleeting, need to crack on and get this finished so I can build the opposite corner board.


David
How many track gauges David?
 
Sorry you have the better of me - Loads?

What I cannae believe is that I stripped 2 lengths of flexi track, ordered 12 yards of rail, (britain hasn't joined the metric age yet?) and I still need more rail, the outer curve alone is 1.64m long x 3, plus 3 x 1.5m for the crossover plus 3 x 1.45m, very approximately that's 14m of rail just for the corner board, or for those not yet converted to metric roughly 46ft or 15.3 yards.
I know people who have built a whole 0 Gauge layout using less rail!

No point in bleeting, need to crack on and get this finished so I can build the opposite corner board.


David
Re amount of rail used, multi gauge track does use 50% more rail and possibly a little more where additional check rails may be needed. My 6 metre length of mixed Gauge 3/45 mm track gage has 18 metres of actual rail in that 6 Metre length, makes you think.
 
How many track gauges David?
Its Monday morning, that's my excuse anyhow.
Yes quite a few and I don't think I finished making different types yet.

When modelling the same scale for a number of years one forgets just how many different track gauges for specific purposes are in the track building box, now of course with a change in track gauge I'll need all the same gauges but bigger.

Another job which came to me last night is to drill out the shoes of the tram crew and fit magnets so the crew can change ends when the trams travel in different directions, oh theirs another job on the list of things to do.

David
 
I was going to say if you buy LGB rail you will be able to buy in metric. But then I converted their code 332 (thou") rail height to mm and got 8.4328 mm. How did that happen ? Some days you just can't win :D Then again, why does my fresh ground coffee come in 227/554 gram bags from the big supermarket down the road? (Think it through). I think this is called thread drift........Max
When I was but a young lad growing up Hong Kong decided to make it law that all markets should be selling there goods in metric which was fun because traditional weight measurements had to be converted to pounds and ounces and then converted to kg, until the day I left I always ordered in Cantonese using traditional weights and still think i got more for my dollar than if I'd used kg's, things you didn't know you didn't need to know.

We always buy our rail in lengths but I now wonder what the weight difference would be using different rail on different exhibition layouts, now theirs something for someone to do who has a spare moment :)

David
 
We always buy our rail in lengths but I now wonder what the weight difference would be using different rail on different exhibition layouts, now theirs something for someone to do who has a spare moment :)
A rivet counters dream, not only checking the exact profile is to scale, but also the track weight!
 
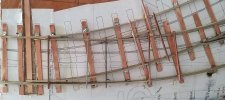
Rail held and gauged before being fixed in placed. The final splice cum wing rail will be a bit of a pig because it is small in comparison to the rest.

More rail on order.

David
 

Attachments

  • 20210926_174332.jpg
    20210926_174332.jpg
    178 KB · Views: 0
The first turnout I built, while it works, is the worst piece of trak work i think i have ever built in any scale, my own fault i rushed to get something moving and unless I rebuild it will be reminded for ever more not to rush building turnouts just to get something moving.

The second turnout is being bu9lt correctly, taking my time and following the correct, tried and tested, co
 
The first turnout I built, while it works, is with out a doubt the worst piece of trackwork I have ever built. I know better than to rush things just to get something moving, unless rebuilt it will be a reminder for ever more to do things correctly in the correct sequence.

The second turnout under construction is being done correctly following tried and tested methods and a proven sequence of working that has served me well in a number of modelling scales and on the full size railway.

Because I was also a little lazy in laying the track plans a bit more time and effort needs to go in to getting things right. This photo shows the main part of the obtuse crossing set up and gauged to confirm where the bend should be, the very short section of rail is purely to help confirm where the bend should be made.

Getting there slowly with the test track.

Research for the main line outside has being going quite well, I've almost confirmed in my own mind I'll use Q-Board or similar product to lay the track on, probably bolted down to metal cable trays, which is something I hadn't previously thought of.
I have lessened my interest in fixing the track base to the fence, but can't decide how to support the elevated track with the second line on a gradient below it, a bit more head scratching required, and as always I'm open to ideas.

David
 

Attachments

  • 20211001_144943.jpg
    20211001_144943.jpg
    219.6 KB · Views: 0
Back
Top