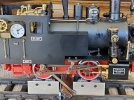
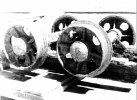
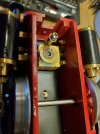
You are using an out of date browser. It may not display this or other websites correctly.
You should upgrade or use an alternative browser.
You should upgrade or use an alternative browser.
More Regner Else and no water
- Thread starter Fred2179G
- Start date
Fred2179G
Registered
Jimmy, that's yet another rabbit hole - rather like the discussion of distilled versus rain water on the other thread. I could quote you quite a few threads discussing the pros and cons of various steam oils, and whether the Green Velvet ISO320 is better than Roundhouse. But I am not going to. I've been cheerfully using a large can, that I got 10+ years ago, in my 20+ steam locos and not one has so far complained - or shown any signs of wear.There are 2 grades of steam oil 220 used by RH and 460 used by Accucraft
The relevant issue is whether you have to use Regner treacle oil in order to seal the pistons in this loco. I currently have 3 working Regner locos, and not one complains about the steam oil I use. However, all 3 are oscillators: Chaloner, Paul ,Heisler - the latter 2 built by me from kits and both working first time! So they aren't a useful comparison.
Always best to go with the manufacturer's recommendation. The if you have the thicker grade, it should be fine if used instead of the 220,but I'm not so sure about vice versa.Jimmy, that's yet another rabbit hole - rather like the discussion of distilled versus rain water on the other thread. I could quote you quite a few threads discussing the pros and cons of various steam oils, and whether the Green Velvet ISO320 is better than Roundhouse. But I am not going to. I've been cheerfully using a large can, that I got 10+ years ago, in my 20+ steam locos and not one has so far complained - or shown any signs of wear.
The relevant issue is whether you have to use Regner treacle oil in order to seal the pistons in this loco. I currently have 3 working Regner locos, and not one complains about the steam oil I use. However, all 3 are oscillators: Chaloner, Paul ,Heisler - the latter 2 built by me from kits and both working first time! So they aren't a useful comparison.
I have some oil that seems thicker than 460, its marked " Superheat Steam Oil" from Pearse Locomotives. I've no idea what the grade is, but it works wonders on my Brunel
Fred2179G
Registered
Unfortunately none of these seem to be available in the USA. I'll possibly order some from Graham at gardenrailways.co.ok. I don't think it is essential for the current tests.I have some oil that seems thicker than 460, its marked " Superheat Steam Oil" from Pearse Locomotives. I've no idea what the grade is, but it works wonders on my Brunel
Fred2179G
Registered
So another air test, though we are running up against the deadline for moving to our summer home.
First thing I found was that the rod wasn't too happy in the clevis when I tried to remove it. I found the same thing on the other (port) side, so a small application of the pliers got it aligned with the slot. It still doesn't want to go in, so I'll have to either sand it or spread the slot a little when I put it back together.
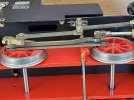
Then I removed the pin on the other side and slipped the rod out and put the loco back on rollers. The port side piston, which I had wrapped with teflon, worked as intended - with the valve backward the piston went forward, and with the valve forward, the piston went backwards.
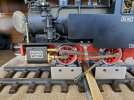
This is the 'start' position with the piston roughly centered. This side did not cooperate.
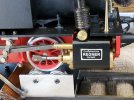
With 4 bar on the gauge, I opened the throttle valve and rotated the wheels by hand. The piston was pushed back when the valve was fully forward:
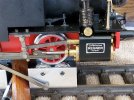
Unfortunately, the piston never got pushed forward. I removed the valve rod pin and moved it by hand and there was no position that would move the piston forward. This suggests the steam can't get to the back of this piston, or it isn't reaching the valve - though the passages to the cylinder casting are good as the other valve works.
This test wasn't complete, as I found the rotary reversing valve had been pushed and wasn't letting much steam past. I repeated it and got a good result. Video at 10 . . .
First thing I found was that the rod wasn't too happy in the clevis when I tried to remove it. I found the same thing on the other (port) side, so a small application of the pliers got it aligned with the slot. It still doesn't want to go in, so I'll have to either sand it or spread the slot a little when I put it back together.

Then I removed the pin on the other side and slipped the rod out and put the loco back on rollers. The port side piston, which I had wrapped with teflon, worked as intended - with the valve backward the piston went forward, and with the valve forward, the piston went backwards.

This is the 'start' position with the piston roughly centered. This side did not cooperate.

With 4 bar on the gauge, I opened the throttle valve and rotated the wheels by hand. The piston was pushed back when the valve was fully forward:

This test wasn't complete, as I found the rotary reversing valve had been pushed and wasn't letting much steam past. I repeated it and got a good result. Video at 10 . . .
Attachments
Last edited:
Fred2179G
Registered
As promised, video from the tests yesterday.
You can observe the valve actions causing the piston actions (when's the last time you saw that in slo-mo.) The only change is that the starboard piston is now wrapped in a layer of teflon, like the port side piston. I did a little fiddling with the valve timing to make it work this way - the stbd valve rod carrier had to be pushed completely forward to make this motion happen.
I guess it is time for a steam test.
Fingers crossed for you.As promised, video from the tests yesterday.
You can observe the valve actions causing the piston actions (when's the last time you saw that in slo-mo.) The only change is that the starboard piston is now wrapped in a layer of teflon, like the port side piston. I did a little fiddling with the valve timing to make it work this way - the stbd valve rod carrier had to be pushed completely forward to make this motion happen.
I guess it is time for a steam test.
Fred2179G
Registered
One last attempt to see if a steam test did more than an air test. While I am not convinced the valve timings are set perfectly, it's easy to experiment if you are running on rollers - just kill the fire, fiddle with it, and light up again.
One silly issue with this loco is the gas jet, which is attached to the tank. Nice idea in theory, but in practice it means that you can only fill the tank once before you have to stop and let it cool down. What happens is that it gets hot, the gas pressure inside rises, and the gas in the can can't overcome the internal pressure. (A few Accucraft locos have this same problem - it's endemic to gas tanks close to the hot boiler.)
A solution is to cool down the tank. As I am running on a drop tray (borrowed from the toaster oven,) I dropped 3 ice cubes on the tank and jet. It worked once the ice melted, which happened quite quickly.
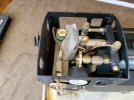
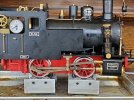
Anyway, several adjustments later, we were close but no cigar, as the saying goes. The wheels attempt to rotate but stop every revolution - interestingly at the same point as they did a few tests ago. Here's the starboard (RH looking fwd) side after it stops, with the piston fully back. At this point this cylinder isn't doing anything - it's up to the other side to rotate the wheel enough so that the steam can get behind the piston and push it.
And here's the port side. It is 90 degrees different (correct) but it stopped. At this point the piston should be pushed by the steam so the wheels continue to rotate. Even more curious, there was plenty of push until the rotation got to this point - possibly done by the other side cylinder.
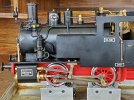
I am still of the opinion that the other side is doing all the work and this side is not doing much, although it does let the wheels rotate when about 180 degrees from this, as the other side piston reverses direction. Then after the other side pushes everything vigorously for 1/2 turn, it all stops as if there is a spanner in the works. And it stops at the same place.
While doing this testing, the steam pressure drops to 1 bar, about 15 psi. That isn't enough to drive any steam loco in my experience, so that should be my focus next. I believe the rotary valve needs lapping in (having the rotary faces smooth so they don't loose so much steam.)
One silly issue with this loco is the gas jet, which is attached to the tank. Nice idea in theory, but in practice it means that you can only fill the tank once before you have to stop and let it cool down. What happens is that it gets hot, the gas pressure inside rises, and the gas in the can can't overcome the internal pressure. (A few Accucraft locos have this same problem - it's endemic to gas tanks close to the hot boiler.)
A solution is to cool down the tank. As I am running on a drop tray (borrowed from the toaster oven,) I dropped 3 ice cubes on the tank and jet. It worked once the ice melted, which happened quite quickly.

Anyway, several adjustments later, we were close but no cigar, as the saying goes. The wheels attempt to rotate but stop every revolution - interestingly at the same point as they did a few tests ago. Here's the starboard (RH looking fwd) side after it stops, with the piston fully back. At this point this cylinder isn't doing anything - it's up to the other side to rotate the wheel enough so that the steam can get behind the piston and push it.

And here's the port side. It is 90 degrees different (correct) but it stopped. At this point the piston should be pushed by the steam so the wheels continue to rotate. Even more curious, there was plenty of push until the rotation got to this point - possibly done by the other side cylinder.

I am still of the opinion that the other side is doing all the work and this side is not doing much, although it does let the wheels rotate when about 180 degrees from this, as the other side piston reverses direction. Then after the other side pushes everything vigorously for 1/2 turn, it all stops as if there is a spanner in the works. And it stops at the same place.
While doing this testing, the steam pressure drops to 1 bar, about 15 psi. That isn't enough to drive any steam loco in my experience, so that should be my focus next. I believe the rotary valve needs lapping in (having the rotary faces smooth so they don't loose so much steam.)
Fred2179G
Registered
Well, put the flags out. Final test of the season:
I had intended to tighten up the rotary valve, so I did and fired it up again - and we got some action. It's still too 'sticky' but I think that may be the valve timing which can be adjusted.
At least there is light at the end of the tunnel. (A Train!!)
Anyway, my posts are now done until next December. We leave in a few days for vacation, and I have other problem locos in MD, like an Aster C&S #22 that is being worked on . . . .
ol_hogger
Registered
My Else was not free of ailments, either.
You know how it goes: a bit weeping here, a little hiss there ... in the end it will pile up and kill the fun.
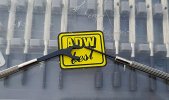
I re-tightened the steam connections inside the smokebox. I used this stamp metal spanner from this cheap set which I bought because it might come in handy sometime, which it did. I just could not reach in with a standard spanner.
Working front to back I then undid the filler valve, as I had observed steam boiling up its inside.
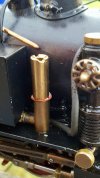
It is connected to the steam manifold, and during a run steam seemed to have crept down from there. You would expect a ball and seat valve for a boiler clack here (whiche duly mounted below the low water line would never have to hold back steam in the first place). Regner's solution is a bit more elaborate.
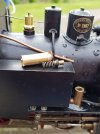
In order to get is open I had to unmount it entirely since there was no provision for holding the top part other than in pliers or a vise.
After I replaced the O-ring I gave the top part a groove for inserting a screw driver next time around. (Meanwhile, Regner machines two parallel faces so that a spanner can be used. The filler being squeezed between the tank and the oiler a screwdriver seemed more practical to me.)
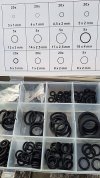
The safety valve comes with an O-ring nowadays, but older ones can use O-rings just the same. (I know there should be a groove to prevent squashing out the O-Ring, but if you pick one slim enough ...)
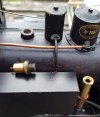
Same goes for the water gauge cap.
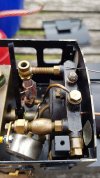
These are the plugs I have to undo frequently following my recommendation of draining a boiler more often than rarely. It is quite convenient, hand-tightening will suffice and no more fiddling with teflon tape that will end up in unwanted places: the boiler or your garden!
For that end I even put in an O-ring at the gas jet. Yet, I did not recognize that this would bring it forward in the poker heater and make the spray cone miss the air holes thus choking the fire. When moved a bit to the rear it was back to normal. For a while ...
You know how it goes: a bit weeping here, a little hiss there ... in the end it will pile up and kill the fun.
I re-tightened the steam connections inside the smokebox. I used this stamp metal spanner from this cheap set which I bought because it might come in handy sometime, which it did. I just could not reach in with a standard spanner.

Working front to back I then undid the filler valve, as I had observed steam boiling up its inside.

It is connected to the steam manifold, and during a run steam seemed to have crept down from there. You would expect a ball and seat valve for a boiler clack here (whiche duly mounted below the low water line would never have to hold back steam in the first place). Regner's solution is a bit more elaborate.

In order to get is open I had to unmount it entirely since there was no provision for holding the top part other than in pliers or a vise.
After I replaced the O-ring I gave the top part a groove for inserting a screw driver next time around. (Meanwhile, Regner machines two parallel faces so that a spanner can be used. The filler being squeezed between the tank and the oiler a screwdriver seemed more practical to me.)

The safety valve comes with an O-ring nowadays, but older ones can use O-rings just the same. (I know there should be a groove to prevent squashing out the O-Ring, but if you pick one slim enough ...)

Same goes for the water gauge cap.

These are the plugs I have to undo frequently following my recommendation of draining a boiler more often than rarely. It is quite convenient, hand-tightening will suffice and no more fiddling with teflon tape that will end up in unwanted places: the boiler or your garden!
For that end I even put in an O-ring at the gas jet. Yet, I did not recognize that this would bring it forward in the poker heater and make the spray cone miss the air holes thus choking the fire. When moved a bit to the rear it was back to normal. For a while ...
Last edited:
Fred2179G
Registered
Aren't live steam engines fun.You know how it goes: a bit weeping here, a little hiss there ...
I've been mentally thinking of the next steps to get this b*** to work smoothly. Clearly need to have the rotary valve lapped (smoothed) so it holds more steam - the steam pressure dropping to below 2 bar as soon as you open the throttle is part of the same problem. I'm also wondering about the lubricator, which was empty after the last steam test. The drain plug wasn't sealing, so I swapped the O-ring for a fiber washer. I wonder if it is loosing pressure through there.
Then finally I have to get the timing perfect, and replace the bolt that isn't doing it's job on the stbd hanger.
Looks like I have to go back to FL and spend Memorial Day (May 30th here in the US) weekend at home, so there may be time for another test.
ol_hogger
Registered
After a while, the jet had jumped back to its old position. There is some springyness in the gas pipe. With the burner getting hot, its end will get warm and expand. As I had set the allen screw while cold ... (who wants to burn their fingers?)
Repeat when the burner is hot - using the allen key form the cheap toolset.
Happy railroading
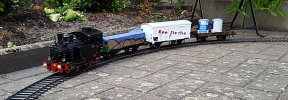
Repeat when the burner is hot - using the allen key form the cheap toolset.
Happy railroading

Last edited:
I have same problem with my Mamod Brunel, I just close the regulator again until the pressure returns, then everything is fine. I thought it was something to do with piston filling with steam causing itthe steam pressure dropping to below 2 bar as soon as you open the throttle is part of the same problem.
ol_hogger
Registered
This is Else hard at work. Just short of stalling, let's say two chuffs per second.
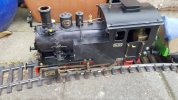
It may be hard to see, but there is some steam at the cylinder coming from underneath.
When trying to tighten the rotary valve let's remember that it is meant to lift so as to let condensate escape which being incompressible might cause damage otherwise. As in many cases it will be a matter of compromize. (Optimists please read optimization here.)
Fred2179G
Registered
And it is memorial Day and I am back in FL with this PITA loco.so there may be time for another test.
I fixed the hanger bolt, and then put toothpaste on the revering valve surfaces. (I'd have preferred rubbing compound or Brasso, but I didn't have any on hand.)
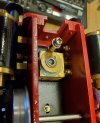
So far so good. I refilled water and gas and fired it up again. The fiber washer on the oil drain was not working and all the oil blew out along with steam.
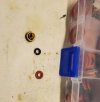
A nylon washer solved that problem. But there was still lots of steam and water coming out of the valve cylinders. It drips onto the steam cylinder and bubbles:
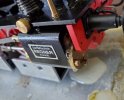
I finally got up pressure and it ran very jerkily, like the previous video.
The jerks/stops happen when the port side is at halfway. Just as the photo in post #68 shows. Here's today's pic:
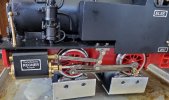
There is definitely steam leaking - with it stationary like this, if you open the throttle at 3 bar the gauge drops slowly to 2 bar and below. But if it is generating steam that shouldn't stop it running.
So why does it jam/stop at this position? Valve is forward admitting steam into the front f the piston, so it should be pushing it back and continuing the rotation. I'm stumped.
Attachments
You can delete your own post, use the delete at the bottom right of your post.Oops, pressed wrong button. Administrator, please deleteView attachment 298006
ol_hogger
Registered
Valve sticking out the infamous 1.5 mm (which btw. is just the size of allen key needef to fix the gas line to the burner. In case you care to be scientific.)
I can't spot cylinder front gaskets, though. The bubbling is from escaping cylinder steam, given where it occurrs. The gaskets look like grey-greenish rings (Manual p. 1, shown in #36 above). You could make a replacement from card soaked in steam oil matching the recessed edge of the cover.
I always thought the toothpaste was meant for polishing and to be removed before operation ...
Last edited:
Fred2179G
Registered
Good point. While there is water coming out of the valves, the bubbling is steam from the cylinder caps.I can't spot cylinder front gaskets
Who the heck put this together???
Once I have sealed the cylinders, I will disconnect the port-side valve and fire it up, then play with the valve to ensure that the piston moves as it should. It's the only thing I can think of that is not working and letting it stop right at the mid-point - the other side will push the wheels round until this rotation point, and then as the other side switches direction there is no push left.
I wondered if it was a mechanical jam but the wheels rotate freely after it stops.

