Ox Mountain Railway
- Thread starter trammayo
- Start date

steven large
USA G SCALES OF 30 TO 50S THEMES.ASLO KIT BASHING
hi tammayo
no times n no hears.. hope u r all well..so wot a fine looking layouts u ave so
far...u ave been doing this hard works and efforts..
it so huge aslo the trailer is looking good and superb..
no times n no hears.. hope u r all well..so wot a fine looking layouts u ave so
far...u ave been doing this hard works and efforts..
it so huge aslo the trailer is looking good and superb..
trammayo
Interested in vintage commercial vehicle, trams, t
Hi Steven - hope you are OK - not looked on here for over a month!
Well I've been busy converting some of my tired locos into all-wheel pick-up (tenders that is).
Apart from converting 3 Big Haulers, I had a go with one of my "Buddy L" 2-6-2s. Tender was attacked as per the BHs - Bent brass wire pick-ups secured to the trucks with soldered wires joining together in a connector block, with a lead to the loco.


I have a few old 2 pin socket/plug assemblies so I used one for this job. I just cut off the latching prong and the lug to make it easier to unplug.

I was able to solder the socket wires to the connecting points on the rear truck and route the wires through the cover and under the cab by drilling some 2mm holes. At the rear, where the loco coupling is fitted, there was enough room to cut a hole to accept the socket. I just glued the socket in the hole.

Pics explain better.


Well I've been busy converting some of my tired locos into all-wheel pick-up (tenders that is).
Apart from converting 3 Big Haulers, I had a go with one of my "Buddy L" 2-6-2s. Tender was attacked as per the BHs - Bent brass wire pick-ups secured to the trucks with soldered wires joining together in a connector block, with a lead to the loco.
I have a few old 2 pin socket/plug assemblies so I used one for this job. I just cut off the latching prong and the lug to make it easier to unplug.
I was able to solder the socket wires to the connecting points on the rear truck and route the wires through the cover and under the cab by drilling some 2mm holes. At the rear, where the loco coupling is fitted, there was enough room to cut a hole to accept the socket. I just glued the socket in the hole.
Pics explain better.
playmofire
Registered
A very neat piece of work, Mick.
trammayo
Interested in vintage commercial vehicle, trams, t
I also have a couple of Bachmann 2-4-2s - one of which has been a real pain in the proverbial - and had a look at them to see what could be done. My little Wite Pass loco only needed a good clean - particularly at the back of the driving wheels which have carbon brushes - so that was tested OK.
The other, a coal burner in Penn colours, was a different kettle of fish. When I took the cover plate off this pre-(well)used purchase, I was surprised to find that there were no pick-ups from the driving wheels and no sign of there being any when made.

The axles are metal running in the plastic 'bearing', whilst the motor block has provision for skates (but no mounting holes or connections), the cover does not. There have never been any brass contact strips on the inside of the cover plate either as there is a shallow cast iron weight secured to it.

So, no wonder it was a poor runner! Just the two single axle trucks to collect the current! I had put a piece of lead on the leading truck to help but I didn't know about the pick-up system until I took it to bits!
Anyway, I converted the tender to 8-wheel pick-up as per all the others. I didn't bother cutting off the latching prong as the plug/socket was more accessible. Before re-fitting the cover, I drilled holes to allow the two wires to pass from the cab and through the cover. These were then soldered to the connectors on the truck.


It now works well. It cost me £4 (inc. post) for 4 metres of 1mm brass wire to make the contacts strips. Although the wire isn't as springy as the 1.0mm brass rod, it does work OK if the wire is over bent. So at £0.50 per loco it's a very cheap do!
The other, a coal burner in Penn colours, was a different kettle of fish. When I took the cover plate off this pre-(well)used purchase, I was surprised to find that there were no pick-ups from the driving wheels and no sign of there being any when made.
The axles are metal running in the plastic 'bearing', whilst the motor block has provision for skates (but no mounting holes or connections), the cover does not. There have never been any brass contact strips on the inside of the cover plate either as there is a shallow cast iron weight secured to it.
So, no wonder it was a poor runner! Just the two single axle trucks to collect the current! I had put a piece of lead on the leading truck to help but I didn't know about the pick-up system until I took it to bits!
Anyway, I converted the tender to 8-wheel pick-up as per all the others. I didn't bother cutting off the latching prong as the plug/socket was more accessible. Before re-fitting the cover, I drilled holes to allow the two wires to pass from the cab and through the cover. These were then soldered to the connectors on the truck.
It now works well. It cost me £4 (inc. post) for 4 metres of 1mm brass wire to make the contacts strips. Although the wire isn't as springy as the 1.0mm brass rod, it does work OK if the wire is over bent. So at £0.50 per loco it's a very cheap do!
trammayo
Interested in vintage commercial vehicle, trams, t
Pics of the repaired Mogul (well, almost repaired - needs exhaust pipe for generator reinstating and wire to tender light re-attaching) posed alongside a Big Hauler for comparison.
The offending connecting wires in their rightful place ...

And size comparisons;-


One thing I'd only noticed recently, is that the boiler and cab (apart from the upgraded Spectrum detailing) is the same as the 2-4-2!
The offending connecting wires in their rightful place ...
And size comparisons;-
One thing I'd only noticed recently, is that the boiler and cab (apart from the upgraded Spectrum detailing) is the same as the 2-4-2!
trammayo
Interested in vintage commercial vehicle, trams, t
playmofire said:A very neat piece of work, Mick.
Thanks Gordon - it just worked out. I converted my favourite BH this week after finding a neat little plug and socket. I used some heat-shrink sleeving to neaten it and give some protection from my wires breaking at the plug. If I can get some miniature plugs, I will re-visit some of my other 'conversions'!
A pic of the connection ....

Of course, I could resist the opportunity to give it a thorough testing! Unfortunately both the smoke unit and the chuff have given up the ghost. The latter might be oil (from the smoke unit) on the contact strips or faulty wires on the plug lead.
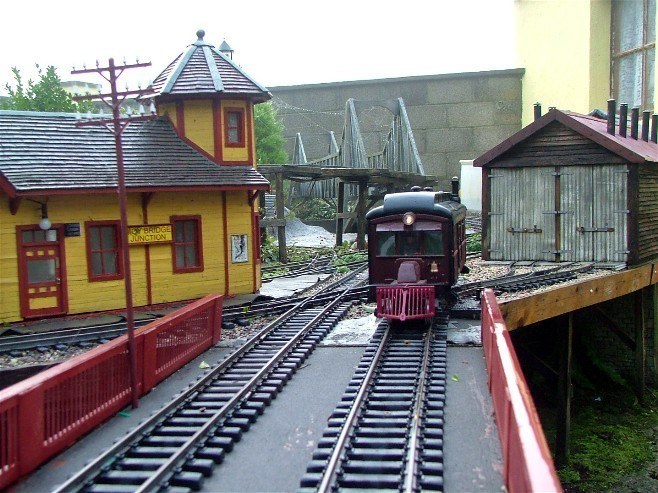
Starting out on the test .......

Having completed its first clockwise circuit and crossed the bridges, it's on the long straight heading for the return loop (R2 radius) ....

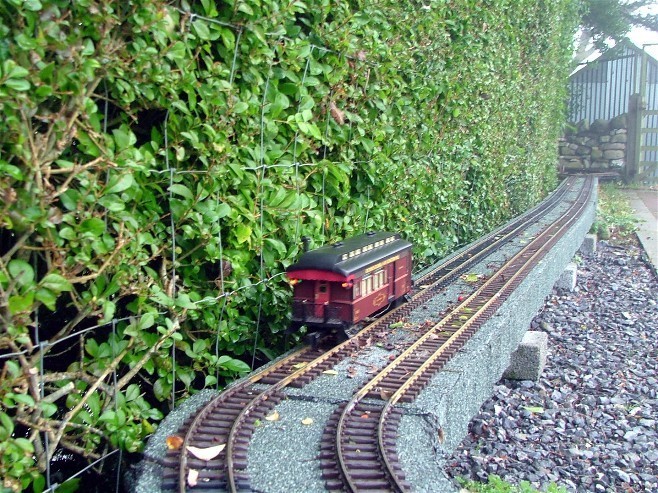
Coming back through the hedge .....

Back over the bridges for a anti-clockwise circumnavigation of the main line ......


And onto the connecting link for a change of direction onto the outer track. The tail of a feline entity can be glimpsed to the right ...

... the marauder (Tomas) himself, waiting to ambush the train - and anything else that moves! ....

Continues in next posting ....
trammayo
Interested in vintage commercial vehicle, trams, t
... continued from above...
Paused for water on the link line .....


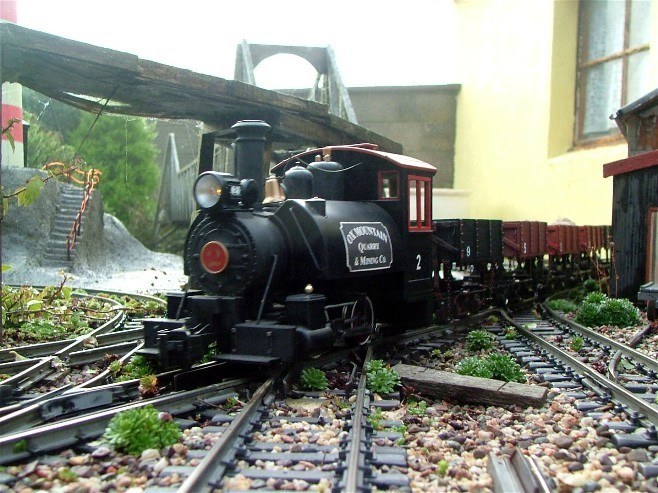
and back on to the main line in a clockwise direction again. I tried it on the High Level circuit also - it still pulls the three coaches up the 1 in 30

I also thought I'd test my recent purchase again - this time over the full extent of the track. It had no problem up the 1 in 30 with its' engineers train.
Leaving the Depot/Station area ....

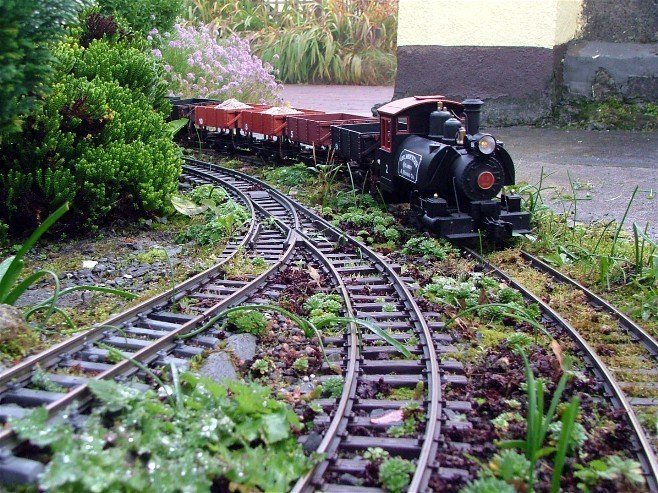
Entering the return loop ....

and returning to the bridge crossing and main line ....

Now I need to work out what I need to do with altering the appearance of the loco!
Paused for water on the link line .....
and back on to the main line in a clockwise direction again. I tried it on the High Level circuit also - it still pulls the three coaches up the 1 in 30
I also thought I'd test my recent purchase again - this time over the full extent of the track. It had no problem up the 1 in 30 with its' engineers train.
Leaving the Depot/Station area ....
Entering the return loop ....
and returning to the bridge crossing and main line ....
Now I need to work out what I need to do with altering the appearance of the loco!
beavercreek
Travel, Art, Theatre, Music, Photography, Trains
Hi Mick
Your layout is looking really great as usual.
Very nice modifications!. They will keep your locos running over any truculent frog...possibly even over real ones! :bleh:
Thomas is looking a sleek animal. Our little new arrival (well I say new, he has been with us now for nearly a year...doesn't time fly!).
'Mogli' has more or less stopped attacking trains and playing amongst the detailed buildings now :wits:
Are your mountains and hills made from chicken-wire over formers and covered with cement cloth?
playmofire
Registered
Another neat piece of work, Mick, and that loco has a very smart livery. Really looks a stunner with the matching coaches.
Your new purchase fits in well, as does Thomas.
(Have you thought further about truck which came with the new loco? I have an idea I'll PM to you later today.)
Your new purchase fits in well, as does Thomas.
(Have you thought further about truck which came with the new loco? I have an idea I'll PM to you later today.)
trammayo
Interested in vintage commercial vehicle, trams, t
Hi Mike. Only show the better bits - its been the year of the dandelion here!
The cat will be 18 months old next month - he's a reall monkey - fast as a streak of lightning, runs up trees (and down). Catches birds in flight - he's had a frog (but didn't kill it), a bat, swallows, water hens, wrens, sparrows, a hare. He keeps looking at the hens (only two left now - old age),
but he's wary of the rooster (and the gander). The pygmy shrew population has take a dive in numbers - now he's trying mice (thank goodness)!
The mountains are built up using old rubble and other non-organic rubbish, concreted over and stippled with a small turks head brush. When dry, I used some green oil-based undercoat which has lasted this last six years (said he with fingers crossed).
I did use some polystyrene to support the tunnel roof whilst I concreted over the top.
Thanks for asking.
beavercreek
Travel, Art, Theatre, Music, Photography, Trains
Ahhhh ,rubble, now that would be nice and permanent...no worries about falling through the scenery!
Yes our little monster seems to have some similar blood to yours.
He has devastated the wildlife in our garden (constantly bringing us 'presents') and has even caught two woodpigeons for which he was most heartily congratulated (he can have as many of those as he likes as we are festooned with the b****rs)
trammayo
Interested in vintage commercial vehicle, trams, t
I thought I would have some time to myself today. It is rather a soft day, with most of the track wet and in need of a clean up.
I thought I`d run my Reo bash - having reconnected the LED Dimmer unit and provided a 14.4v supply. I don`t know if it`s the Keyfob battery or what, but I can only switch it on and off when it`s nearly within reach!
Anyway just a couple of pics. The extremely wet track by the hedgeside caused considerable wheel slip - despite the weight of batteries on board.
Attachments
trammayo
Interested in vintage commercial vehicle, trams, t
Hi Gizzy - I ended up searching for it! Its a good job I remembered the title ")
I got called away before I finished really. I was testing it out to see how pictures would appear. It seems that my previous resizes come out a lot smaller on this new Forum. I`ll have to remember next time (I batch edited these pics all at one go).
Anyway, before SWMBO called my attention, I was going to include a couple of pics of this morning`s running. With the track wiped dry and cleaned up (outer circle only) I tried out some track power.
I had acquired a couple of side tipping ore cars off eBay. Somebody had numbered them so I did the same with the four already in the roster. I hadn`t run them as a complete train until this morning ;-
Attachments

Gizzy
A gentleman, a scholar, and a railway modeller....
trammayo said:Hi Gizzy - I ended up searching for it! Its a good job I remembered the title
I've done the same now and found my threads for the LG&B and Hardyard. I'd subscribed to these on the old forum software so I could find them easily, but I haven't seen a way of doing this on the new s/w as yet....
playmofire
Registered
Everything's looking very good, Mick,
trammayo
Interested in vintage commercial vehicle, trams, t
Gizzy said:trammayo said:Hi Gizzy - I ended up searching for it! Its a good job I remembered the title
I've done the same now and found my threads for the LG&B and Hardyard. I'd subscribed to these on the old forum software so I could find them easily, but I haven't seen a way of doing this on the new s/w as yet....
The thought crossed my mind (as many things do that don't always register) that maybe things are in the order of when they were first posted? It's a learning curve for sure.
trammayo
Interested in vintage commercial vehicle, trams, t
playmofire said:Everything's looking very good, Mick,
Thanks Gordon - I only showed the better bits!
Moss prevails, which then provides a lovely growing medium for Dandelion, unknown invasives and Grape Hyacinth. If I had wanted to grow the latter from seed instead of bulbs I would have failed.