You are using an out of date browser. It may not display this or other websites correctly.
You should upgrade or use an alternative browser.
You should upgrade or use an alternative browser.
What happened at your workbench today?
- Thread starter Henri
- Start date
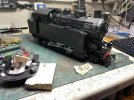
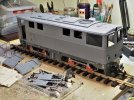
Hm I tried to contact him yesterday as well, no message on phone to say on holiday or anything. Hope Steve is ok.Newquida to Skoda bash progressing. About 85% done now, though Fosworks strangely quiet at the moment (busy?), so no battery and sound card yet, to fiddle about inside and finish the electrics. Better press on with more steps and pipework around the cab, then.
View attachment 316426
3 minutes of fame
3d printing, electronics and trams
With pleasureWould you mind revealing the source of the PDF motors and gearboxes? Thanks.

30.1 motor gearbox kit | Pdf Models
new gearbox kit for 1/8 axlehas a 2mm hole for fixing to a chassis with a bit of 2mm wire not inc kit contains3 volt 24mm can motor or6 to 15 volt 27.5mm can motor2x bolts2x brass bearings1x 1/8 axles 73mm long with gear 30.11x worm gear1x gearbox housing
JimmyB
Now retired - trains and fishing
Must admit they look better than the Dean Good I have bought, may think about one from my next bash.With pleasure

30.1 motor gearbox kit | Pdf Models
new gearbox kit for 1/8 axlehas a 2mm hole for fixing to a chassis with a bit of 2mm wire not inc kit contains3 volt 24mm can motor or6 to 15 volt 27.5mm can motor2x bolts2x brass bearings1x 1/8 axles 73mm long with gear 30.11x worm gear1x gearbox housingwww.pdf-models.co.uk
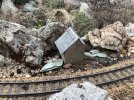
Not the prettiest of buildings, started life as a pound land bird house a couple of decades ago. Roof gave up so replaced with lead, rest of building gave up in the last few weeks and is junked behind so built some more new wood using old pallet wood. Wonder how long it will last this time? Lead roof good probably forever!

The Shed
Citizen of the Republic of the North East.
'Herself' somewhat worse for wear, Family Barbecue yesterday, me up like the Cock 'a' Doodle Donkey, (Advert on UK TV) headed out just after 6am, Front Garden weeded, Roses Pruned, Car hoovered and washed, windows washed, lawns cut, all before 'Herself' surfaced at around 10 am!
Plan for today was a session with the 3D printer, not a hope in Hell, 'Herself' decreed NO to the wee wee machine as in reference to the 3D printer, headed out to shed, might as well make use of the peace and tranquility!
As some of the components arrived yesterday, remainder due Monday if the Royal Mail notification is kosher.
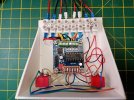
First up, put together a Logic controlled MOSFET for motor control.
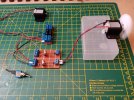
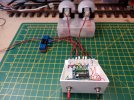
Then a further tinker with the H Bridge Module.
Plan for today was a session with the 3D printer, not a hope in Hell, 'Herself' decreed NO to the wee wee machine as in reference to the 3D printer, headed out to shed, might as well make use of the peace and tranquility!
As some of the components arrived yesterday, remainder due Monday if the Royal Mail notification is kosher.
First up, put together a Logic controlled MOSFET for motor control.

Then a further tinker with the H Bridge Module.


Rhinochugger
Retired Oik
What happened on my workbench?
Well, not a lot, but Evilbay has been busy - I have a cunning plan, but sadly it isn't G scale

Well, not a lot, but Evilbay has been busy - I have a cunning plan, but sadly it isn't G scale
JimmyB
Now retired - trains and fishing
Very similar, but not even railwaysWhat happened on my workbench?
Well, not a lot, but Evilbay has been busy - I have a cunning plan, but sadly it isn't G scale

Northsider
Modelling the Northern half of the Isle of Man
They are from pdf Models, a UK-based manufacturer. Although they are quite a small outfit, their stuff is good: I have one of their 7/8" Ruston diesels, which was esay to build and has proved supremely reliable.Would you mind revealing the source of the PDF motors and gearboxes? Thanks.

30.1 motor gearbox kit | Pdf Models
new gearbox kit for 1/8 axlehas a 2mm hole for fixing to a chassis with a bit of 2mm wire not inc kit contains3 volt 24mm can motor or6 to 15 volt 27.5mm can motor2x bolts2x brass bearings1x 1/8 axles 73mm long with gear 30.11x worm gear1x gearbox housing
viaEstrecha
Spanish metre gauge in G scale (on the cheap)
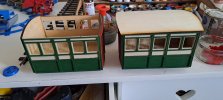
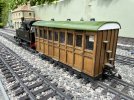
A year or two back, I thought I would try my hand at a laser-cut wooden 3-compartment coach kit, from Timpdon, as it bore a passing resemblance to the sort of coaches built by Craven and others for the Olot-Girona line. Nice kit, real glass windows too, and although intended more for 16mm/ft, it looks the part on my line as it is built to sit low. But my inexperience showed and a rash decision to use slightly smaller metal wheels from my stash, made half way through the build, backfired as the 2xAA battery holder I had already mounted under the floor then fouled LGB points! I was also never happy with the way the roof was formed and would not sit straight (more a product of my poor modelling than the design). So, since my loco bash projects have all now stalled, awaiting Fosworks components, I decided to replace the coach roof, and re-site the battery box up there.
I used part of a GRS Gauge3 standard coach roof, which was not expensive and I am more comfortable working with plastic than wood. I have enough left to make another roof for the planned partner coach. Yes, the taller profile is a touch incorrect (the beauty of having a freelance railway), but it covers the join with the body nicely without being fixed, an important feature as the roof needed to be removable in order to take out the lighting batteries to charge. I did need to make a new filler panel for the coach ends, to hide the gap due to the changed profile - the photo exaggerates this a little and I hope it will blend better with painting. But it now fits nice and snug and level, with a plug and socket lead in case I want to disconnect to remove the roof entirely. Many Spanish small NG coaches did not have ventilators but just for a bit of visual appeal, I have added L&B style ones, again one GRS pack of six does two coaches.
Useful little days' work, so now the coach can finally be used, providing a touch of variety from the usual bashed big brand stuff I have. It needs paint and detail now. Suitably chuffed, I've just ordered the matching one.

3 minutes of fame
3d printing, electronics and trams
I'm knocking up a couple more Bug boxes, to give me a mixed rake of 6. This shot shows the 3d printed chassis, oversized wheels - to provide better running, and the wooden sides and ends. These will be finished on Thursday, with some last painting and fitting the magnetic couplers and detailed parts.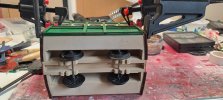

Rhinochugger
Retired Oik
Some n gauge dalliance - on the way to building a hand held, walk about controller.
Black wires to mains adapter - 12v 1amp
Blue / white wires to Kato track connector
White cable - 4 cores. 2 cores power in to speed controller, 2 cores controlled power out to track.
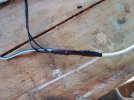
And a directional switch (reverse polarity on the controlled power out)
Why did I solder the wires at 90 degrees to the pins? well, I want the project box to be as shallow as possible. I may well set the switch in a version of 'potting compost' to prevent any accidents at the right hand end

Black wires to mains adapter - 12v 1amp
Blue / white wires to Kato track connector
White cable - 4 cores. 2 cores power in to speed controller, 2 cores controlled power out to track.

And a directional switch (reverse polarity on the controlled power out)
Why did I solder the wires at 90 degrees to the pins? well, I want the project box to be as shallow as possible. I may well set the switch in a version of 'potting compost' to prevent any accidents at the right hand end

PhilP
G Scale, 7/8th's, Electronics
You can use SW's glue-gun for that..Some n gauge dalliance - on the way to building a hand held, walk about controller.
Black wires to mains adapter - 12v 1amp
Blue / white wires to Kato track connector
White cable - 4 cores. 2 cores power in to speed controller, 2 cores controlled power out to track.
View attachment 316644
And a directional switch (reverse polarity on the controlled power out)
Why did I solder the wires at 90 degrees to the pins? well, I want the project box to be as shallow as possible. I may well set the switch in a version of 'potting compost' to prevent any accidents at the right hand end
View attachment 316645
It also means you can peel it off in the future.
There was no mention of a fuse anywhere in your works..
I believe you 'have form'?
PhilP
Rhinochugger
Retired Oik
Mmmm, some of the controllers that I was looking at had a fuse, this one hasn't - 'cos I went for one with a remote potentiometer; the fixed ones all came out the end, not the top which was not what I wanted to doYou can use SW's glue-gun for that..
It also means you can peel it off in the future.
There was no mention of a fuse anywhere in your works..
I believe you 'have form'?
PhilP
DafyddElvy
1:22.5 & 15mm Scale Trams, , NG Steam Railways
Philip, clips arrived in jig time, I have no idea yet how the heck I get a soldering iron through the tiny slot to solder a wire to the tag, any suggestions appreciated.I buy the clips, then solder silicon insulated flexy wire..

Pack of 10 Mini Test Clip Hook Probe SMD Grabber UK Stock & Seller | eBay
Find many great new & used options and get the best deals for Pack of 10 Mini Test Clip Hook Probe SMD Grabber UK Stock & Seller at the best online prices at eBay! Free delivery for many products.www.ebay.co.uk
PhilP
PhilP
G Scale, 7/8th's, Electronics
Philip, clips arrived in jig time, I have no idea yet how the heck I get a soldering iron through the tiny slot to solder a wire to the tag, any suggestions appreciated.
They will pull apart, and you feed the wire through BEFORE you solder...
PhilP
viaEstrecha
Spanish metre gauge in G scale (on the cheap)
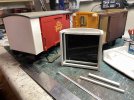
Carriage & Wagon duties continue, even though I found myself painting wagon strapping at 2 in the morning! Takes so long.
My first ever attempt at bashing a wagon was many years ago, and the foamboard/balsa skin I used back then has now warped and was starting to fall off (lying flat in the picture). Like JonD, I think the small LGB 'toy' vans are fine but they look better with the verandah filled in, even if the side doors are assymetrical, and so I set about replacing my original bodge to that effect with ABS profile and plasticard, and using CA glue rather than Uhu. I get ABS profile in bulk from China occasionally, as it is much cheaper than posh branded styrene and is fine for bracing. Finally, just in case I should ever need to do so, I wanted the extension to be part of the body for removal purposes, without any attachment to the chassis, so it would need to be sturdy, too.
I had bought a cheapy eBay second van in the mean time, so it was easier to make two conversions at the same time. Scoring with a bradawl to replicate the 5mm LGB planking inevitably invites warping, so I laminated a second layer of plastic sheet on the inner surfaces, to give more rigidity and added chunky framework inside. It is not my favourite task, so I could have done with Mike, our scribing guru! Styrene equal angle completes the outer corner external bracing to match the other end.
Lastly, with the verandah now gone, the side steps were trimmed down, to match just the open doorway.
The two vans now join the growing painting and weathering queue, though I'll aim to do them at a more sociable time of day.

Last edited:
Madman
Registered
Can you tell what it is yet........
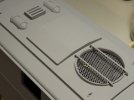
View attachment 316651
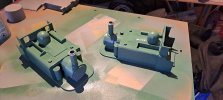
Well, you probably guess correctly, still a way to go yet......
View attachment 316652
David
i spy with my little eye a see through screen on top. Nice work !

