What happened at your workbench today?

Well, the last few days, since The Fiancee and I have been home with Flu, I've been working on train projects (when I have had the energy).
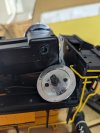
I took apart my new 25 Tonner and started planning. It seems, however, that I may need to order some parts to dry-fit things in. There should be enough room to keep all the original wiring and add some of my own. But, time will tell.

In addition, I've done some 3D design work for my Henrietta coach (to go along with my Toby the Tram) plus some other misc design work, too. I may pull out the actual coach today and do some more cutting. We shall see...

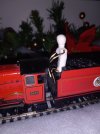
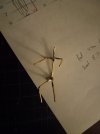
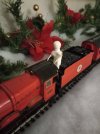
Finally, this morning, I built a skeleton for a 1:24 scale driver for my HO scale Hogwarts Express. I've had this idea for some time now that my HO stock can behave as a 1/4 scale railroad for my large scale railroad. And, so, the Leeds Hill Railroad will have a 1/4 branch line for passengers to visit. I've already got plans to make space for drivers in a few of my HO engines (almost all my HO stock is old, junky things that I don't mind cutting up). The Hogwarts Express I have is not something I'm going to cut up, but I do have a second tender for the train, so the driver may get a cushion to sit on. Also, I've never built a person before, so fun challenges all around!
20250101_054152.jpg20250101_070138.jpg20250101_070153.jpg
 
View attachment 336798

View attachment 336799


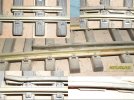
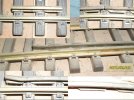
Last week, modell-werkstatt.de sent me this kit. As you can see, it is where the 45 mm track and the 64 mm track part ways. Or come together, according to where you stand.
The kit isn't difficult. The hardest part I found to be inserting the chairs into the sleepers. The chairs have a stem that, by my measurement, is about 2.75 mm thick, and they go into pre-drilled 2.5 mm holes. There are over 50 of them. Made my fingers hurt.
The frog looks to be brass, but isn't. It is isolating, and the connecting rails are electrically linked as they would on a normal LGB point.


I needed a similar thing at the other end, but with an R1 radius. These aren't available so I botched one myself. It works, but it looks a bit crude. Maybe one day I'll build another one that doesn't need to be switched.

View attachment 336800
These are really cool! I love the concept of duel gauge. Someday, I will need help figuring out my own duel gauge. Though, it'll be a bit more complex, Id think...
 
Well spotted! I did ponder it. My rationale is that since it's the straight path, it may need it less than does the curved path.

But whatever 64 mm stock I come up with (I haven't any so far) will be extensively tested, so any problem that occurs then, will be addressed then.
The wheels can still wander enough to 'bump' the frog - personally, I'd do it as a matter of course but, as you say, testing may prove that it's not needed ................. but your railway is at some height :oops:
 
The wheels can still wander enough to 'bump' the frog - personally, I'd do it as a matter of course but, as you say, testing may prove that it's not needed ................. but your railway is at some height :oops:
By now, I've come to that conclusion too, and I was actually in my workshop today to try and figure something out. But I couldn't offhand find anything to build one from. So for now I've decided to just install it and keep looking for something that's simply asking to become a check rail.
 
I think the trouble with using rail for check rail, is that in some cases you can't attach it close enough to the rail, making it less effective.

But I'll try. Thanks for the suggestion, hadn't thought of it yet.
Rather than a piece of rail, a section of right angled brass strip might suffice?

In the UK, we have K&N who make various metal profiles in aluminium and brass....
 
I think the trouble with using rail for check rail, is that in some cases you can't attach it close enough to the rail, making it less effective.

But I'll try. Thanks for the suggestion, hadn't thought of it yet.
I have a section of track that could do with a check rail, but there seems to be no easy aesthetic solution, as you say it is difficult to get close enough, and attachment is also an issue.

Rather than a piece of rail, a section of right angled brass strip might suffice?

In the UK, we have K&N who make various metal profiles in aluminium and brass....
That could work, but IMHO would look out of place.
 
I think the trouble with using rail for check rail, is that in some cases you can't attach it close enough to the rail, making it less effective

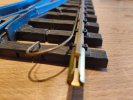
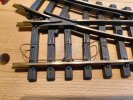
I have some G Scale points made by Tenmille (no longer available, it would seem) where the check rail is connected to the running rail with a pair of nuts and bolts drilled through the thinnest part of each, and where the two rails are held apart by small springs. The fact that the check rail is "floating" (rather than being attached to the sleepers) means that you can set the precise spacing (and angle!) to suit. I have seen examples where the check rail is a piece of rail and others where it is a strip of brass. No photo to hand, so hope the description makes sense without one.

Cheers

David
 
I have a section of track that could do with a check rail, but there seems to be no easy aesthetic solution, as you say it is difficult to get close enough, and attachment is also an issue.


That could work, but IMHO would look out of place.
Aristocraft track uses a small screw into the underside of the track to hold sleeper panels in place - so I have found that's a good place to start. I've never drilled a second hole as the check rails I have on the bridge are cosmetic.

However, In most model scales, having two rails abutting bottom flange to bottom flange usually provide the desired clearance, so I wonder whether you could get away with cutting half of the plastic chair and butting another rail fixed from the underside.

The solution of a devout bodger :cool::cool:
 
Very nice, I am finding that my red of choice ‘Halfords Audi Laser Red’ to pretty well match that is no longer one of their colours after a big change a year or two back. What was your choice here please?
It's Ford 'Race Red', from Halfords. To be honest, over the years I have picked a suitably bright red and the differences between shades isn't noticeable; and photos of the IoMR show a number of shades too, which was often put down to weathering, although film stock, printing processes and the quality of light on the day the pic was taken must all play a part, too!
The off-white is Ford Ivory.
Thanks, one does get used to specific colours. I agree there tends to not be much in tone colour, the match charts tend to be not a lot of help and colours vary somewhat on the real thing so a bit if difference is fine to me, but hateful to get something that looks so out of kilter thus your choice is good.
 
guardrails01.JPG

those, who think, that my solution for guardrails is not optimal, are right. but...
but it all depends, what one needs, how bad one needs it and how quick.
for me - next hobby shop at 300 miles, next largescale shop on another continent - make do with materials at hand is the only way to keep my stuff running.
yeah, the cut-outs are sloppy work. the alternative- to cut away the plastic chairs would have weakened the structure.
for fixing the guardrail, i was too lazy, to drill holes for nails or screws into its railfoot.
a swipe with a file to roughen the underside of the railfoot, wiping away the dust from the sleepers, applying some dots of two-part epoxy.
nobody hinders you guys, to work more precise.

i specially needed guardrails, where R1 curves entered into straights.
my new and cheap (10$US each) newqida flatcars with truck-mounted couplers tended to derail the following car to the outside.

cheap and dirty fixes, but quick! that's the way, we hillbillies behind the backwoods are doing things.

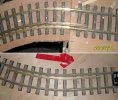
(if one leaves railfoot and plastic chairs intact, the guardrail allows the outer wheels to ride up on the outer rail, but not over it)

spurschiene05.JPG

spurschiene01.JPG
 
Aristocraft track uses a small screw into the underside of the track to hold sleeper panels in place - so I have found that's a good place to start. I've never drilled a second hole as the check rails I have on the bridge are cosmetic.

However, In most model scales, having two rails abutting bottom flange to bottom flange usually provide the desired clearance, so I wonder whether you could get away with cutting half of the plastic chair and butting another rail fixed from the underside.

The solution of a devout bodger :cool::cool:
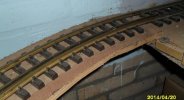
My particular area the 'needs' a check rail is 3 ft radius (6 ft dia) curve on a 1 in 30 gradient, and even with play in the bogies occasionally a wheel clicks over the rail, it has taken a lot of time to get the track 'balanced' and some superelevation, with the ballast bonded in place. The lesson to be learnt is no sharp curves and gradients together (but we are where we are) and I need to manage this. A check rail on the inner rail would prevent the issue, but needs to be a working check rail not just for show.
 
My particular area the 'needs' a check rail is 3 ft radius (6 ft dia) curve on a 1 in 30 gradient, and even with play in the bogies occasionally a wheel clicks over the rail, it has taken a lot of time to get the track 'balanced' and some superelevation, with the ballast bonded in place. The lesson to be learnt is no sharp curves and gradients together (but we are where we are) and I need to manage this. A check rail on the inner rail would prevent the issue, but needs to be a working check rail not just for show.
Whether something would be possible with Tenmille track components - alternative a rail chair on the running rail and check rail every other sleeper ....................

I could be tempted, but it would be a bit expensive if it didn't work :think::think:
 
By now, I've come to that conclusion too, and I was actually in my workshop today to try and figure something out. But I couldn't offhand find anything to build one from. So for now I've decided to just install it and keep looking for something that's simply asking to become a check rail.
Probably a silly idea, but a rail of smaller gauge attached to the top of the chairs, might work. Or a bit filed from the bottom of LGB rail to fit over the chairs.
 
Probably a silly idea, but a rail of smaller gauge attached to the top of the chairs, might work. Or a bit filed from the bottom of LGB rail to fit over the chairs.
Or even the left over bit with the check rail cut from the original point with some fill in bits of sleeper?
 
Back
Top