What happened at your workbench today?

A bit filed off is what korm kormsen korm kormsen is trying to achieve I think, I think this may be the way to go.

yes.
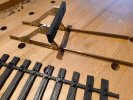
just, that my laziness lets me cut triangle formed gaps into the railfoots with a dremel.
the file i only use, to roughen the underside of the railfoot, to give the epoxy a chance to cling to the rail.
 
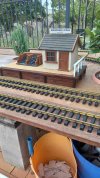
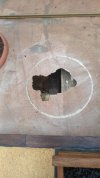
IMG_20250106_155753614.jpg
IMG_20250106_155810500.jpg


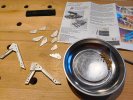
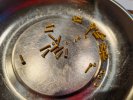
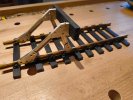
Another kit from modell-werkstatt.de this time a buffer stop. The little bolts are M2 and their lengths either 8 mm or 10 mm. Somehow, when I got into the G Scale hobby, I naively thought I wouldn't have to deal with such small stuff....

It is designed to be bolted to the rails. I thought I'd be smart and remove the sleeper webbing, in order to more easily move my hands and the little pipe wrench around. But when I'd bolted the buffer stop to the rails, well... Do you see the problem?


IMG_20250106_151912049.jpg


So I had to undo and redo a lot of those pesky nuts and bolts. Of course, when it's finally ready and good looking, one forgets the trials and tribulations:


IMG_20250106_153916835.jpg
 
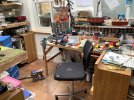
Nothing in the modeling sense but yesterdays fix of the CCTV required quite a bit of uoheaval so that the fitter could get the old wire out and the new one in. Scene of chaos this morning with the CCTV bkack wires just visible below the window. Work done was to cable tidy the wires so that stuff can go back in place plus the other day I found some wheels so the boxes below the bench could have a slidy pully out thing so that access to the main distribution box and plug easier. Sorry second pic a bit dark, just took it. But at least order restored for getting on with a project when ‘round to it’ kicks in.IMG_8404.jpegIMG_8405.jpeg
 
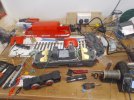
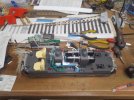
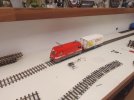
I have finally got back to my workbench today. Seeing I nearly have some track down , I figured it was about time I have a loco to run. I bought this 4010 off ebay at christmas no battery pack or controller , ad said it was new out of a pack that was broken up for resale. It did look in new condition but is missing one traction tyre off the non powered bogie.
IMG_20250116_155136 - Copy.jpg
It was a nice little job opening it up and stripping out the playmobil R/C bits. I had bought a micron controller and a few MR603c receivers' over a year ago, but never used them. I wasn't sure if the micron R/C would work as it said a min 5v was needed, but figured it would not hurt to try 4x AA holder with nimh batteries as I had these already. Fully charged it was reading 5.6v. I did order a 6 x AA holder just in case.
IMG_20250119_182931.jpg
I fitted 2x 4AA 2450mah packs in parallel. There is a lot of room inside the loco. I drilled through the centre roof support and then cut out the rest with the dremel disc' either side of the mounting hole. 3A poly switch in front of battery connectors. On/charge switch and charge socket through to bottom where there is a gap between boogies. I added some weight to the drive boogie where the old batteries should go. I might connect the leds later or swap them for white/red ones.
IMG_20250119_202421.jpg
It worked, but that wheel with no tyre jumps around a lot. Once I have a loop done I will see how well it lasts , the min 5v supply needed could be a problem when the batteries are getting a bit flat. If so I will plug the 6 xAA pack for 7.2v instead or connect the 2x 4 packs in series for 9.6v. Wonder how the 4.8v motor might like that. The old R/C gear is next to a micron receiver, bit of a difference in size. :)
I now have a loco to test my track (play with) as I get it installed.
 
Last edited:
I have finally got back to my workbench today. Seeing I nearly have some track down , I figured it was about time I have a loco to run. I bought this 4010 off ebay at christmas no battery pack or controller , ad said it was new out of a pack that was broken up for resale. It did look in new condition but is missing one traction tyre off the non powered bogie.
View attachment 337679
It was a nice little job opening it up and stripping out the playmobil R/C bits. I had bought a micron controller and a few MR603c receivers' over a year ago, but never used them. I wasn't sure if the micron R/C would work as it said a min 5v was needed, but figured it would not hurt to try 4x AA holder with nimh batteries as I had these already. Fully charged it was reading 5.6v. I did order a 6 x AA holder just in case.
View attachment 337680
I fitted 2x 4AA 2450mah packs in parallel. There is a lot of room inside the loco. I drilled through the centre roof support and then cut out the rest with the dremel disc' either side of the mounting hole. 3A poly switch in front of battery connectors. On/charge switch and charge socket through to bottom where there is a gap between boogies. I added some weight to the drive boogie where the old batteries should go. I might connect the leds later or swap them for white/red ones.
View attachment 337681
It worked, but that wheel with no tyre jumps around a lot. Once I have a loop done I will see how well it lasts , the min 5v supply needed could be a problem when the batteries are getting a bit flat. If so I will plug the 6 xAA pack for 7.2v instead or connect the 2x 4 packs in series for 9.6v. Wonder how the 4.8v motor might like that. The old R/C gear is next to a micron receiver, bit of a difference in size. :)
I now have a loco to test my track (play with) as I get it installed.
These are a rather nice loco, I have replaced the PM power unit with USA bogies on mine with Fosworks RC and a MLS Sound unit. They are suitably Swiss in looks so should fit in nicely with your line. I would certainly consider an upgrade in time with possibly decent Pantographs. Piko or LGB types should be fine. A respray will also lift it a lot, loosing the PM stuff before a respray if you do one.
 
Don't go above 7.2V,and don't run 'flat out' with any great load. - The drive train is pretty solid, but not bomb-proof.
So watch the overall weight you achieve.

If you can't get a Playmobil traction tyre, then one for a Stainz, will fit.

You might want to consider the newer Micron MR601a receiver/controller?

You do realise, once you have something to play with, the work-rate will drop markedly?
;);)

PhilP.
 
These are a rather nice loco, I have replaced the PM power unit with USA bogies on mine with Fosworks RC and a MLS Sound unit. They are suitably Swiss in looks so should fit in nicely with your line. I would certainly consider an upgrade in time with possibly decent Pantographs. Piko or LGB types should be fine. A respray will also lift it a lot, loosing the PM stuff before a respray if you do one.
Yeah it is a nice little loco for the price, there are a lot of possibilities for upgrading it later on. In the mean time it gives me something to experiment with batteries and R/C.
 
Don't go above 7.2V,and don't run 'flat out' with any great load. - The drive train is pretty solid, but not bomb-proof.
So watch the overall weight you achieve.

If you can't get a Playmobil traction tyre, then one for a Stainz, will fit.

You might want to consider the newer Micron MR601a receiver/controller?

You do realise, once you have something to play with, the work-rate will drop markedly?
;);)

PhilP.
Thanks , I will not series the 2 x 4AA packs then. Just use the 6AA pack and insulate the spare battery connector. Definitely the 601 would work much better for this, but I had the 603c already .
 
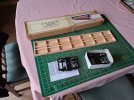
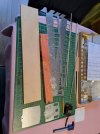
Right, next project, small F 25 from a DJB kit acquired in 2022, I had built one for a friend, so at the same time, built both chassis, bogies and pre drilled holes etc.
First job was to file the ends to create a tumble home and then scribe the doorways, next will be curving and sides to put in the tumble home, that could be fun!!
20250121_115652.jpg
20250122_085513.jpg
 
Right, next project, small F 25 from a DJB kit acquired in 2022, I had built one for a friend, so at the same time, built both chassis, bogies and pre drilled holes etc.
First job was to file the ends to create a tumble home and then scribe the doorways, next will be curving and sides to put in the tumble home, that could be fun!!
View attachment 337820
View attachment 337821
I am pondering tumblehome for my G3 Stephens type Railcar, current thoughts (as I am using plastic coated Foamboard is to use my metal benders then heat up the Foamboard gently to bend along a defined line for the 2 ends and 4 sides. A similar solution with 2 metal bits at the bottom end of the flat but if there is one may help you?
 
Right, next project, small F 25 from a DJB kit acquired in 2022, I had built one for a friend, so at the same time, built both chassis, bogies and pre drilled holes etc.
First job was to file the ends to create a tumble home and then scribe the doorways, next will be curving and sides to put in the tumble home, that could be fun!!
View attachment 337820
View attachment 337821
I'm considerably less jealous now that I see that it's an aluminium-sided one! The plywood ones were a beautiful build, but word on the streets is that the ally ones (with etched brass frets?) are a bit more challenging. That said, a DJB is a DJB...
 
I am pondering tumblehome for my G3 Stephens type Railcar, current thoughts (as I am using plastic coated Foamboard is to use my metal benders then heat up the Foamboard gently to bend along a defined line for the 2 ends and 4 sides. A similar solution with 2 metal bits at the bottom end of the flat but if there is one may help you?
Remember the contour models we made in Geography, with a new layer for each contour line? DJB (see above) did a similar thing to achieve the tumblehome on their plywood coaches, ie stepped layers under the final skin. It worked perfectly.
 
Back
Top