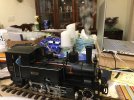
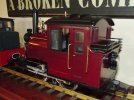
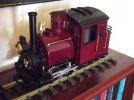
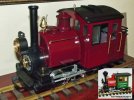
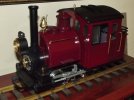
Thanks for the info, I'll take a look at EbayI used 1mm flat backed nail jewels, E-bay is as good as anywhere to find them.
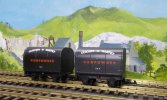
Look at the photos of Brooklyn, my Porter kitbash, the ones used on the adaptor plate are 1mm, but you can get them up to 5mm and in any colour you want.
The bigger ones make for good (Non functional.) marker lights.
Paul.
You are using an out of date browser. It may not display this or other websites correctly.
You should upgrade or use an alternative browser.
You should upgrade or use an alternative browser.
What happened at your workbench today?
- Thread starter Henri
- Start date
Rhinochugger
Retired Oik
No, Ford 1600 CVH - at least you can still get parts for thatWith the rocket-ship Japanese engine? The car got a bad press at the time, but it has aged well, hasn't it? Up there with the Gilbern GT, the Reliant Sabre and the Bond Equipe GT 2+2: each one beautiful, and lost. :-(
Oh yeah, I know, thread drift: this is about cars, and not trains. It will all work out in the long run. Trust me.
David1226
Registered
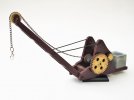
The Modeltown yard crane has been assembled and painted. It certainly lived up to its name as an Easy Build Kit, going together very easily. The problem I now have which was mentioned before is how to mount it track side. The fact that it has a fixed jib means that in order to gain sufficient clearance to raise a load from base level to the wagon load bed means that the crane has to be mounted on a platform or plinth. My original intention was to install the crane midway along the goods loop. This will require a platform much higher than I had anticipated, but what shape, square or round? One answer may be to locate it on the goods platform, but that would make things a bit too cramped. Lots of things to ponder, but I will take my time to mull over a few ideas. In the meantime here are some pics of the completed kit. The crane has been painted in the Claptowte Railway corporate colours of BR maroon and cream.
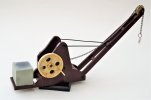
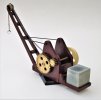
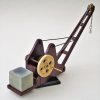
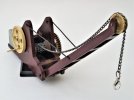
David


David
Rhinochugger
Retired Oik
I'm not sure if my memory is playing tricks, but I think I recall seeing small yard cranes mounted on a square stone plinth on the platform ?The Modeltown yard crane has been assembled and painted. It certainly lived up to its name as an Easy Build Kit, going together very easily. The problem I now have which was mentioned before is how to mount it track side. The fact that it has a fixed jib means that in order to gain sufficient clearance to raise a load from base level to the wagon load bed means that the crane has to be mounted on a platform or plinth. My original intention was to install the crane midway along the goods loop. This will require a platform much higher than I had anticipated, but what shape, square or round? One answer may be to locate it on the goods platform, but that would make things a bit too cramped. Lots of things to ponder, but I will take my time to mull over a few ideas. In the meantime here are some pics of the completed kit. The crane has been painted in the Claptowte Railway corporate colours of BR maroon and cream.
View attachment 275229
View attachment 275230
View attachment 275231
View attachment 275232
View attachment 275233
David
a98087
Registered
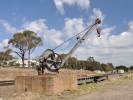
This example from Medstead on the mid Hants railway.
the crane is on the end of the platform surrounded by stone setts. (A nice modelling challenge for you)
Dan
the crane is on the end of the platform surrounded by stone setts. (A nice modelling challenge for you)
Medstead and Four Marks Station | Mid Hants Railway Ltd 'Watercress Line'
Mid-Hants Railway Watercress Line
www.watercressline.co.uk
Dan
David1226
Registered
I'm not sure if my memory is playing tricks, but I think I recall seeing small yard cranes mounted on a square stone plinth on the platform ?
View attachment 275237
The proportions of that setup appear to be spot on, now to sort out the construction materials.
David
Paul2727
Registered
casey jones snr
Registered
Lovely paint job.Brooklyn enters the final furlong...
Just the finishing touches (Including putting the name plate on permanently.)
I can just about see the finishing post now...
Paul.
View attachment 275239View attachment 275241
Paul2727
Registered
Firstly, thank you for all the thumbs up's and positive comments.Lovely paint job.
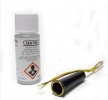
I'm now looking at fitting a no: 6 14 v Seuthe smoke generator inside the funnel.
It leaves about 1 mm clearance between the funnel wall. How hot do these things get?
Will it melt the 1.5 mm wall thickness acrylic tube that the funnel is made from? Also, does anyone know of a liquid heat proof compound that I could fill the gap with?
Regards,
Paul.
Last edited:
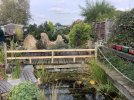
Over the weekend I revised the protection around my pond to a more Japanese type of Fence Structure. Was protected by string just like the right, right side will be done when I get round to a trip to Wicks to get the rest of the Wood. When I visited last time I could only get enough for the bit that has been done. Oh and to the right is a train from yesterdays operating day. The other Mallat that was out. Though you cannot see it but it is returning 3 Mail vans to Gernrode. The other two will be returned on the next trip.

Paul2727
Registered
Very nice, if mine look anywhere as good as those I'd be more than happyHere's a couple of mine I made a year or so ago....
Both on Hartland chassis but one has smaller wheels with a coupling height adjustment
View attachment 275353
I made for me a monumental discovery, well got told by someone on YT of it. This prompted me to modify my iPad holder that I have in my Shed. Now this is mostly used for having the Fast Clock running and as this has not really proved worthwhile the holder was now the wrong size as the iPad it was made for has been given to a friend and my current one is somewhat larger. So today I modified the size to match the new iPad Air that I have. Below shows the basic construction.
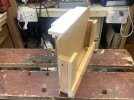 However the forward facing eye was hidden by the holding wood so a quick mod shows how it has been revised and where it sits in use.
 Now the revelation made was that the iPhone and indeed iPad can do Time Lapse movies. I had though that oh yes he has got an iPhone 12 or something flash like that, but and a real joy my 6 or so year old iPhone has the feature as well, so do my iPads hence the holder mods. Here is a short demo showing me tidying up after the work.
And here is the Vid that got me going on this, possibly this may be of help to anyone doing a big shed installation of their Garden Railway indoor section, his subroadbed installation may also be of interest in his next vid. All done using the Time Laps feature, do not be put off by his Rocket and Helicopter starts to the vids. They are both very interesting.
 However the forward facing eye was hidden by the holding wood so a quick mod shows how it has been revised and where it sits in use.
 Now the revelation made was that the iPhone and indeed iPad can do Time Lapse movies. I had though that oh yes he has got an iPhone 12 or something flash like that, but and a real joy my 6 or so year old iPhone has the feature as well, so do my iPads hence the holder mods. Here is a short demo showing me tidying up after the work.
And here is the Vid that got me going on this, possibly this may be of help to anyone doing a big shed installation of their Garden Railway indoor section, his subroadbed installation may also be of interest in his next vid. All done using the Time Laps feature, do not be put off by his Rocket and Helicopter starts to the vids. They are both very interesting.
I concur with Paul, if you have looked at one of my build threads you will see that I am a great beliEver of using card and paper. But I also use Plasticard as well and found a recent good tip to cut up Margarine Tubes to use as Wagon Strapping and detail. Of course will need a good degrease first and cut to get just the flat parts.Here's a couple of mine I made a year or so ago....
Both on Hartland chassis but one has smaller wheels with a coupling height adjustment
View attachment 275353
Fezwig
Just a man in the middle of a complicated plan.
A bit more on with the conversion to an 8 window coach, after a lot of measuring, trimming, more measuring and trimming, I've got some bits stuck together and more importantly, I now know how long it's going to be !
any how a pic, can't see the join eh! which is more that can be said about the chassis!
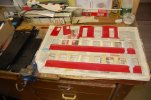
any how a pic, can't see the join eh!

AustrianNG
Director of my railway
Firstly, thank you for all the thumbs up's and positive comments.
I'm now looking at fitting a no: 6 14 v Seuthe smoke generator inside the funnel.
It leaves about 1 mm clearance between the funnel wall. How hot do these things get?
Will it melt the 1.5 mm wall thickness acrylic tube that the funnel is made from? Also, does anyone know of a liquid heat proof compound that I could fill the gap with?
Regards,
Paul.
View attachment 275257
It won't melt the stack.......I wouldn't worry about sealing the gap, none of my locos have been a problem with a Seuthe
/LGB/Massoth smoke unit fitted.
Last edited:
I got a replacement pulsed smoke unit for my LGB 20273 G3/4 LD1 Rhatia about 4 weeks ago from Modell-Land.de. I finally got around to installing it today. I had been dreading tearing into the lok again figuring the installation to be a multi day affair. Surprisingly, it only took me about about two hours. The smoke unit, Märklin part no. E297811, comes with all the necessary wire harnesses already soldered in place so it was literally just a matter if unplugging the defective unit and plugging in the new one.  The price was right too at only 25.82€!
  Unfortunately the postage, 39.99€, forced me to buy some other goodies to amortize cost.
