Chris Vernell
45.29 N, 75.75 W
Let's Go BrokeReally..? I thought it meant Lets Go Bananas..!
(not a reference to company history, but to the wallet-emptying temptations of the product
Let's Go BrokeReally..? I thought it meant Lets Go Bananas..!
Tell me more, pleaseJust fitted my little rail car/ tram with £5 radio control. My battery operated tram has the switch inside, so it’s very awkward to stop, especially if it’s misbehaved.
Saw a thread about using led dimmer control, mine cost £4.97 from flea bay. It’s supposed to have 12-24 volt supply, I’m only using 9 volts as the motor is rated at 3-4.8 volts, so the control is hit and miss, but it does work!
Probably old news to the experts, but if there’s any cheapskate beginners like me ,could be useful.
The joy of stopping it without giving it an intimate examination is untold.View attachment 276080
These are for dimming and controlling leds in the home I presume. You need the dc version, handy as it’s the cheapest, connect your battery to the two input wires, and your motor to the two output wires.Tell me more, please
Cheers , I'll look them out and have a playThese are for dimming and controlling leds in the home I presume. You need the dc version, handy as it’s the cheapest, connect your battery to the two input wires, and your motor to the two output wires.
They don’t have the facility to reverse so I connected mine to the original dpdt switch.
These ones are good for 2 amps, others may go higher, the control isn’t precise but more than good enough for starting and stopping, when you switch off, it is supposed to remember the last setting, which is another reason they are good for what I want, as my little tram is not meant for speed.
I set mine for the same sort of speed it achieved with 3 volts, I assume the 9v battery will last quite a bit longer.
Only had about 5 minutes to test due to rapid onset of darkness, If the rain allows, will play more tomorrow.
No idea how to insert link, but they are readily available on flea bay.

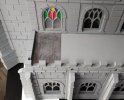
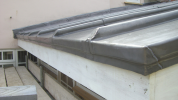
Remember your lead rolls - and no, you don't eat themBit behind on my Church build but decided the best way to make the Lead looking roof is real Leadrather than imitating it , some I bought has arrived so a test fit to see what it looks like and it will on its own tarnish naturally, Will just need to watch out for lead thieves on the church roof
just a few more bits to finish and add,l then its time for a sanding and a color change so it looks like its built from Limestone.
View attachment 276098

Beautiful ! The one roof that will outlast the building it protects.
It'll also give it a bit of weight to keep it in placeBeautiful ! The one roof that will outlast the building it protects.
Just read the instructions!!! They are good for 8 amps!Cheers , I'll look them out and have a play
It ought to be entirely possible to replicate the complex work on a lead roof if you get this stuff.Looking into how to form them over something , Lead work at 1:22 not as easy as full size

As a bit of a nerdy, anally retentive diversion, studying the details and skills necessary for lead roofing can be rather fascinating (I've avoided using the word 'interestingThe Lead I got is 0.5mm , did a bit of looking at Lead church roof pics and have printed roll former's to go under my Lead to give the correct look and shape, plus the joints will be watertight as wellAfter having a play its fiddly to do, but it will be worth the effort looking at it

Very nice.New kit building proceeds apace at the workbench. The first building is a ModelTown small Signalbox. This one will go on the shelf until the new extension to the CFR is constructed:-
View attachment 276131

The answer came in and said yes. So know it is mine for 130,00€. Now to wait for the postman. May be tomorrow.... Hope.Sitting in my work shop and starring onto my computer. Found an G scale tram from Zurich. Needs a little bit of work for the windows and finding a motor unit for it..... Price, nearly a present. But it must run on R1 tracks, so I'm waiting for answer. ... ... .... ... ....


