What happened at your workbench today?

One of the resin kits that Father Christmas brought me was a a signal box by Thornley Miniatures. Having started to put it together, rather that wait until some time in the future to add some internal detail and fittings, I decided to add it as I went along. Being a signal box, central to the whole detailing regime was to add a lever frame. I scoured 'tinternet looking for a suitable model, but was unable to find anything. What I did come across was an excellent tutorial video, on YouTube, describing how to build one. The main material used was 3mm Foamex sheet, a material familiar to many of you, but a medium that I had not previously worked with myself. I found the video easy to follow and although the demonstrator was obviously very experienced and accomplished. My own efforts, following his example, were quite crude by comparison, but given that the lever frame is intended to be representational, not an accurate scale model, and not much of it will be visible inside the building, I am not displeased with the result.

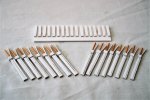
I have built a 16 lever frame. Below is a pic showing the frame and 16 levers. I have omitted the number plates on the front of the levers having decided to add these after the levers have been painted. The base and levers are 3.0mm Foamex, the release levers and collar are 1.0mm plasticard, the lever handle should have been brass rod, but having mislaid mine, I used wooden cocktail sticks instead.

dig 210331001.JPG

David
 
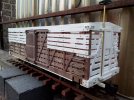
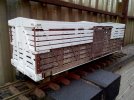
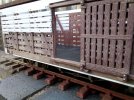
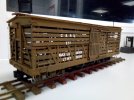
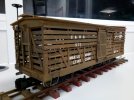
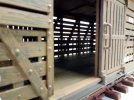
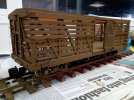
Not on the workbench today but over a couple of days but I don`t think that matters? Stock car upscale now well under way as ordered bits turned up on Saturday,strip,sheet,brass rod and glue!!!things to do,roof to make and roof walks to adapt from the original car,grab irons and steps to go on when the holes are drilled,more grain detail for the new boards,more rivets and bolts to add,the doors need some more boarding added to beef them up a little,coupling replacement one end,not sure yet what colour to paint it but matt black is possibly on the cards with brown interior.;)IMG_20210331_185253.jpgIMG_20210331_185308.jpgIMG_20210331_185322.jpg
 
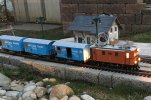
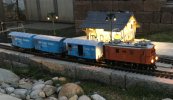
Some one else's altered LGB 2095 (ÖBB 2 1/2ft gauge Diesel 4-4) plus two LGB 3062 (or similar) made into a push-pull unit and racing (next time slower, I promise) over the "Ramosch" part of my layout currently being enlarged. The bridge under construction ...kit bashing plastic water conduit into a simile of the Trisanna viaduct of the Arlberg line. The FSN is a long dismantled 950mm gauge, very mountainous railway which linked Spoleto with Norcia in central Italy's Abruzzi (nice for trail bikers nowadays). Liberties are being taken and enjoyed.
 
Started work on the removable beam bridge which will become the centerpiece of my tramway.
IMG_20210401_205439.jpg
 
I have painted and assembled the lever frame, shown in the raw above #1382. Having placed it in the signal box, it does make things slightly crowded, I suspect that dimensionally it was intended for 16mm scale rather than G Scale, but outside looking in this should not be noticeable. The enlarged photographs show how naff the painting was, but again viewed from outside at normal distances, they will be fine. All in all, never having worked with Foamex sheet before, I am very pleased with the result.

dig 210402001.JPG

dig 210402002.JPG

dig 210402003.JPG

dig 210402004.JPG


David
 
That train is a chameleon! Close by, it's clearly light blue, but when it crosses the bridge it appears a darkish green.
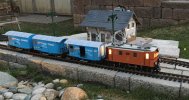
'tis a chameleon and a changeling too. More information about the abandoned line (in Dutch, interesting photos). LGB coaches quite similar to FSN. Motor car more tramway like. Found it on eBay-IT(aly).
 

Attachments

  • FSN kit-bash from Italy (3).jpeg
    FSN kit-bash from Italy (3).jpeg
    1.1 MB · Views: 0
  • FSN kit-bash from Italy (4).jpeg
    FSN kit-bash from Italy (4).jpeg
    1.6 MB · Views: 0
  • FSN kit-bash from Italy (5).jpeg
    FSN kit-bash from Italy (5).jpeg
    1.3 MB · Views: 0
  • railations-net Spoleto-Norcia.png
    railations-net Spoleto-Norcia.png
    758.6 KB · Views: 0
444037B8-F215-48F4-BDF3-CB08BB0FA8F4.jpegCE092527-F19B-4E73-BF7B-A9031F7667AD.jpeg
I removed the regulator arm from both “Sammie” locomotives and fitted knobs. This means that an engineer can now stand in the cab. The knobs are covered with heat shrink to lessen the heat when turning the knobs.
 
This afternoon I did some decoder re-wiring on my RhB Ge 2/4, No.205 (LGB 2045). I had initially set it up similar to its original analog workings. This seemed easiest at the time because the cab lights and upper center headlights were electrically connected on small circuit boards. The direction dependent "driving" cab light came on whenever the lights were on.

Today I cut the common return trace on the small circuit board with the upper headlight and cab light sockets. The cab lights now connect to their own decoder outputs on the LokPilot V4.0 decoder I had put in this loco. While I was at it I also added a "Shunting Lighting" function that turns on all the front and rear headlights. I don't think this is historically accurate, but hey - rule 8. I should have added lights to the motor room while I was at it. Maybe next time I've got the roof off. There are still some unused decoder outputs available. I'll probably dim the cab lights a bit too next time I've got the LokProgrammer hooked up.

Ge2-4 casb lighting - 1.jpeg Ge2-4 casb lighting - 1 (1).jpeg Ge2-4 casb lighting - 1 (2).jpeg
 
Phil, to the best of my knowledge, RhB forward cab does not have any lights on when driven at night. Instrument panel is lit, gauges have lights and should it be the cab in a motor coach, then a curtain is drawn inside the driver's cab to keep out light from the coach. It's the one thing I'd like to get off in my analog Ge 2/4 but I don't feel like tinkering with the inards ...
Meanwhile another analog item arrived ...see above. The Ge 2/4 together with the LGB 2095 (three motors in all) draw 2 amps. So, I think my MRC Tech3 PowerCommand is in deed sufficient.
That diesel altered into a motor coach needs a thorough cleaning and some repainting, runs fine. Wonder who was the previous owner. Must've had a soft spot for the FSN, the Spoleto-Narci 950mm line across the Abruzzi. The LGB model may have become available during the 1980s by which time the FSN had been dismantled. Re-issued it comes with sound and the works (MTS).
Good looking Engadine RhB Station!
 
Phil, to the best of my knowledge, RhB forward cab does not have any lights on when driven at night
That's why I finally got around to putting the cab lights on their own individually controllable circuits. Night vision isn't helped by a brightly lit cab! The Lokführer no longer has to be blinded at night!

I have the cab lights of my Ge 6/6 crok (LGB 2040) separated from the headlights too. These were much more straight forward to wire. The cab light sockets were separately wired from the factory. I only needed to disconnect them from the headlight wiring.
 
Oh, so they are merely stuck in not threded. I might just do that. TNX for the pointer.

And as to the dismantled FSN, haven't found a write up in EN of the functioning RR but touristic access as it is now here and here and various trip-advisor entries. And the color scheme on my eBay find seems accuarte enough (can't find a large view).
 
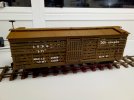
I`m still messing with the stock car upscale,more rivets on,grab irons on and first coat colour, I suppose I should think about the roof now?I decided on a brown instead of black,Humbrol 186,good woody shade;)Some changes I thought about not doing now such as beefing the doors up as they seem fine as they are and just added the handle,"stuff" on order to make the cut bars on all the cars I have done as a little more detail,the 1;20 cabooses and locos have them so why not match even if they are dummies? Must change that broken coupling!!!!!!!!!IMG_20210403_012619.jpg
 
Last edited:
It`s got to the point where I am waiting for bits to finish completely all the cars but the roof on this one now and painted together with the lettering and numbers,I rebuilt the roof side walks to be a little longer to match the car width better and so I may do the boxcar to match,I may have some spare grab irons in the scrap box and add them to the roofs also,safety first!!!!!;);)IMG_20210404_052708.jpgIMG_20210404_052747.jpgIMG_20210404_052959.jpgIMG_20210404_052822.jpg
 
Last edited:
Been doing a bit of spraying now the weather is warmer. Gauge 3 wheels, skirt base for the Steam Tram, some couplings and cow catchers. One set of wheels still have masking tape on.
C18F4182-5607-4751-8977-6CE27596FD13.jpeg
 
I cant show anything a nice as the model photos before me, but today I actually started using my modelling bench for modelling for the first time since we moved house, may not sound very glamorous but its been a big day for me, you could say its been a bench mark in the post house move (sorry couldn't resist) ;-)

David
 
Back
Top