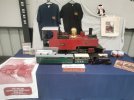
Nice set of wagons, would dust powders work for the creosoted look? A quick spray after with Humbrol Matt varnish should seal things in. Worth a test on some scrap wood first.The Manx Northern 'M' wagons are finally (almost) finished! They really need to be a bit darker -the originals were creosoted- but are fine for the time being. They will no doubt be worked into the ground transporting lead ore from the mines at Foxdale...
View attachment 301982
The long flat in the background is the running gear from the County Donegal/IMR railcar, which is having rc battery power installed, along with passengers and Driver Corlett, a man so keen, he is already sitting waiting for the body to be fitted around him!
You are using an out of date browser. It may not display this or other websites correctly.
You should upgrade or use an alternative browser.
You should upgrade or use an alternative browser.
What happened at your workbench today?
- Thread starter Henri
- Start date
Northsider
Modelling the Northern half of the Isle of Man
I've never used them before so don't know -something to research, so thank you for the suggestion. As you say, they need a coat of matt varnish which may darken them down a bit too.Nice set of wagons, would dust powders work for the creosoted look? A quick spray after with Humbrol Matt varnish should seal things in. Worth a test on some scrap wood first.
Weathering powders work very well on wood so well worth doing.I've never used them before so don't know -something to research, so thank you for the suggestion. As you say, they need a coat of matt varnish which may darken them down a bit too.
DafyddElvy
1:22.5 & 15mm Scale Trams, , NG Steam Railways
So many questionsThe Manx Northern 'M' wagons are finally (almost) finished! They really need to be a bit darker -the originals were creosoted- but are fine for the time being. They will no doubt be worked into the ground transporting lead ore from the mines at Foxdale...
View attachment 301982
The long flat in the background is the running gear from the County Donegal/IMR railcar, which is having rc battery power installed, along with passengers and Driver Corlett, a man so keen, he is already sitting waiting for the body to be fitted around him!
From where did you obtain the transfers?
Being wood I am guessing they are scratch built, from where did you obtain the wagon body strapping W iron and other under frame parts?
Lovely looking wee consist.
David
Northsider
Modelling the Northern half of the Isle of Man
The transfers are white vinyl (what we used to call sticky-backed plastic) cut on a Roland Stika vinyl cutter; the bodies are laser cut ply, and the hinges and brake parts are laser cut styrene with nail art gems as rivets (I will revert to Cambrian rivets next time, as he adhesive on the gems is rubbish). Safety chains are jewellery chain which has been heated to vapourise/oxidise the 'silver' coating, laser cut styrene hooks, mounted onto split pins with an M2 washer.So many questions
From where did you obtain the transfers?
Being wood I am guessing they are scratch built, from where did you obtain the wagon body strapping W iron and other under frame parts?
Lovely looking wee consist.
David
I use plain ones without adhesive, and use superglue to hold them(I will revert to Cambrian rivets next time, as he adhesive on the gems is rubbish).
DafyddElvy
1:22.5 & 15mm Scale Trams, , NG Steam Railways
Thanks for the info, they are very nice, did you incorporate any compensation?The transfers are white vinyl (what we used to call sticky-backed plastic) cut on a Roland Stika vinyl cutter; the bodies are laser cut ply, and the hinges and brake parts are laser cut styrene with nail art gems as rivets (I will revert to Cambrian rivets next time, as he adhesive on the gems is rubbish). Safety chains are jewellery chain which has been heated to vapourise/oxidise the 'silver' coating, laser cut styrene hooks, mounted onto split pins with an M2 washer.
Would I be correct in thinking the wagons are modelled to 15mm:ft scale?
I don't suppose you have a drawing for the bodies you could share, I would need to cut mine by hand but a drawing would be extremely useful.
Northsider
Modelling the Northern half of the Isle of Man
I used the illustrations in either Boyd or the Hendry's Manx Northern Book, photocopied to get the scale/gauge correct. I have got my own drawings, but they are on a rather odd CAD format (2D Design) that is used in schools -I don't think it is available as freeware and is quite costly. They aren't dimensioned because I only used them to drive the laser cutter, and have a couple of errors in them. This screenshot shows them:Thanks for the info, they are very nice, did you incorporate any compensation?
Would I be correct in thinking the wagons are modelled to 15mm:ft scale?
I don't suppose you have a drawing for the bodies you could share, I would need to cut mine by hand but a drawing would be extremely useful.
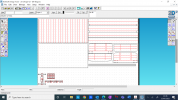
They don't have any compensation, although I have seen it done on similar wagons. I use the IP Engineering IMR axleboxes and whatever 32mm dia wheels I have available.
musket the dog
Registered
I used the illustrations in either Boyd or the Hendry's Manx Northern Book, photocopied to get the scale/gauge correct. I have got my own drawings, but they are on a rather odd CAD format (2D Design) that is used in schools -I don't think it is available as freeware and is quite costly. They aren't dimensioned because I only used them to drive the laser cutter, and have a couple of errors in them. This screenshot shows them:
I've got quite a bit of experience with Techsoft, it's quite a pleasant surprise to see someone else still using it! If you're happy to share the files I would be happy to have a go at getting the lines out into a modern 2D drawing program so David could have a go at printing them from a PDF?
Fixing a broken Piko 2-10-2 valve gear, see this link.
 www.gscalecentral.net
Piko 2-10-2 Class 95 Ref. 37230 conversion to Battery Power.
Many Thanks Jon this is all really helpful. I'm still debating where to apply the razor saw to my Bubikopf - cab or side tanks? - to house the batteries, see separate thread Piko BR 64 Bubikopf. When it come to re-assembly, there are three screws with big red washers to attach the chassis to...
DafyddElvy
1:22.5 & 15mm Scale Trams, , NG Steam Railways
That would be very much appreciated Ricky thank you.I've got quite a bit of experience with Techsoft, it's quite a pleasant surprise to see someone else still using it! If you're happy to share the files I would be happy to have a go at getting the lines out into a modern 2D drawing program so David could have a go at printing them from a PDF?
Northsider
Modelling the Northern half of the Isle of Man
PM sent.
Today (actually yesterday) I successfully completed initial outdoor testing of an Azatrax MRD8 IR emitter/receiver model train detector.
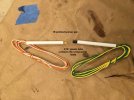
First a pic of the Azatrax MRD8: It will operate up to 8 IR emitter/receiver pairs.
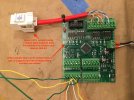
The on-board LED indicators make testing each IR sensor pair after being connected simple. All that is needed is power to the board, 8-15V ac or dc. I used a 9V battery to temporarily power the unit. I also used some spare networking parts to make the connection between the Azatrax contacts and the contact inputs of a Märklin S88 AC module on my CS3's S88 bus.
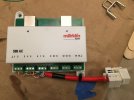
Because the network cable has 8 conductors only 7 contacts are connected. One conductor is needed for the common to all contacts. I'll run another single conductor wire if I ever need the last contact which I doubt. The network cable color coding makes the connections a breeze.
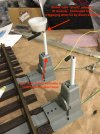
Next is a pic of one IR emitter/receiver pair.
I was trying to figure out the best way to add these to the existing track without tearing anything up when I remembered some LGB catenary mast bases I were not using. These snap nicely and securely between a pair of ties on LGB track. Drilling a 3/16 inch hole from the top let me insert the protective tube of the receiver in the catenary base. You'll notice in the pic below my first attempt was nearer the rails. After I had bent the IR receiver leads to point it downward I realized I'd be better off drilling the hole further from the track. I also drilled a smaller hole in the back of the base to bring the receivers leads out.
i plan to connect the IR emitters to the track using LGB No. 10710 wire holders which similarly clip between a couple of ties. (And, are a lot less expensive than the catenary mast bases!) The emitters will be near rail height. The resulting line-of-sight, which is diagonal in both the vertical and horizontal planes, will make sure the contact remains triggered until an entire train has completely passed. There will not be any on-off, on-off as individual wagons go by. I didn't have any of the wire holders on hand so for testing I just had the emitters temporarily held by wrapping their leads around the far rail. This worked fine for testing.
Everything functioned great inside including my CS3 central station acknowledging when a contact triggered and when it cleared. Next I moved outside. I was working under a shade umbrella at my patio table and the Azatrax was still working fine in the daylight. Next came hooking it up to the S88 line I had run earlier this Summer.
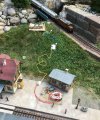
Once the IR receivers were in the direct sunlight, however, they did give false sensing. The Azatrax instructions warn against this possibility. One suggested cure is to "Shade the IR receiver from bright lights, and point it away from windows or other strong light sources." It was already pointed toward the ground, that was why I chose to mount the receiver to the catenary mast base. I tried shading the back side of the receiver but that didn't do anything. Adding a shrink tube snout to the receiver did block enough stray light stop the false triggering. I experimented with various lengths and settled on 1 inch which gave some extra margin of protection beyond the minimum length needed.
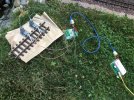
All-in-all I'm quite pleased with how the Azatrax MRD8 performed outside. I was worried it would just be too bright outdoors for IR sensors to work. I'll post some more pics once I get the LGB wire holders I've ordered and can more permanently mount both the emitters and receivers.
The great advantage of these IR detectors is they function as occupancy detectors without needing to electrically isolate a section of track. Each sensor gives both an "arrival" signal when it's triggered and "departure" signal when it clears. Not just a simple "something passed by" like a magnet actuated reed switch gives.
First a pic of the Azatrax MRD8: It will operate up to 8 IR emitter/receiver pairs.

The on-board LED indicators make testing each IR sensor pair after being connected simple. All that is needed is power to the board, 8-15V ac or dc. I used a 9V battery to temporarily power the unit. I also used some spare networking parts to make the connection between the Azatrax contacts and the contact inputs of a Märklin S88 AC module on my CS3's S88 bus.

Because the network cable has 8 conductors only 7 contacts are connected. One conductor is needed for the common to all contacts. I'll run another single conductor wire if I ever need the last contact which I doubt. The network cable color coding makes the connections a breeze.
Next is a pic of one IR emitter/receiver pair.

I was trying to figure out the best way to add these to the existing track without tearing anything up when I remembered some LGB catenary mast bases I were not using. These snap nicely and securely between a pair of ties on LGB track. Drilling a 3/16 inch hole from the top let me insert the protective tube of the receiver in the catenary base. You'll notice in the pic below my first attempt was nearer the rails. After I had bent the IR receiver leads to point it downward I realized I'd be better off drilling the hole further from the track. I also drilled a smaller hole in the back of the base to bring the receivers leads out.

i plan to connect the IR emitters to the track using LGB No. 10710 wire holders which similarly clip between a couple of ties. (And, are a lot less expensive than the catenary mast bases!) The emitters will be near rail height. The resulting line-of-sight, which is diagonal in both the vertical and horizontal planes, will make sure the contact remains triggered until an entire train has completely passed. There will not be any on-off, on-off as individual wagons go by. I didn't have any of the wire holders on hand so for testing I just had the emitters temporarily held by wrapping their leads around the far rail. This worked fine for testing.
Everything functioned great inside including my CS3 central station acknowledging when a contact triggered and when it cleared. Next I moved outside. I was working under a shade umbrella at my patio table and the Azatrax was still working fine in the daylight. Next came hooking it up to the S88 line I had run earlier this Summer.

Once the IR receivers were in the direct sunlight, however, they did give false sensing. The Azatrax instructions warn against this possibility. One suggested cure is to "Shade the IR receiver from bright lights, and point it away from windows or other strong light sources." It was already pointed toward the ground, that was why I chose to mount the receiver to the catenary mast base. I tried shading the back side of the receiver but that didn't do anything. Adding a shrink tube snout to the receiver did block enough stray light stop the false triggering. I experimented with various lengths and settled on 1 inch which gave some extra margin of protection beyond the minimum length needed.

All-in-all I'm quite pleased with how the Azatrax MRD8 performed outside. I was worried it would just be too bright outdoors for IR sensors to work. I'll post some more pics once I get the LGB wire holders I've ordered and can more permanently mount both the emitters and receivers.
The great advantage of these IR detectors is they function as occupancy detectors without needing to electrically isolate a section of track. Each sensor gives both an "arrival" signal when it's triggered and "departure" signal when it clears. Not just a simple "something passed by" like a magnet actuated reed switch gives.
Last edited:
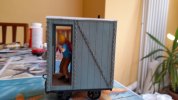
Over past couple of weeks, (I know it seems slow, but it's a kit so the longer you take, the more value for money you get!) I've been building a P&S Models brake van kit. Although it was extremely cheap, and we're obviously not talking about a top notch quality kit, I'm very impressed with it. All parts included (apart from the figure). For £18. Anyone could make a great wagon out of it, and I highly recommend them as a range. 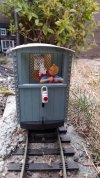


Technocrat
Mostly Retired?
Tin Tin is a nice touch, but isn't he Spanish?Over past couple of weeks, (I know it seems slow, but it's a kit so the longer you take, the more value for money you get!) I've been building a P&S Models brake van kit. Although it was extremely cheap, and we're obviously not talking about a top notch quality kit, I'm very impressed with it. All parts included (apart from the figure). For £18. Anyone could make a great wagon out of it, and I highly recommend them as a range. View attachment 302408View attachment 302409
viaEstrecha
Spanish metre gauge in G scale (on the cheap)
Belgian.Tin Tin is a nice touch, but isn't he Spanish?
Technocrat
Mostly Retired?
I stand corrected. My memory is playing tricks on me. (All to common these days.) I read the English translations as a child and had it in my head he was Spanish.Belgian.

