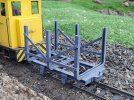
What have you been printing.

So much great work here, to bring it back down a level, or two...
I've been making some new platform lights
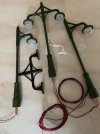
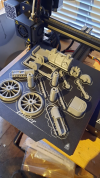
All parts.jpg
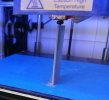
The bottom piece is 3d printed into which goes a length of 1/4" copper tube for the pole.
The head is a two piece part and can be made for one or two LEDs.
I've put Aluminium tape between the LED and the shade to prevent light showing through where light shouldn't
and the "glass" is the anti tamper cap off a Fruit Shoot drinks bottle (other soft drinks are available)

The white leds pull about 10mA each from an existing 12v dc supply so with 5A to play with I could run a bucket load.
 
Last edited:
Today as it was a little bit wet out , I decided to have a play, Printed in my favorite PETG, slowed down and .01mm layer height and 100% infil , I should not have printed these, as now I know it works, that means more jobs to do added to my outstanding list :fearscream: :rofl::rofl:

test1.jpg
 
Today as it was a little bit wet out , I decided to have a play, Printed in my favorite PETG, slowed down and .01mm layer height and 100% infil , I should not have printed these, as now I know it works, that means more jobs to do added to my outstanding list :fearscream: :rofl::rofl:

View attachment 284781
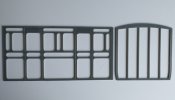
OK, the panelling looks spiffing, and there's minimal tumblehome, but will the sides flex enough to create that?

>:)>:)
 
OK, the panelling looks spiffing, and there's minimal tumblehome, but will the sides flex enough to create that?

>:)>:)
The panel side will flex enough to form the Lower curve, still thinking about what to make the body's out off. 1.5mm thk PETG printed sides with the window holes in would flex enough. but a pain to print big flat sheets. I think they would also be a pain to bend / hold and glue for a perfect finish. I could print curved sections vertically in shorter lenths, or use a Plastricard of some sort for the inner wall and go thinner. Thinking back to model boat building days some ribs with the bottom curve in might help as well. I could make the sides all flat for an eaiser life but the curve looks better :)
 
Plasticard or maybe 1.5mm ply? It's easy to work and shape and will give you a reasonable thickness to work with. Bending it is not an issue, as you just soak it in water for an hour, then bend to shape and clamp until it dries out.
 
The panel side will flex enough to form the Lower curve, still thinking about what to make the body's out off. 1.5mm thk PETG printed sides with the window holes in would flex enough. but a pain to print big flat sheets. I think they would also be a pain to bend / hold and glue for a perfect finish. I could print curved sections vertically in shorter lenths, or use a Plastricard of some sort for the inner wall and go thinner. Thinking back to model boat building days some ribs with the bottom curve in might help as well. I could make the sides all flat for an eaiser life but the curve looks better :)
I s'pose, with the panelling already formed, it should be a comparatively straightforward matter to form the sides from plastikard, as you can use the panelling fret as the template for marking out the windows. I would never be able to cut out a row of windows in a nice straight line - which was why I had to cheat when I built my Fn3 combine ;);)
 
I s'pose, with the panelling already formed, it should be a comparatively straightforward matter to form the sides from plastikard, as you can use the panelling fret as the template for marking out the windows. I would never be able to cut out a row of windows in a nice straight line - which was why I had to cheat when I built my Fn3 combine ;);)
Why not build the coach sides in clear plastic/Perspex , overlay panelling and then paint leaving windows clear ?
 
Can you guess what this is and how it will be used once the weather improves a little??
20210510_120538.jpg
 
This is coming along nicely as well. Will get the glazing and ventilators finished off today, so the roof can go on. The end railings and buffers are printed, so its nearly ready to roll.
20210510_123711.jpg
 
Decided in for a Penny in for a Pound if I.m going to print a coach then there always a way to print everything :) to print curved walls you just print vertical :)

vertical.jpg

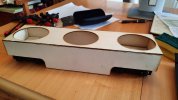
I can just with millimeters to spare get a chassis for a three compartment coach on my printer bed , so it got longer :). As I still have some R1s the chassis has swiveling bogies behind the fixed springs as per LGB setup.

It's a very suttle curve at the bottom, but it's copied from drawings / photos by tracing the outline, it might have looked better emphasized at this scale , but bit late now

carrage2.jpg
 
Decided in for a Penny in for a Pound if I.m going to print a coach then there always a way to print everything :) to print curved walls you just print vertical :)

View attachment 284950

I can just with millimeters to spare get a chassis for a three compartment coach on my printer bed , so it got longer :). As I still have some R1s the chassis has swiveling bogies behind the fixed springs as per LGB setup.

It's a very suttle curve at the bottom, but it's copied from drawings / photos by tracing the outline, it might have looked better emphasized at this scale , but bit late now

View attachment 284951
Looks good :clap::clap:

You can always mimic the idea that GRS had, which was short lengths of coach sides that you can make up to suit your plan :nod::nod:
 
Looks good :clap::clap:

You can always mimic the idea that GRS had, which was short lengths of coach sides that you can make up to suit your plan :nod::nod:
Thats sort of what I am doing, the curved sections etc. will be printed to suit one compartment so 3 in length for this chassis. The printer can and could print the whole side at once as a single vertical piece, but I have a feeling it would bound to fail before it got to the top so not pushing my Luck :rofl:
 
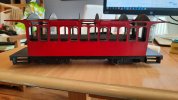
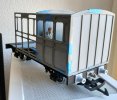
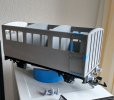
A Long week of Printing but it has a complete body shell at last :) just getting the outer panel frames the right height before having a go at printing a full side. I think the Outer side will be Rover Green Lower half and Cream upper with all Rover Green paneling. For those that have built kits where it says spray the outer panels before attaching to the fully painted main body , what glue did you use to stick painted parts to a painted body ? It's a big piece to superglue without making a dam mess :)

carrage3.jpg
 
For those that have built kits where it says spray the outer panels before attaching to the fully painted main body , what glue did you use to stick painted parts to a painted body ? It's a big piece to superglue without making a dam mess :)
Not sure what glue to use, but through experience I know that trying to do the painting when it's stuck together is a b*gg*r
 
A Long week of Printing but it has a complete body shell at last :) just getting the outer panel frames the right height before having a go at printing a full side. I think the Outer side will be Rover Green Lower half and Cream upper with all Rover Green paneling. For those that have built kits where it says spray the outer panels before attaching to the fully painted main body , what glue did you use to stick painted parts to a painted body ? It's a big piece to superglue without making a dam mess :)

View attachment 285095
Using super glue for big areas can always be a bit tricky, my solution is to splurge a good amount out on a piece of scrap plasticard or suchlike then use a straightener paper clip to apply it to the part to be added. This can then be carefully picked up and placed. You do need to be pretty well spot on with placing but with 802 or Hafix you do have a few seconds before it starts to go off on contact.
 
Using super glue for big areas can always be a bit tricky, my solution is to splurge a good amount out on a piece of scrap plasticard or suchlike then use a straightener paper clip to apply it to the part to be added. This can then be carefully picked up and placed. You do need to be pretty well spot on with placing but with 802 or Hafix you do have a few seconds before it starts to go off on contact.
I know someone who pins the frets in place, as well as glues, that way he can use a slower acting glue
 
Not sure any of you will have difficulty guessing what this is... From an excellent model on Thingiverse (Stephenson Rocket 1:32 train by UTJTrain) which I think I may improve in a couple of areas. Pipework will be printed in copper metallic PLA and there will be quite a lot of rubbing down and priming to do to reduce lines in a few areas. I think the cylinders look a bit "heavy", so may well replace parts of these in brass, particularly the slides.

1621418771276.png
 
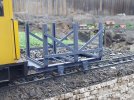
this is a new sugar cane car I printed and posted on my etsy site. can't wait to get a long sting of them printed to run.open cane.jpgopen cane2.jpg
 
Back
Top