Arosa Line

"Thyme enough at last".
Madman Madman should know this one.

Wait, it just hit me. Burgess Merideth in the Twilight Zone episode where he comes out of a cellar, after surviving a nuclear attack. Since he is a book geek he is thrilled to be surrounded by all of the books that were once on the shelves of the library destroyed in the attack. As he bends over to pickup one last book, his glasses fall from his face and break on the floor.

CzhGdZKWgAAdJLI.jpg
 
Wait, it just hit me. Burgess Merideth in the Twilight Zone episode where he comes out of a cellar, after surviving a nuclear attack. Since he is a book geek he is thrilled to be surrounded by all of the books that were once on the shelves of the library destroyed in the attack. As he bends over to pickup one last book, his glasses fall from his face and break on the floor.

View attachment 335343
That must have been quite a spectacle.

David
 
It's Thyme to get this thread back on track ( could not resist one more bad pun).

I have been posting photos of what's been going on here at the railway in the daily thread. Thought I should bring all the photo's here in one place, to keep track of them.
Apologies to those that have seen these photo's before. Should be something new to see next week, if I am lucky time and energy wise.
IMG_20241128_160841.jpg
I have got some planting done. The water level in this shot is where I wanted it to be.

IMG_20241204_082320.jpg

This shot shows the water level dropping down, to about half the depth that I wanted it to be. The white clouds in the water is milk sprayed into the water, you can see that disperse and get drawn towards the leak and stay like this photo where its not near the leak. The photo I took near the leak didn't turn out , too much glare on the water( didn't notice at the time). It looked like the corner where the waterfall is going to be joining the pond , I didn't glue the rubber of the stream to the pond liner, just overlapped it .I have seen on youtube that water can wick between rubber sheeting. If it's not that then its a hole behind the big rock at the back under the even bigger rock beside the stream. I am not moving those again, so I will just have to live with it if that's the case, will find out next week . Problem 1 to sort out before moving on with this section.
IMG_20241204_171105.jpg
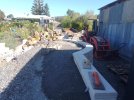
The compacted roadbase is where one station will be, a 10-15mm layer of paving sand on top then i will lay 90mm besser blocks on their side as a track base.
Can't do that yet as the big rocks for the centre scenic break , to the left of the roadbase will be placed on the station area and pushed into place with the backhoe. If it mucks the roadbase up doing that it will be quick and easy to fix.
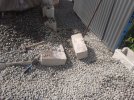
Not so easy to fix is Problem 2, the end wall has sunk 10mm from one side to the other. I made the mistake of making the fill layers too deep, was around 100mm. The little tractor and compactor in the photo are too light weight for that. Should of done 50mm layers max between compacting, I know now for any future projects. I will take photos of the problem area and post how I try to fix that up. Hopefully weather permitting it can be done in the next few days.
IMG_20241216_110358.jpg

IMG_20241211_170805.jpg

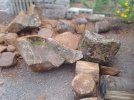
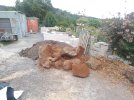
Here's the dirt and rocks back home to finish of the section closet to the shipping container. I loved the moss and weathered finish of these rocks when I first seen them a decade ago . I think they have been sitting in the paddock as a edge to a cattle loading dock for about 25 years . I knew I wanted to do something special with them .
The orange look of some is where they were buried in the very orange soil, I am going to try the pressure cleaner on the orange bits. Some are a real big ask for my very small tractor to deal with, so they get knocked around a lot moving them. This lot and the rocks around the pond are about half the rocks from the dock .The other half are 150 - 300 kgs in size , double the capacity and up of the little kubota , so they will be staying at the property. Somebody else can use them.
 
Last edited:
I didn't glue the rubber of the stream to the pond liner, just overlapped it .I have seen on youtube that water can wick between rubber sheeting. If it's not that then its a hole behind the big rock at the back under the even bigger rock beside the stream.
I had a leak from my pond too, I narrowed it down to the stream by switching off the main pump for a day and then the stream pump and the water level only fell when the stream was running. I checked for any damage to the stream pond liner and all was okay so I suspected capilliary action but was surprised when I found the true culprit. The ground covering plants had grown just over the edges of the stream and, as you say, caused a wick effect. The amount of water loss from such a trivial thing was a real eye opener. Anyway an attck with garden shears and secateurs and H2O stayed where it should be.

 
I had a leak from my pond too, I narrowed it down to the stream by switching off the main pump for a day and then the stream pump and the water level only fell when the stream was running. I checked for any damage to the stream pond liner and all was okay so I suspected capilliary action but was surprised when I found the true culprit. The ground covering plants had grown just over the edges of the stream and, as you say, caused a wick effect. The amount of water loss from such a trivial thing was a real eye opener. Anyway an attck with garden shears and secateurs and H2O stayed where it should be.
I don't have the filter /waterfall running yet, so the leak is in the pond. It drops to the same level every time. I will know next week when I lift the smaller rocks in the corner where the stream liner will join the pond it just overlaps the pond liner , by about the amount (from memory) the pond is dropping too . The milk was clearly get drawn into that corner. So fingers crossed its that, cause that's a easy fix.
 
Pond leaks can be a real pain, I keep getting adds on YouTube for a German glue that may help solve it if you can get to the leak. I have used it in a water based situation though I would use it with water level below hole just to be sure. As for other pond stuff, I always put rocks on a soft surface with some old liner on too to disguise it, expanded polystyrene or celtex house insulation has worked well for me.image.jpg
 
Pond leaks can be a real pain, I keep getting adds on YouTube for a German glue that may help solve it if you can get to the leak. I have used it in a water based situation though I would use it with water level below hole just to be sure. As for other pond stuff, I always put rocks on a soft surface with some old liner on too to disguise it, expanded polystyrene or celtex house insulation has worked well for me.View attachment 336228
Thanks for the info on the glue , I put a thicker layer of liner under the rocks on top of the pond liner. Some of the rocks are pretty heavy thou . I have other things to fix this week, next week I should get some time to have a go at fixing it. Its not the end of the world if I can't , there is 30 cms of water in the pond to the leak level.
 
Even going down to 50mm layers, I think you will find that your fill will settle a little?

I always warn people that if they build-up an area, it will settle, and need a top-up, at a later date.

It can be quite upsetting to build a bed, plant it, and it they settle several inches over the coming months.

PhilP
Indeed so, I have one bit that has had 3 lots of fill with cement (it is a small road area in front of buildings) over the 10 years since built, due for another fill after Xmas.
 
Even going down to 50mm layers, I think you will find that your fill will settle a little?

I always warn people that if they build-up an area, it will settle, and need a top-up, at a later date.

It can be quite upsetting to build a bed, plant it, and it they settle several inches over the coming months.

PhilP
Its been down nearly a year , so think it has settled as much as it will . Compacting ( properly) does what time/gravity and rain does it forces particles into the small air gaps in the soil , so at 50mm layers I think it should not settle afterwards as all the air gaps would of been filled . At 100mm the equipment I have just wasn't heavy enough to fill all the air gaps. I did 5 layers and it has dropped 10mm at one end . I should of filled with only roadbase directly under the wall not half dirt half roadbase . Looking at the wall more closely I am now thinking the fill could of washed into the drain as well as sunk its down 15mm (which is not great but no real problem) at that end. I guess lessoned learned the hard way are remembered the most. I am about to get into fixing it so will know soon enough.
 
Last edited:
Its been down nearly a year , so think it has settled as much as it will . Compacting ( properly) does what time/gravity and rain does it forces particles into the small air gaps in the soil , so at 50mm layers I think it would not settle afterwards as all the air gaps would of been filled . At 100mm the equipment I have just wasn't heavy enough to fill all the air gaps. I did 5 layers and it has dropped 10mm at one end . I should of filled with only roadbase directly under the wall not half dirt half roadbase . Looking at the wall more closely I am now thinking the fill could of washed into the drain around the wall at one end as the other has not settled as much, only 2mm (which is not great but no real problem) at that end. I guess lessoned learned the hard way are remembered the most. I am about to get into fixing it so will know soon enough.
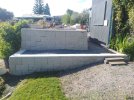
Yeah compactor plates aren't the best for deeper compaction layers, we mainly used whacker packers and could do 300mm layers in dirt/clay, but it needs to have some moisture in it but not too much
as it will just wobble like jelly and not compact, even road base will do that.
 
Yeah compactor plates aren't the best for deeper compaction layers, we mainly used whacker packers and could do 300mm layers in dirt/clay, but it needs to have some moisture in it but not too much
as it will just wobble like jelly and not compact, even road base will do that.
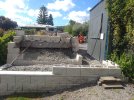
Yeah the plate compactor and running the tractor back and forward aren't the best tools for the job, that's why I thought I was safe at 100mm layers. Trying to compact wet roadbase is hilarious the way it wobbles all around and lifts beside the compactor.
 
Last edited:
Ok I had a bit of a crack at the wall this morning, but it's got too hot for me now.
IMG_20241219_085721.jpg
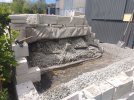
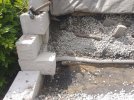
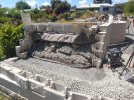
You can see why I had to do something. The wall wasn't in danger of falling, just looks really @#$%^&. Would of been no real problem if the left side had sunk as well as the right side. Its basically just a big raised garden bed not the Taj Mahal. So the right side being a bit off level I can live with, its lower by 15mm dropping along 2m . Probably has sunk as much as it will, I will just try to get the bow out of the short wall, it can slope from left to right, it's in the least seen part.

IMG_20241219_094257.jpg
IMG_20241219_104409.jpg
Filling the beds with broken concrete was really helpful now, I hardly had to cut back much dirt to remove the wall.
IMG_20241219_094348.jpg
The instructions from the block makers was to use construction adhesive to bond the corner blocks. I did wonder when I was building the wall just how strong the bond would be, stronger than the blocks after nearly one year. Breaking most joins, the glue pulled the top surface away from the blocks.
IMG_20241219_104416.jpg
The fill had washed into the drain in this corner and sunk along the other side. Should of used all roadbase under the wall and compacted in shallower layers , but why make one mistake when you can make multiple ones :rofl: .
IMG_20241219_113209.jpg
Hopefully some landscape fabric on the left side and more road base compacted will be enough, time will tell. I will set the wall a couple of mm higher too, just to allow for a bit more settling. If that doesn't work and the crack opens up again , then it's bodge time. Slivers of capping stone cut on the brick saw hammered into the gaps:rofl: Unfortunately our run of warm weather is at an end and it's hot today , too hot for me to continue I am knackered. Maybe I can start this evening when it cools or it can wait till tomorrow morning putting the blocks back. Hope the weatherman was right , no rain forecast for 3 more days. This would be a real mess if it did rain. Time for a well earned cup of tea.
.
 
Last edited:
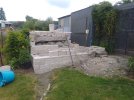
Stewie, I think you need to take the end wall down to the same level as the side wall, at least 3 blocks along, that way that corner is bearing on the same
sub base. I commend you on your efforts in the heat, I know I can't handle it as I used to.
 
Stewie, I think you need to take the end wall down to the same level as the side wall, at least 3 blocks along, that way that corner is bearing on the same
sub base. I commend you on your efforts in the heat, I know I can't handle it as I used to.
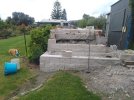
You probably are right Alan , I should of done that at the start. That ship has sailed I am afraid. I can't get the digger into that corner now so it would have to be done by hand, and that is beyond me to dig down that much, and I would have to cut back the ground above I think too. So rightly or wrongly that's not going to happen. The wall is not going to collapse its only holding back a small amount of ground, with good drainage behind it. Different story if it was cut into a hillside like that, it would blow out with a big rain for sure.
 
Well another hot day here , at least it was overcast to start.

IMG_20241220_092258.jpg
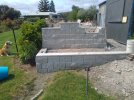
Progress has been made, once the first row goes in the others are fast to do.

IMG_20241220_093218.jpg
I am pretty sure doggo is thinking I am wasting my time and should just come play ball.

IMG_20241220_111328.jpg
Done enough for today, it's too hot. If it rains now all is good, just a few more end stops to buy and the capping to cut. I. can get back to landscaping on top of this section.
As A Alan McLennan pointed out I should of continued the wall deeper down across the end , would of needed to do the section running parallel to the shed to the first curve too. Would of been a way more solid job .
This has been down for a year to drop the amount it did and had been sitting like that for a while so rebuilding this end properly isn't feasible at the moment, in a year's time I will be able to get the digger down to this part of the yard again . If it drops again too much I will bite the bullet and dig the end out and do it properly .If it doesn't all is good and I get a railway a year sooner .In the mean time wall is not going to collapse, it is only holding back a small amount of ground with good drainage behind it .
Now there's a doggo to walk , a 15min drive to the coast where there is beautiful cool sea breezes for us to enjoy. :)
 
Last edited:
Stewie, this has been a very interesting and informative thread. I look forward to your next posts and the transformation into a working garden railway.
 
Back
Top