You are using an out of date browser. It may not display this or other websites correctly.
You should upgrade or use an alternative browser.
You should upgrade or use an alternative browser.
Arosa Line
- Thread starter grizzmo
- Start date
grizzmo
From NW Tas
Now that I have rebuilt the wall , I realised I could of put a row of heavy 150mm besser blocks (that I have here doing nothing) on their side at 90degrees to the wall as footings in a row along the bottom of the wall. Would of only taken a few hours more to dig 170m down and would have nearly doubled the footprint of the wall. I could kick myself now , it seems so obvious. Oh well as they say 1 step forwards and 2 steps back.You probably are right Alan , I should of done that at the start. That ship has sailed I am afraid. I can't get the digger into that corner now so it would have to be done by hand, and that is beyond me to dig down that much, and I would have to cut back the ground above I think too. So rightly or wrongly that's not going to happen. The wall is not going to collapse its only holding back a small amount of ground, with good drainage behind it. Different story if it was cut into a hillside like that, it would blow out with a big rain for sure.
grizzmo
From NW Tas
A new year and a new name for this thread. I am attempting to make more of a "impressionist" model of the Arosa Line , than a accurate everything is a exact reduction of the real thing. So things will be left out and others reduced and reorganised to suit the area I have and what appeals to me. I hope others can enjoy this version of the Arosa Line also.
Since I last posted here , much progress has been made.
One of the advantages of the stacking block wall is changes can be made , relatively easily. That also is probably a big disadvantage too, as it has allowed me to change my mind , many times.
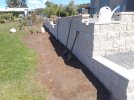
The extra blocks I bought before, to make each station area 1 row higher. Have been repurposed into a skirting retaining wall , to make it easier to walk around. Saving the cost of buying more blocks, free rocks will be used instead at the station areas to bring them up to track height.
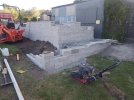
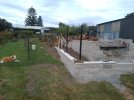
The posts for the fence have been put in ready for the panels, when our budget allows. The end wall with a foundation mistake was pulled down as well.
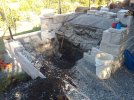
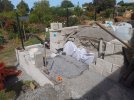
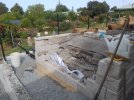
I decided it was foolish to just leave the foundation mistake and hope for the best. So the wall was removed and all the soft fill dug out until I hit solid ground. It was really soft , so glad I bit the bullet and did it. Half a cubic metre of road base went in , compacted in 50mm lifts. 2 rows of heavy besser blocks also were used.
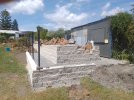
The walls complete, again . I have a couple more blocks to buy and a few capping stones too. The end wall is slightly off level, but I can live with that..
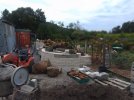
These 2 big rocks were too heavy for my tractor to lift, but it could skid them along the ground. A few holes along fault lines and some smacking with the sledge hammer broke them nicely.
You might of noticed the row of grey blocks in the top row. That is where the Arosa station extension will be going. I hear you laugh , a extension when you haven't even finished this part .
.
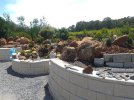
I think the big rocks look pretty good and were worth the effort of stuffing around with them. They are closest to the camera and the gap between them is where the entrance to Arosa station will be.
Most of the big rocks on the left at the back of the photo have just been dumped there and are yet to be pushed into their final positions. They will form part of the scenic break between St Peter/Molinis station on the left and Langwies station on the far side.
They can wait ,as the fill in the repaired end section will need time to settle. Before any track work can be done there anyway.
Now that all the big rocks are in place in the middle and right section. I can finally start some track work , only 11 months after I first started this build
Since I last posted here , much progress has been made.

One of the advantages of the stacking block wall is changes can be made , relatively easily. That also is probably a big disadvantage too, as it has allowed me to change my mind , many times.
The extra blocks I bought before, to make each station area 1 row higher. Have been repurposed into a skirting retaining wall , to make it easier to walk around. Saving the cost of buying more blocks, free rocks will be used instead at the station areas to bring them up to track height.


The posts for the fence have been put in ready for the panels, when our budget allows. The end wall with a foundation mistake was pulled down as well.


I decided it was foolish to just leave the foundation mistake and hope for the best. So the wall was removed and all the soft fill dug out until I hit solid ground. It was really soft , so glad I bit the bullet and did it. Half a cubic metre of road base went in , compacted in 50mm lifts. 2 rows of heavy besser blocks also were used.

The walls complete, again

These 2 big rocks were too heavy for my tractor to lift, but it could skid them along the ground. A few holes along fault lines and some smacking with the sledge hammer broke them nicely.
You might of noticed the row of grey blocks in the top row. That is where the Arosa station extension will be going. I hear you laugh , a extension when you haven't even finished this part

I think the big rocks look pretty good and were worth the effort of stuffing around with them. They are closest to the camera and the gap between them is where the entrance to Arosa station will be.
Most of the big rocks on the left at the back of the photo have just been dumped there and are yet to be pushed into their final positions. They will form part of the scenic break between St Peter/Molinis station on the left and Langwies station on the far side.
They can wait ,as the fill in the repaired end section will need time to settle. Before any track work can be done there anyway.
Now that all the big rocks are in place in the middle and right section. I can finally start some track work
casey jones snr
Registered
Stewie, your construction work is absolutely fantastic, the whole area is coming together nicely. I look forward to seeing more pictures from you.
trammayo
Interested in vintage commercial vehicle, trams, t
I agree with Paul - a real credit to you!A new year and a new name for this thread. I am attempting to make more of a "impressionist" model of the Arosa Line , than a accurate everything is a exact reduction of the real thing. So things will be left out and others reduced and reorganised to suit the area I have and what appeals to me. I hope others can enjoy this version of the Arosa Line also.
Since I last posted here , much progress has been made.
View attachment 337307
One of the advantages of the stacking block wall is changes can be made , relatively easily. That also is probably a big disadvantage too, as it has allowed me to change my mind , many times.
The extra blocks I bought before, to make each station area 1 row higher. Have been repurposed into a skirting retaining wall , to make it easier to walk around. Saving the cost of buying more blocks, free rocks will be used instead at the station areas to bring them up to track height.
View attachment 337308
View attachment 337309
The posts for the fence have been put in ready for the panels, when our budget allows. The end wall with a foundation mistake was pulled down as well.
View attachment 337310
View attachment 337311
View attachment 337312
I decided it was foolish to just leave the foundation mistake and hope for the best. So the wall was removed and all the soft fill dug out until I hit solid ground. It was really soft , so glad I bit the bullet and did it. Half a cubic metre of road base went in , compacted in 50mm lifts. 2 rows of heavy besser blocks also were used.
View attachment 337313
The walls complete, again. I have a couple more blocks to buy and a few capping stones too. The end wall is slightly off level, but I can live with that..
View attachment 337314
These 2 big rocks were too heavy for my tractor to lift, but it could skid them along the ground. A few holes along fault lines and some smacking with the sledge hammer broke them nicely.
You might of noticed the row of grey blocks in the top row. That is where the Arosa station extension will be going. I hear you laugh , a extension when you haven't even finished this part.
View attachment 337316
I think the big rocks look pretty good and were worth the effort of stuffing around with them. They are closest to the camera and the gap between them is where the entrance to Arosa station will be.
Most of the big rocks on the left at the back of the photo have just been dumped there and are yet to be pushed into their final positions. They will form part of the scenic break between St Peter/Molinis station on the left and Langwies station on the far side.
They can wait ,as the fill in the repaired end section will need time to settle. Before any track work can be done there anyway.
Now that all the big rocks are in place in the middle and right section. I can finally start some track work, only 11 months after I first started this build

grizzmo
From NW Tas
Thankyou
 casey jones snr
and
 trammayo
, both of your lines are very inspirational and I have enjoyed seeing them both.
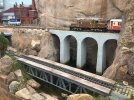
Good work, I wonder will you be attempting an Arosa Concrete Viaduct? I looked once at trying one but bottled out of all the complexity of them and did a simple concrete arch one. That was enough of a job!Thankyoucasey jones snr and
trammayo , both of your lines are very inspirational and I have enjoyed seeing them both.
grizzmo
From NW Tas
Very nice bridges indeed. I am going to try and make a model of Langwies bridge , but out of steel painted to look like cement. It is one of the very appealing features of the Arosa line. It would be very difficult to make out of cement.Good work, I wonder will you be attempting an Arosa Concrete Viaduct? I looked once at trying one but bottled out of all the complexity of them and did a simple concrete arch one. That was enough of a job!
View attachment 337323
Gizzy
A gentleman, a scholar, and a railway modeller....
I look forward to seeing your bridge, even if it only just captures the essence of the Langwies viaduct....Very nice bridges indeed. I am going to try and make a model of Langwies bridge , but out of steel painted to look like cement. It is one of the very appealing features of the Arosa line. It would be very difficult to make out of cement.
Last edited:
grizzmo
From NW Tas
I think I have made pretty good progress in the last 2 weeks.
I was going to leave moving the rest of the big rocks into place in this section till later, but I changed my mind . I decided just to get all the moving big rocks over and done with first.
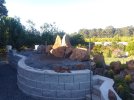
The scenic divide rocks are in place, just need a bit of mortar to fill some gaps.
The smaller edge rocks around what will be St Peter/Molinis station still need to mortared in place after I have the conduits in installed.
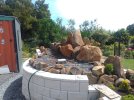
This is the other side which will be Langwies station. Again same work still be done on this side.
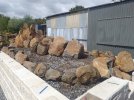
This section just needs the edge rocks mortared in place. This is where I will start laying track and mortaring the edge as I go.
Edge pavers with the blue tape can lift out and are where conduits join in the hollow block below and will be used as junction boxes. The conduit will form a complete loop all around the perimeter. 2 conduits go back to the workshop as well, installed right at the beginning of construction.
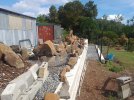
The track will cross the ravine on 2 bridges, I am hoping future plantings will block seeing both bridges at once. I am thinking I will probably want 4-5 dozen dwarf pines to fill gaps and soften the view of all the large rocks. Plenty of planting gaps have been left as I placed the rocks. I have started cuttings going , so fingers crossed they work out.
I have a pretty good supply of ground covers going and they will be used to cover half-3/4 of the smaller edge rocks. Unfortunately they are shade loving and this area gets way too much sun at the moment. There is only 1 more month of summer left then I can plant them. The plan is to cover this area with 3 large shade sails before next summer begins. No council planning or building permits are needed if I keep them below 3m high.
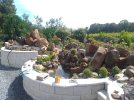
This will be part of Arosa station, entry will be between the large rocks. I might make it a tunnel later on like the real thing, but at the moment we still have snakes around and I don't want to make any hidden snake accommodation. The last thing I want to do is run a train into a tunnel and have a very cranky tiger snake driven out.
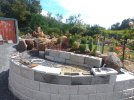
You might of noticed no Doggo in any pictures today, he is off sulking under the gum tree in the shade. Because I put sunscreen on his nose, guess it really will protect him from skin cancer
I will update again in 2 weeks time, there's a very good chance there will be trackwork to show.
I was going to leave moving the rest of the big rocks into place in this section till later, but I changed my mind . I decided just to get all the moving big rocks over and done with first.

The scenic divide rocks are in place, just need a bit of mortar to fill some gaps.
The smaller edge rocks around what will be St Peter/Molinis station still need to mortared in place after I have the conduits in installed.

This is the other side which will be Langwies station. Again same work still be done on this side.

This section just needs the edge rocks mortared in place. This is where I will start laying track and mortaring the edge as I go.
Edge pavers with the blue tape can lift out and are where conduits join in the hollow block below and will be used as junction boxes. The conduit will form a complete loop all around the perimeter. 2 conduits go back to the workshop as well, installed right at the beginning of construction.

The track will cross the ravine on 2 bridges, I am hoping future plantings will block seeing both bridges at once. I am thinking I will probably want 4-5 dozen dwarf pines to fill gaps and soften the view of all the large rocks. Plenty of planting gaps have been left as I placed the rocks. I have started cuttings going , so fingers crossed they work out.
I have a pretty good supply of ground covers going and they will be used to cover half-3/4 of the smaller edge rocks. Unfortunately they are shade loving and this area gets way too much sun at the moment. There is only 1 more month of summer left then I can plant them. The plan is to cover this area with 3 large shade sails before next summer begins. No council planning or building permits are needed if I keep them below 3m high.

This will be part of Arosa station, entry will be between the large rocks. I might make it a tunnel later on like the real thing, but at the moment we still have snakes around and I don't want to make any hidden snake accommodation. The last thing I want to do is run a train into a tunnel and have a very cranky tiger snake driven out.

You might of noticed no Doggo in any pictures today, he is off sulking under the gum tree in the shade. Because I put sunscreen on his nose, guess it really will protect him from skin cancer
I will update again in 2 weeks time, there's a very good chance there will be trackwork to show.
grizzmo
From NW Tas
Its a real nice video , lots of details in it for running the line and making models. I have it saved already, but I appreciate you posting itThis link popped up on a subscriber email from Grootspoor this morning, saw the name in the heading and hoped it was appropriate.....
cheers,
Ian
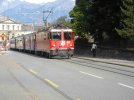
The running on the street leading into Chur station is one of the reasons I choose to model this line, love the tramway feel of this section.
Lol, I got up at 5.30 am this morning because a ebay auction of a second hand hopper wagon in the US was ending, same as in this video. Chuffed I got it for $175 Aud including delivery, well worth getting up early for. Its a bit knocked around, missing buffers, the box and couplings but that's no big deal. I have been looking for one for the last year. Cheapest I have seen them before is $500 plus, for a nice shiny new one. At least I will not have to worry about weathering this one up, just like a sand/gravel hopper should be.
Last edited:
Chris Vernell
45.29 N, 75.75 W
Could be a slightly alarming sight in the rearview mirrorThis link popped up on a subscriber email from Grootspoor this morning, saw the name in the heading and hoped it was appropriate.....
cheers,
Ian
If they tried street-running around here, there'd be some fools trying to argue the right of way
Northsider
Modelling the Northern half of the Isle of Man
I've just caught up with this thread -what an inspiration! You've done a huge amount, and to a really high standard. I'm looking forward to seeing your line develop.
grizzmo
From NW Tas
Yeah it would take some getting used too. There was a crash last week , no one hurt but the car sure came off second bestCould be a slightly alarming sight in the rearview mirror
If they tried street-running around here, there'd be some fools trying to argue the right of way
grizzmo
From NW Tas
ThankyouI've just caught up with this thread -what an inspiration! You've done a huge amount, and to a really high standard. I'm looking forward to seeing your line develop.
rhaetianfan
RhB (obviously) but otherwise any 'modern' locos
rhaetianfan
RhB (obviously) but otherwise any 'modern' locos
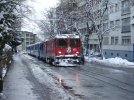
Looks like an entitled Merc driver from a distance.Here's a picture I took in December 2003 - looks like the car behind the train is impatient to overtake, despite the slushy road!!
M
View attachment 338115

