What happened at your workbench today?

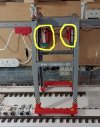
Something that I thought I had purchased from Amazon but apparently not, may have been an advertiser on here. A steel base with bendy extensions and magnetic clips that appear to have some heat resistant isolating tips. There are also extra magnets (seen in the base) that can be unscrewed from the base then screwed to the bendy extensions or used on the base to hold parts. Sorry have totally lost track of where purchased from but certainly this year. Pic below of something similar.
View attachment 320343
Thanks Jon
 
can you explain a little bit more on what you did on the playmobil crane and particularly what are those red items.
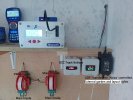
The red items are 32A AC 220V 2 Pole Double Throw DPDT Knife Safety Disconnect Switch, as used in the picture below.
DCC system setup.jpg

As for the Playmobil Crane, in brief, converting from stationary battery operated, to a DCC operated version, for remote operation of the Traverse and Lift motors.

The next stage which is a work in progress, is enable the Crane to be mobile (motorised) and travel along standard G Gauge track, again operated remotley by DCC.

The parts and components have been part assembled and tested, the crane travel section(s) (motorised) have been designed, draft 3D prints have been produced, at present due to be packaged up and sent down to The Chief Mechanical Engineer and part time Hoover Operative for checking and double checking the clearances for the 3mm axle gear, and the N20 "D" Shaft motor gear, if all fits(?) and/or any other minor tolerance issues need to be remedied, will then go for a full on, no filament spared 3D print.

The above is the easy part!, designing, assembling and configuring the electronics, and fitting onto the motorised travel sections is going to be the real challenge.......more details to follow as the assembly progresses...........:cool:
 
Last edited:
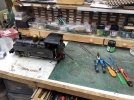
Today having thought some more about Russell it has been back on the workbench. My thoughts that steam was not reaching the cylinders was confirmed when I steamed him up with the top off the lubricator. No steam with open regulator. So take off and dismantle the regulator showed that the screw was too far in. This probably occurred when after my last run I adjusted it to stop over run, the only way to stop it being to put the beast ‘out of gear’. So adjusting so that when open steam would flow got it back running ok on rollers but back to the non stopping without gear being centred. This looks like the default now so it is all back together, working but I think a different regulator may be required. This is a rather venerable loco having a Roundhouse CEN number in the 5000 series. In fact I bought him second hand sometime around 2010 long before I had even thought about moving to the nits. Still I now have 2 Roundhouse locomotives for Xmas day with this also being tested yesterday. Just Jack to go now.
IMG_7698.jpeg
 
can you explain a little bit more on what you did on the playmobil crane.
Brief explanation on the DCC Control.

Massoth 8FS Decoder provides the interface to the RC ESC, which in turn provide the PWM control to the appropriate motor.

As below one 8FS to two RC ESC, one of which controls the crane traverse motor, the other to control the lift motor.

This is will be duplicated for the travel motors, (control system each side of the crane legs) in this case the two 8FS's will be configured to act as one decoder, activating F1 and using the Massoth thumbwheel control to control the travel motors on both sides of the Crane Legs backwards and forwards.

F2 Left Hand side 8FS and using the Massoth thumbwheel control to control the Crane Traverse motor backwards and forwards.
F3 Right Hand side 8FS and using the Massoth thumbwheel control to control the Crane Lift motor up and down.

Next stage, on return (probably be several weeks) of the motors, wheels, axle and N20 gears plus any modified 3D parts, will be to assemble the travel motor sections, test, and then reattach to the Crane Legs.

And if it all works, could well be a video!

Playmobil Crane Control.jpg
 
Last edited:
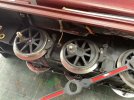
A week or two back after an ooerating day my little red Piko GRS loco took a nosedive to the kitchen floor. Fearing the worst I was well pleased to see that no damage had occurred. Though it appeared on running yesterday that the front coupling rod wheel to coupling rod bolt had sprung out unnoticed. Safe to say that as the kitchen floor has been vacuumed a few times since said part was well lost. Fortunately I found a 4ba screw with a nice plain bit of curved brass one end that was a near fit into the hole. Some gentle turning on the lathe made it a fit to araldite in place. But the centre part needed to be removed to properly get in via removal of the coupling rod, that broke as well but at least I was able to tap the thing 8ba for a round headed screw to fit back. These old Piko puffers can be a bit of a challenge at times. In the pic it looks like the araldite is well up over the bearing, not the case just how the picture looks. Now waiting 24 hours for it to cure in this cooler weather. A bigish washer will need to go over the rod to keep in place after the nut fitted which will be held in place with Locktight as will be the centre screw.
IMG_7700.jpeg
 
Last edited:
A week or two back after an ooerating day my little red Piko GRS loco took a nosedive to the kitchen floor. Fearing the worst I was well pleased to see that no damage had occurred. Though it appeared on running yesterday that the front coupling rod wheel to coupling rod bolt had sprung out unnoticed. Safe to say that as the kitchen floor has been vacuumed a few times since said part was well lost. Fortunately I found a 4ba screw with a nice plain bit of curved brass one end that was a near fit into the hole. Some gentle turning on the lathe made it a fit to araldite in place. But the centre part needed to be removed to properly get in via removal of the coupling rod, that broke as well but at least I was able to tap the thing 8ba for a round headed screw to fit back. These old Piko puffers can be a bit of a challenge at times. In the pic it looks like the araldite is well up over the bearing, not the case just how the picture looks. Now waiting 24 hours for it to cure in this cooler weather. A bigish washer will need to go over the rod to keep in place after the nut fitted which will be held in place with Locktight as will be the centre screw.
View attachment 320412
That's the little fella, which scuttles round at the end of an operating session, collecting all the wagons we have left in the wrong place? Get well soon, I say, for we will need its services when operating resumes :giggle:
 
That's the little fella, which scuttles round at the end of an operating session, collecting all the wagons we have left in the wrong place? Get well soon, I say, for we will need its services when operating resumes :giggle:
Yup that is the little fellow, we also use the Piko 25t diesel as well for such duties. But hopefully little Red will be back in service for next year, think yesterday may well have been the last for this year.
 
A week or two back after an ooerating day my little red Piko GRS loco took a nosedive to the kitchen floor. Fearing the worst I was well pleased to see that no damage had occurred. Though it appeared on running yesterday that the front coupling rod wheel to coupling rod bolt had sprung out unnoticed. Safe to say that as the kitchen floor has been vacuumed a few times since said part was well lost. Fortunately I found a 4ba screw with a nice plain bit of curved brass one end that was a near fit into the hole. Some gentle turning on the lathe made it a fit to araldite in place. But the centre part needed to be removed to properly get in via removal of the coupling rod, that broke as well but at least I was able to tap the thing 8ba for a round headed screw to fit back. These old Piko puffers can be a bit of a challenge at times. In the pic it looks like the araldite is well up over the bearing, not the case just how the picture looks. Now waiting 24 hours for it to cure in this cooler weather. A bigish washer will need to go over the rod to keep in place after the nut fitted which will be held in place with Locktight as will be the centre screw.

Have you got any more details on this Loco?
 
Have you got any more details on this Loco?
This is my thread about the loco, not easily found by the Forum search engine as it does not like 3 letter words!
 
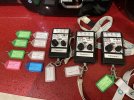
The Dunnyrail attention to detail continues to rub off! I found with 3 similar-looking multi-loco RC handsets, shared across the loco fleet, I kept forgetting what I was controlling, so smart new tags just made as a 'round-tuit' job, whilst waiting for glue to set. The appropriate tag can now be attached to match the current ID setting.
tags.jpg
 
Numerous ongoing projects, awaiting components and 3D printed items, both 3D printers working flat out.

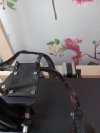
One observation when converting the original Ender 3 to Direct Drive, sparse information on how to route the cables, purely by chance found this, duly printed out and fitted.

Ender 3 Direct Drive Cable Management Plate.jpg

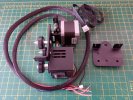
Speaking of the conversion of the original Ender 3 to Direct Drive, a Roll Your Own Version, taking the original items from the Ender 3 and attaching to a replacement back plate and fittings kit.

Ender 3 removed parts convert to direct drive.jpg


DIY Ender 3 Direct Drive.jpg
 
Last edited:
Numerous ongoing projects, awaiting components and 3D printed items, both 3D printers working flat out.

One observation when converting the original Ender 3 to Direct Drive, sparse information on how to route the cables, purely by chance found this, duly printed out and fitted.

View attachment 320447

Speaking of the conversion of the original Ender 3 to Direct Drive, a Roll Your Own Version, taking the original items from the Ender 3 and attaching to a replacement back plate and fittings kit.

View attachment 320448
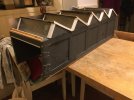
Latest project is to build a new loco shed for my exhibition layout Crib Lane which is due to appear at the W Sussex meet at Henfield on the first Sunday in December, and then at the Essex G scale show on the second Sunday of the month 6D81B58B-37D4-4A49-B86F-24BC972AA6D7.jpeg
 
Latest project is to build a new loco shed for my exhibition layout Crib Lane which is due to appear at the W Sussex meet at Henfield on the first Sunday in December, and then at the Essex G scale show on the second Sunday of the month View attachment 320542
Were those safety clips recovered from Richard Burton’s leg.
 
Latest project is to build a new loco shed for my exhibition layout Crib Lane which is due to appear at the W Sussex meet at Henfield on the first Sunday in December, and then at the Essex G scale show on the second Sunday of the month View attachment 320542
Those clips remind me of the means of access to the roof of St Michael's Abbey, Farnborough. Hoop irons, built into the outside of one of the stone buttresses - no safety cage or anything like that. From the first roof you could walk along, climb a short ladder to the raised roof under the dome, walk up some lead covered steps at the end of the roof abutting the base of the dome, and then get to the ridge, from where we had to provide scaffold access for an architect to clamber into the lantern to find out why water was dripping onto the congregation.

Spectacular view of the Surrey and Hampshire countrysides (Surrey to the north, Hampshire to the south) while sitting on the ridge as the scaffolding company's manager measured up to price the job ;);)

While that was post-1974, the safety elves are much more active and you wouldn't be able to do it now :tmi::tmi::tmi:
At least you could spread the cost with higher perches.

David
 
Back
Top