You are using an out of date browser. It may not display this or other websites correctly.
You should upgrade or use an alternative browser.
You should upgrade or use an alternative browser.
What happened at your workbench today?
- Thread starter Henri
- Start date
Brixham
No buffers were hurt at this sign
Lgb 20231.2 #1218 on the cab
Lgb 20231.3 A.T.S.F on the cab, 1217 on the boiler front which is the better model
Neither have sound
Oddly, the spare tender I have is Pennsylvania #210. Not 6 5 thousand.
I was mix and matching to make a ‘best’ loco. The bits have made up a non runner .atm. Missing a few screws, but that’s not a problem whilst it’s dead. Wheels almost at end of life too.
Cost of 2 new gears and shipping from USA then import taxes probably exceed what I paid for the donor loco.....and I still have a good motor, skates and bulbs.
Thanks for looking for the parts.
If anyone is considering a large order to modeland li, then I’m in.
A fellow group member has at least one of these with stripped gears.
Malcolm
Rhinochugger
Retired Oik
Oddly, the spare tender I have is Pennsylvania #210. Not 6 5 thousand.
Or as we say in UK a triangle. I did one for a test of the LGB 55080 DCC reverse loop unit but I was lazy and used a couple of isolating sections plus straights making the loop somewhat larger. Your loop will be tiny, are you using DCC with the module? If so it may be a bit chalenged with locomotives and any lighted stock.
Jasper
Hey, I'm only being creative here!
The tininess is prototypical, because this is a tram layout. I won't use DCC, mainly DC via the overhead. Since two-rail DC will also be used I'm isolating one leg of the wye, or triangle.Your loop will be tiny, are you using DCC with the module? If so it may be a bit challenged with locomotives and any lighted stock.
Last edited:
Oh you can run into trouble with overhead 2 rail and triangles and common return. Fancy switching will be required.The tininess is prototypical, because this is a tram layout. I won't use DCC, mainly DC via the overhead. Since two-rail DC will also be used I'm isolating one leg of the wye, or triangle.
Jasper
Hey, I'm only being creative here!
Thanks. I know all that, and am in the process of thinking it through.Oh you can run into trouble with overhead 2 rail and triangles and common return. Fancy switching will be required.
Don't worry.
Jasper
Hey, I'm only being creative here!
Testing an idea for a tram coupling.
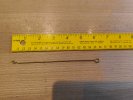
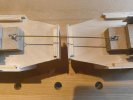
In the future, some of my trams will probably be grouped into fixed sets of two or three, which could then be close-coupled. Now I've been wondering whether, for close-coupling, I prefer a long coupling bar to the standard LGB couplings.
The rationale behind these long coupling bars is that when pushing through a curve, you want the hinge point of the coupling to be close to the axle, to minimise the derailment risk.
(And yes, it looks like future operation on my tramway will see some pushing through tight curves!)
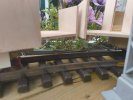
A brief test shows that you can indeed push through a tight curve without derailment. I also found I made the coupling a bit too short, and coaches can just touch each other, as you can see below.
More testing is in order.

Jasper
Hey, I'm only being creative here!
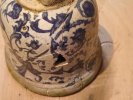
I started with these two bell-shaped things that have been around the house for years and years, not serving any purpose. I don't even know where they came from.

I decided to try and do something with them. Then I dropped one of them and had to re-glue it.
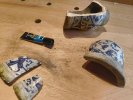
A triangular piece is missing, and missing it shall stay.
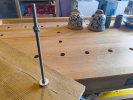
I toyed around with some nuts and bolts.
A bit of PVC piping.
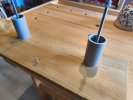
And now we have mushrooms.
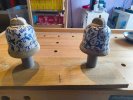
By now, you've probably guessed I'm building a tram stop.
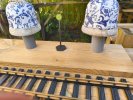
The mushrooms provide shelter against the rain.

I decided to try and do something with them. Then I dropped one of them and had to re-glue it.

A triangular piece is missing, and missing it shall stay.

I toyed around with some nuts and bolts.

A bit of PVC piping.

And now we have mushrooms.

By now, you've probably guessed I'm building a tram stop.

The mushrooms provide shelter against the rain.

Wistow vale rlwy
Registered
Hi, Jasper. The pots look similar to the counter-weights used on some pull-down light fittings in a bar in Luenen, Germany that I visit when I'm over there working. (I'm not working at the bar, but at our facility in the town!)
playmofire
Registered
Ah, nothing too rare then. I was thinking maybe 5th century Ming.Hi, Jasper. The pots look similar to the counter-weights used on some pull-down light fittings in a bar in Luenen, Germany that I visit when I'm over there working. (I'm not working at the bar, but at our facility in the town!)
I was thinking on the same lines. You HAVE had them valued, haven't you, Jasper?Ah, nothing too rare then. I was thinking maybe 5th century Ming.
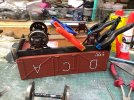
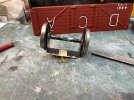
Being somewhat cooler today working on the scratch chassis for one of the 2 troublesome truck open bodies I got at the G3 gig earlier this year. I am making all with 3 point suspention that makes the works a bit more involved but makes much better running. Metal work involved using GRS Axle Guards that to not feature any provision for springing or 3 point. I have used some spare Bachmann wheel holders to facilitate the 3point modifying them so that the wheels can be removed as I have done on earlier conversions.
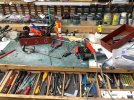


Jasper
Hey, I'm only being creative here!
Of course. Valued at "Fungus Grade"You HAVE had them valued, haven't you, Jasper?
Jasper
Hey, I'm only being creative here!
Can you tell more about this conversion? I get that one axle is held by a new c-shaped thing that pivots in the middle near the wagon floor, but what about the axle box assembly, I think you cut it off and are now re-attaching it, what's changed? Is this just to make the wheelset removable?
The wheel one end rides in the axle guards, this end the construction shown is to allow the wheel to wobble left n right for 3 point suspension. A view underneath now it is fitted, I had to cut some of the wood away on the side-frame to move the axle guards out a bit to allow sufficient space for the movement. Hope pics make things clearer, from side view subterfuge near impossible to see.dunnyrail
Can you tell more about this conversion? I get that one axle is held by a new c-shaped thing that pivots in the middle near the wagon floor, but what about the axle box assembly, I think you cut it off and are now re-attaching it, what's changed? Is this just to make the wheelset removable?
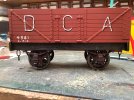
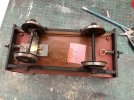
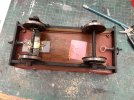
MalOz_1957
Registered
oh, am new here, but am going to love this thread ... have always been a bit of a voyeur into other's WIPs and workbenches  ...
...
ok, here's my 2c worth for today...brake shoes for my BR Class 06.....BTW the brakes are for show only...
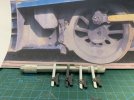
first on in situ next to the sandbox...
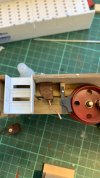
...i can post more as I progress if anybody is interested...
ok, here's my 2c worth for today...brake shoes for my BR Class 06.....BTW the brakes are for show only...

first on in situ next to the sandbox...

...i can post more as I progress if anybody is interested...
Nice what Gauge track and Scale are you using, be good to see more of your work.oh, am new here, but am going to love this thread ... have always been a bit of a voyeur into other's WIPs and workbenches...
ok, here's my 2c worth for today...brake shoes for my BR Class 06.....BTW the brakes are for show only...
View attachment 331949
first on in situ next to the sandbox...
View attachment 331950
...i can post more as I progress if anybody is interested...

