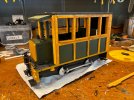
What happened at your workbench today?

Nice what Gauge track and Scale are you using, be good to see more of your work.
Thanks. Ah, as close to 10mm to the foot as i can get… and loosely aligned to british outline … no particular region tbh… but i can’t guarantee no Eastern influences won’t crop up from time to time… particularly in any buildings i might do later .

Cheers
 
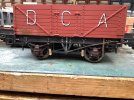
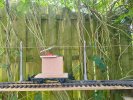
I had put some brake rigging on my scratch chassis with bachman open coal wagon body. I used copper that was to hand and have been chemically blackening it, but it is taking a lot of applications. I have been using the chemical route as the brake gear is likely to get knocked about a bit chipping off paint that does not adhere too well to copper. As you can see some work to go.image.jpg
 
A few small projects today just to get back into things.

First, I am working on stakes for my two LGB flatbeds so that, come the holidays, my work train can haul Christmas trees. I haven't finished yet. There will also be chain that runs from one stake to the next.
View attachment 329786
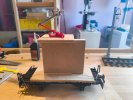
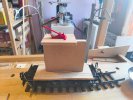
Second, a quick build: a large wooden crate made of styrene. This is primarily for oversized wreaths, but I also intend to make clay pumpkins for the crate for fall (eventually).
View attachment 329788
View attachment 329787
how did you create the wood effect? Looks very good!
 
how did you create the wood effect? Looks very good!
Thanks, Curtis! I just took an Xacto knife and scored it down the length. Sometimes I'll add waves or 'eyes' to it for some extra detail. If I want it to look splintered I'll go over the ends a ton with the tip of the blade and the sides a little.
I'm not home right now, but I'll try to post a picture of the last crate I built. It has a broken board.
 
Tinkering and fettling ideas for a quick, simple and inexpensive method to produce working colour light signals.

Being an prolific 'file that away for a rainy day', spent a few hours mating and amending various *.stl files to produce a workable colour light signal, complete coincidence it looks similar to the offerings from @viaEstrecha, apologises for any perceived plagiarism.

Signal controlled by the EVO-X, which has caused many moments of pondering, mainly down to the unexpected actions of the way EVO-X operates.

But, all's well, and Signal Operates as designed, now to the EVO-S, well that is altogether another story, work in progress at the present moment in time.

A few pictures below of the test Signal, the 3D printer is churning out the required parts for future Signals.

View attachment 329905

View attachment 329906

View attachment 329907
These look great! I've been toying with out to buy some dwarf signals, this style could be a place to begin...
 
Thanks, Curtis! I just took an Xacto knife and scored it down the length. Sometimes I'll add waves or 'eyes' to it for some extra detail. If I want it to look splintered I'll go over the ends a ton with the tip of the blade and the sides a little.
I'm not home right now, but I'll try to post a picture of the last crate I built. It has a broken board.
Will need to give it a try. I want to create something similar for Jersey Royals potatoes but also the Christmas train (similar to what you've done!) Will have a look at it. Any tips for the painting?
 
Will need to give it a try. I want to create something similar for Jersey Royals potatoes but also the Christmas train (similar to what you've done!) Will have a look at it. Any tips for the painting?
Honestly, I use cheap, thick acrylic paints. As I paint layers I let it dry a little. It gives a rough, unsanded look. (In most cases, you'd water-down the acrylics to use on styrene so it flows more and gives a smoother metal-like look.)
 
I had put some brake rigging on my scratch chassis with bachman open coal wagon body. I used copper that was to hand and have been chemically blackening it, but it is taking a lot of applications. I have been using the chemical route as the brake gear is likely to get knocked about a bit chipping off paint that does not adhere too well to copper. As you can see some work to go.View attachment 332137
Awesome… what did you use for bolts on the strapping and corners? Assuming this for 45mm track ?
 
I
I had put some brake rigging on my scratch chassis with bachman open coal wagon body. I used copper that was to hand and have been chemically blackening it, but it is taking a lot of applications. I have been using the chemical route as the brake gear is likely to get knocked about a bit chipping off paint that does not adhere too well to copper. As you can see some work to go.View attachment 332137
Ignore my last post… didn’t read it properly Although what did you use for ‘bolts’ on the chassis ? I.e holding the brake hanger to the solebar?
 
I

Ignore my last post… didn’t read it properly Although what did you use for ‘bolts’ on the chassis ? I.e holding the brake hanger to the solebar?
I use Cambrian Rivet Heads, they also do Nuts and Bolts all on a plastic sprue that are cut off and glued in place. Quite tedious to do but well worth the effort. I tend to blob a small squirt of super glue onto a piece of plastic then stab a pre cut rivet head with a pin in a captive pair of pliers dunking into the super glue then popingbin place releasing from the pin with a craft knife. Look below for 16mm parts.
 
In readiness for a large dose of the cat being away, I have soldered a couple of leads onto the fishplates of some 00 track. (I soldered them in situ, using the jaws of the vice as a heat sink.)

We had an extension to the kitchen last year, so waddya think it's for ? :cool: :cool: :cool:
 
Honey, what are these burn marks on our new kitchen table?
Oh, no, in situ as still on the lengths of track - even I wouldn't risk the kitchen floor, or the worktop. The worktops were expensive :cry::cry: the floor tiles are an incredibly close match to what was laid two years previously and had ceased manufacture - so there's no guarantee that even the new ones could be replaced :worried::worried:
 
I use Cambrian Rivet Heads, they also do Nuts and Bolts all on a plastic sprue that are cut off and glued in place. Quite tedious to do but well worth the effort. I tend to blob a small squirt of super glue onto a piece of plastic then stab a pre cut rivet head with a pin in a captive pair of pliers dunking into the super glue then popingbin place releasing from the pin with a craft knife. Look below for 16mm parts.
 
Probably a daft question but are you planning to run the locos from the catenary?
Yes, I am. And no, not daft. :)


All the while, my oldest scratch-built loco has a dummy pantograph and runs on track power. It will run like that for now. I may or may not give it a real panto one day.
 
Back
Top