Yup those curved ends are a bitch to do as are the steps. Y6 not 60, finger slip?I spent the day sorting the curved ends on my Occre London tram and doing some redesigns on the Y60 prototype to get it a bit closer to the real thing: View attachment 278643View attachment 278644
You are using an out of date browser. It may not display this or other websites correctly.
You should upgrade or use an alternative browser.
You should upgrade or use an alternative browser.
What happened at your workbench today?
- Thread starter Henri
- Start date
3 minutes of fame
3d printing, electronics and trams
Probably actually a J70 as it has external cylinders...Yup those curved ends are a bitch to do as are the steps. Y6 not 60, finger slip?
3 minutes of fame
3d printing, electronics and trams
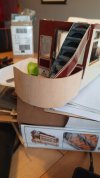
Sorry meant the curves on the metal stairs as well, I found the ends nit too bad completing as you have done.A photo of the curved ends as fitted. Soaked the wood in hot water for an hour, then bent it to shape, secured with some elastic bands. Left it like that for 24 hours to dry out and then glued and clamped it in place.
View attachment 278647
3 minutes of fame
3d printing, electronics and trams
I er, ahem, applied the stickers...Great looking lining there, how did you manage it?
Painting is not a skill I have mastered - and lining doubly so!!
Right, but it still takes a skill to fit stickers like that! I find they will stick solidly to the wrong bit!Great looking lining there, how did you manage it?
3 minutes of fame
3d printing, electronics and trams
2 tricks I've found with the Occre kits.Right, but it still takes a skill to fit stickers like that! I find they will stick solidly to the wrong bit!
1. If you need to apply the stickers to painted wood, varnish it first and leave to dry for 36 hours. wipe the surface with a damp cloth and leave to dry.
2. Use a scalpel to hold the decal. Just the tip is normally enough. If you are not convinced about the fit, cut the backing paper to the same size and offer up the sticker to ensure it will fit. Once happy peel off the paper and use the scalpel point to position the decal. Check it from a few angles before pressing down.
Use a clean cloth to remove any air bubbles and to press down hard. If the decal starts to lift, a thing smear of PVA is normally enough to hold them down.
Oh, and no.1 rule, take your time. You can always put the decal back onto the backing sheet before you've fitted it if you need to adjust something on the model. Don't leave them hanging around sticky side up as they will attract dust and particles and will then never go down flat. If this does happen, wash them in clean water. Once they dry, the stickiness will return to the adhesive.
...So that's about 8 tricks...
Hope this helps
Rhinochugger
Retired Oik
DefoOh, and no.1 rule, take your time. You can always put the decal back onto the backing sheet before you've fitted it if you need to adjust something on the model.
Looked at it again and yes it is a J70.Probably actually a J70 as it has external cylinders...
3 minutes of fame
3d printing, electronics and trams
I'm reworking the chassis to integrate the steps into the side frames and will play with the windows and door shape as well.
It's only ever going to be an approximation, but I think I can improve on the original design.
It's only ever going to be an approximation, but I think I can improve on the original design.
David1226
Registered
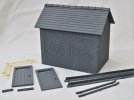
As mentioned previously, Father Christmas was kind enough to deliver a number of cast resin buildings for the Claptowte Railway, including a Kippo Models Station Building and Toilet Block. I have not previously had any experience of putting together resin building kits, so it was logical that I start with the smallest and simplest, this being the Toilet Block.
The Station Building and Toilet Block parts came wrapped together in a single parcel. The first thing to do was separate the parts, Kippo having helpfully marked most of the Toilet Block parts with TB in pencil. Once I had gathered the parts, I set about them with files and abrasive paper to clean up the various mouldings. When this was done, everything was given a good wash in soapy water to clean off any mould release agent.
Although the parcel contained a set of assembly instructions for the Station Building, there were none for the Toilet Block. I fired off an email to Kippo Models and received an almost immediate reply from Edward Williams of Kippo Models. It appears they do not include instructions with their smaller kits but he referred me to a tutorial video on Youtube, in which he was co-incidentally assembling a Toilet Block. There were two videos, one dealing with assembling and another dealing with painting. I found these both very useful and adaptable to my needs. I have included the links for anyone interested.
I assembled the main structure, as per Eddie's advice, using Gorilla Superglue to assemble and then worked some Unibond Repair Metal, similar to plastic padding, into the corner joins. I then attacked some of the roof slates to give the appearance of a few cracked/broken ones. The only part of the assembly that I am not certain about is the fitting of the facia boards to the end gables. This part of the assembly was missed in the video. I am not happy with the fit of these parts and will probably fabricate new ones from plasticard. This is the story so far, next everything will be off the the spray booth (old cardboard box) for a spraying with grey plastic primer.
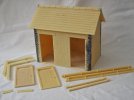
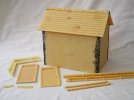
David
The Station Building and Toilet Block parts came wrapped together in a single parcel. The first thing to do was separate the parts, Kippo having helpfully marked most of the Toilet Block parts with TB in pencil. Once I had gathered the parts, I set about them with files and abrasive paper to clean up the various mouldings. When this was done, everything was given a good wash in soapy water to clean off any mould release agent.
Although the parcel contained a set of assembly instructions for the Station Building, there were none for the Toilet Block. I fired off an email to Kippo Models and received an almost immediate reply from Edward Williams of Kippo Models. It appears they do not include instructions with their smaller kits but he referred me to a tutorial video on Youtube, in which he was co-incidentally assembling a Toilet Block. There were two videos, one dealing with assembling and another dealing with painting. I found these both very useful and adaptable to my needs. I have included the links for anyone interested.
I assembled the main structure, as per Eddie's advice, using Gorilla Superglue to assemble and then worked some Unibond Repair Metal, similar to plastic padding, into the corner joins. I then attacked some of the roof slates to give the appearance of a few cracked/broken ones. The only part of the assembly that I am not certain about is the fitting of the facia boards to the end gables. This part of the assembly was missed in the video. I am not happy with the fit of these parts and will probably fabricate new ones from plasticard. This is the story so far, next everything will be off the the spray booth (old cardboard box) for a spraying with grey plastic primer.


David
They didn't give you anything to go on you mean? (Sorry someone had to do it)there were none for the Toilet Block.
Last edited:
David1226
Registered
They didn6give you anything to go on you mean? (Sorry someone had to do it)
I just hope I make a good job of it so that I can claim to be flush with success.
David
Chris Vernell
Three score and nineteen
Go to Dartmoor. Go directly to Dartmoor. Do not pass Go. Do not collect 200 of whatever currency applies to your country of residence.They didn6give you anything to go on you mean? (Sorry someone had to do it)
Well don't forget a good job's not complete until the paper is doneI just hope I make a good job of it so that I can claim to be flush with success.
David
3 minutes of fame
3d printing, electronics and trams
I would give it 10 minutes after you finish if I were you...
David1226
Registered
After I posted the pics of the Kippo Toilet Block, which prompted the outburst of lavatorial humour, I set to with a spray can of grey plastic primer (not air freshener as some implied). For a first attempt I was very pleased with outcome of my corner joints. The individual parts will all be painted before final assembly. I did not spray the boards for the gable ends, as stated previously, I am not happy with the fit and I may fabricate my own, in any case they will be the last parts to be fitted. I shall put all the bits to one side until I have reached the same stage with the other buildings and then for continuity of finish/appearance I will paint them all at the same time. I am currently working to clean up all the mouldings for the Kippo Station Building, a much bigger undertaking in every sense.
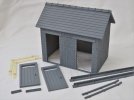
David


David

