What happened at your workbench today?

Having primed the bare walls of my Kippo Station Building for the Claptowte Railway I had decided that the next step would be to paint it once the relevant paints could be obtained. Although I do not necessarily intend to add much in the way of interior detail, at least not in the short term, one glaring omission stood our to me, and that was the fact that the interior walls had a door moulding on one side only. I decided that they needed the depiction of a doorway on both sides to make any sense of the interior. I set about creating doors on 'the other side' of the walls, using thin plasticard sheet. The doors /frames did not need to be as detailed as the original moulding as they would be largely obscured once the building is complete, so a simple representation of a panelled door would suffice. The door knobs were represented by the same 2.5mm wire/insulation as mentioned previously.

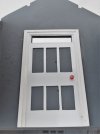
The original moulded door and frame.
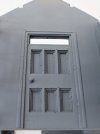
dig 210118001.JPG

The reverse side of the wall before adding the other side of the door.
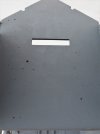
dig 210118002.JPG

The plasticard door added

dig 210118003.JPG

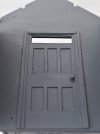
And primed

dig 210118004.JPG

David
 
Having primed the bare walls of my Kippo Station Building for the Claptowte Railway I had decided that the next step would be to paint it once the relevant paints could be obtained. Although I do not necessarily intend to add much in the way of interior detail, at least not in the short term, one glaring omission stood our to me, and that was the fact that the interior walls had a door moulding on one side only. I decided that they needed the depiction of a doorway on both sides to make any sense of the interior. I set about creating doors on 'the other side' of the walls, using thin plasticard sheet. The doors /frames did not need to be as detailed as the original moulding as they would be largely obscured once the building is complete, so a simple representation of a panelled door would suffice. The door knobs were represented by the same 2.5mm wire/insulation as mentioned previously.

The original moulded door and frame.

View attachment 279160

The reverse side of the wall before adding the other side of the door.

View attachment 279161

The plasticard door added

View attachment 279162

And primed

View attachment 279163

David
Giant G Scale woodworm in your neck of the woods!
 
Giant G Scale woodworm in your neck of the woods!

Yes, air bubbles in the resin. I could not decide whether of not to fill them, but given that once painted, little of the interior will be visible, I decided against it,

David
 
Today a bit more progress on the Bowaters small F, finished the beading and door Louvres, now starting to join bits together :)
20210118_223940.jpg
Thanks to Northsider for help and encouragement :clap:
 
Yes, air bubbles in the resin. I could not decide whether of not to fill them, but given that once painted, little of the interior will be visible, I decided against it,

David
Think you are right but I would probably attack the larger ones.
 
Today a bit more progress on the Bowaters small F, finished the beading and door Louvres, now starting to join bits together :)
View attachment 279194
Thanks to Northsider for help and encouragement :clap:
Aw, shucks, it was nothing. :blush:. Can we have a close-up of those louvres above the doors, please? 1611042456851.png
 

Attachments

  • 1611042396622.png
    1611042396622.png
    940 bytes · Views: 0
Aw, shucks, it was nothing. :blush:. Can we have a close-up of those louvres above the doors, please? View attachment 279200
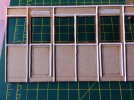
Here you go mate, in gory detail,
20210119_104858.jpg
Basically I carved out the opening so it was deeper at the top and laid 4 pieces of plasticard staggered to (hopefully) give the right effect, also you can see that I have taken the square edge off the plasticard strips to look more like beading.
 
Last edited:
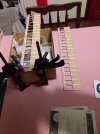
Progress at the end of play today
20210119_141028.jpg
The partisions are just in loose to help keep things square, also thought of a cunning plan for the step boards :nerd:
Must admit, I'm enjoying working in wood, IKEA on rails!
 
Here you go mate, in gory detail,
View attachment 279225
Basically I carved out the opening so it was deeper at the top and laid 4 pieces of plasticard staggered to (hopefully) give the right effect, also you can see that I have taken the square edge off the plasticard strips to look more like beading.
Looking good! I was lazy and just glued strips on flat: eight feet rule and all that. I'm impressed that you've radiused the beading too: it's going to look good! Have you decided on a livery yet?
 
Looking good! I was lazy and just glued strips on flat: eight feet rule and all that. I'm impressed that you've radiused the beading too: it's going to look good! Have you decided on a livery yet?
Thanks, it does look better at a distance! livery will be red & cream, I'm going for a 1968 time line when Mona last ran and when I first visited the Island, so it's just which shade (the Accucraft pairs I have are a dark red) to go with, I have a few pots to pick from, hmm
 
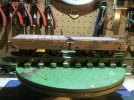
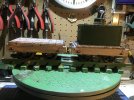
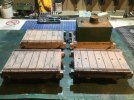
I’ve repainted a number of my 7/8ths rolling stock:-
D73054E0-A77B-4BE4-B616-090A3B31D113.jpegCD48B379-855A-4508-98FE-8754D55E8285.jpegDE2DC4CD-4A3A-4B80-960A-1410E8CE32CA.jpeg10FCD152-124E-4AFA-A4BF-DF5D6061675C.jpeg

The original paint on the wagons had begun to flake off, so I decided that a complete repair was required. I now need to apply a few coats of matte varnish.
 
Back
Top